Saint Paul American Schools
Science
Curriculum > Elementary > 2nd Grade| Course Title | Grade | Course Length | Science | 2 nd | 1 year |
|---|
- Course Description
-
Our science program engages the innate curiosity that kinder brings them to school.
Students will work together and observe, compare, measure, classify, communicate, and put things in order. Students will learn through this curriculum how to infer, make a model, predict and investigate. The children will do many hands on experiments and be able to draw conclusions from them. An example science classroom program provides ideas and suggestions for creating a well-organized and well -equipped classroom that enforces scientific exploration as well as discovery. Our program offers all of this to meet the needs of each and every child and help them grow and learn.
Unit A: Life Science
- Informational Knowledge Objectives
- Living and Nonliving
-
- Students will know the basic needs of all living things.
- Students will know how to apply knowledge about life processes to distinguish between living and nonliving things.
- Students will know that animals and plants change and grow.
- Students will know that grown animals can have baby animals.
- Students will know that animals can move on their own.
- Suggested activities:
-
- Students will read books about plants and animals and know that they can grow and change and write post it comment notes in the books about them.
- Students will ask each other questions about living and nonliving things and write and draw answers in their science notebooks.
- Students will plant grass and other vegetables in the classroom and take notes and watch as they grow. Students will be in charge of taking care of the plants.
- What Plants Need?
-
- Students will know that plants need food, water, space, and shelter to survive.
- Students will understand why living things must have water, food, shelter, and space to survive.
- Suggested activities:
-
- Students will draw their favorite plant in their science journal and be able to draw about it starting from a seed and be able to say all of the things it needs in order to survive.
- Students will act out how a plant grows and record it with a camera… the plant dance.
- Students will use chalk to draw all different kinds of plants on the sidewalk.
- What do Animals Need?
-
- Students will know that animals need food, shelter, and space in order to survive.
- Suggested activities:
-
- Students will look through all kinds of books about animals and what they need to survive. They will make a chart graphing animals’ needs.
- Students will write about their favorite pet and if they don’t have one they will make one up and discuss all that they need in order to keep the pet alive.
- Students will draw various types of shelters that animals need in order to survive and write about it.
- What are nonliving things?
-
- Students will know that environments have living and nonliving parts.
- Students will know that some nonliving things are found in nature.
- Students will know that some nonliving things move and look like living things.
- Students will know how to sort and count living and nonliving things.
- Suggested activities:
-
- During this unit students will plant and observe plants. Students will be in charge of taking care of the plants and making sure they are healthy all the time recording what they do to make this happen in their science journals.
- Students will use magnifying glasses to look very closely at plants and record their findings.
- Students will use science tools to measure and work on experiments in their science center.
- Habitats
Chapter 2 -
- Students will know that animals and plants are connected to their environment by an examination of their structural characteristics.
- Students will know that they place where animals live is its habitat.
- Students will know that a forest is a habitat with many trees and plants
- Students will know that plants and animals who live a particular habitat (example ducks in wetlands, bears in the forest.)
- Students will know that environments have living and nonliving parts.
- Students will know that some characteristics of different environments and some animals and some plants are found there
- Students will know plants and animals that have a particular habitat
- Students will know that environments have living and nonliving parts.
- Students will know what kind of water whales live in.
- Students will know that many animals and plants meet their needs in the ocean.
- Suggested activities:
-
- Students will watch BBC all about the ocean and its habitat.
- Students will write stories about various animals in the ocean and pretend that they are one of them living there with them undersea.
- Students will graph and chart animals that live underwater and on land.
- What is a desert habitat?
-
- Students will know that a desert if a habitat and it is very dry and receives much sunlight.
- Students will learn about various animals and plants that live in the desert.
- Suggested activities:
-
- Students will make a chart and tally all the animals and plants in their home.
- Students will look at books about animals as well as plants and write comments on post it notes about things they have learned.
- How Plants and Animals live?
-
- Students will know that structures of living things are adapted to their function in specific environments.
- Students will know the vocabulary terms antennae, camouflage, root, stem, leaf, and flower.
- Students will know that in some ways animals and plants are adapted to living in different areas.
- Students will learn that animals can be associated with their environment by an examination of their structural characteristics.
- Students will learn things that can help protect animals.
- Students will understand that different kind of plants live in different kinds of environments.
- Students will know that spines can protect plants.
- Life Cycles:
-
- Students will identify and know the vocabulary terms: tadpole, life cycle, larva, pupa, seed coat, and seedling.
- Students will know ways organisms change as they grow and mature.
- Students will know and be able to describe how a butterfly grows.
- Students will know that young animals look similar to their parents when they grow up.
- Suggested activities:
-
- Students will make posters to show what dentists and doctors do to keep us safe and help us stay healthy.
- Students will keep a science journal and take a nature walk and draw all the different kinds of plants that they see.
- Students will read books about seeds to plants and write post it notes as comments about things they have learned or questions they have.
- Students will watch a BBC program about plants.
- Food Chains
-
- Students will know the basic needs of all living things.
- Students will know that plants and animals are dependent on each other for survival.
- Students will know that plants produce oxygen and food for animals.
- Students will learn how living things get food in a rain forest.
- Students will understand that living things are part of a food chain.
- Students will know that oxygen is a gas that living things need to live.
- Students will know that all living things are connected through food chains.
- Suggested activities:
-
- Students will choose a plant or animal and illustrate and draw about the life cycle of it.
- Students will watch BBC programs about life cycles and take notes in their science journals.
- Students will do a Venn diagram about plant and meat eating animals.
- Procedural Knowledge Objectives
-
- Students will be able to classify things as living and nonliving.
- Students will be able to name living things.
- Students will be able to write about living things and support in their writing details.
- Students will be able to graph different plants under different categories.
- Students will be able to grasp the concept that plants need rain or water to survive.
- Students will be able to understand the needs that animals need in order to survive.
- Students will be able to understand how babies need their mothers in order to survive.
- Students will be able to classify things as living and nonliving.
- Students will be able to use simple graphs, pictures, and written statements, and numbers to observe, describe, record and compare data.
- Students will be able to record data using concrete materials or pictures.
- Students will be able to tell if animals live on land or in the water.
- Students will be able to observe pictures and chart where different animals live and why.
- Students will be able to name characteristics of different environments and some plants and animals that are found there.
- Students will be able to draw different characteristics of the climate in different habitats.
- Students will be able to draw images of wetlands and various animals who live there.
- Students will be able to draw a picture of the ocean and understand that it is a habitat.
- Students will be able to draw plants and animals that live in the ocean and know that they get everything they need from their habitat.
- Students will be able to name some plants and animals that live in the desert.
- Students will be able to understand how leaves hold water.
- Students will be able to chart animals that live in the desert and those that live in the forest.
- Students will be able to compare and contrast plants and animals.
- Students will be able to describe how fur can keep animals warm.
- Students will be able to describe the habitat of a mountain goat.
- Students will be able to describe how various animals get food.
- Students will be able to draw adaptations that plants and animals have in order to survive in their environment.
- Students will be able to compare and describe structural characteristics of plants and animals.
- Students will be able to write and draw about how mealworms change.
- Students will be able to draw and write about how frogs grow.
- Students will be able to draw a flowchart how trees grow.
- Students will be able to describe and draw how seeds change.
- Students will be able to compare size and age while taking notes and graphing it.
- Students will be able to show through drawing pictures that plants and animals are dependent upon each other.
- Students will be able to group animals according to what they eat.
- Students will be able to tell and write about how a plant makes food.
Unit B: Earth Science
- Informational Knowledge Objectives
- Land, Water, and Air
-
- Students will know the vocabulary terms: rocks, sand, natural resources, clay, humus, weathering, erosion, and minerals.
- Students will know how to use models as representations of real things.
- Students will know the major features of Earth’s surface.
- Students will extend and refine knowledge that the surface of the Earth is composed of different types of solid materials.
- Students will know that rocks are nonliving things that come from Earth.
- Students will know that plants live and grow in soil and that some animals live in the soil as well.
- Students will know that erosion and weathering change the land which changes the environment in where they live.
- Students will know that people and animals use water in different ways.
- Students will begin to understand the term hypothesis which is making inferences and recording and exploring the natural world.
- Weather
-
- Students will understand what weather is and be able to recognize patterns in weather.
- Students will be able to recognize patterns in weather.
- Students will understand that wet weather can be rain or sleet.
- Students will know that weather can be described by form and amount of precipitation.
- Students will know that the seasons of the year occur in natural patterns.
- Suggested activities:
-
- Students will look at books that describe different weather patterns around the world and choose an area and write about the weather.
- Students will draw and write about the four seasons of the year and choose a favorite season.
- Students will read books about the seasons and write post it comments or questions on them.
- Students will act out various weather patterns with their bodies.
- Students will pretend they are meteorologists and use self made tools to pretend to report the weather.
- Procedural Knowledge Objectives
-
- Students will be able to name different types of land and water and be able to write about or say how living things such as plants and animals, and people use these parts of Earth.
- Students will be able to make a model of land and water using clay.
- Students will be able to show they know that Earth contains different kinds of land and water.
- Students will be able to draw and write about ways they can care for the Earth.
- Students will be able to draw various minerals and know that they are nonliving things that are found in the soil.
- Students will be able to make and read a picture graph about items they have recycled.
- Students will be able to work with others to complete an experiment or solve a problem.
- Students will be able to use the senses, tools, and instruments to obtain information from his or her surroundings.
- Students will be able to use tools to measure weather on a daily basis.
- Students will be able to understand how the weather pattern can change each day.
- Students will be able to use a bar graph to answer questions about weather.
Unit C: Physical Science
- Informational Knowledge Objectives
- Observing Matter
-
- Students will learn the following vocabulary terms: matter, mass, solid, liquid, gas, dissolve, and evaporate.
- Students will learn how objects are made up of parts that are too small to be seen without magnifying them.
- Students will learn that matter can be identified by how it looks and feels and that not all types of matter look and feel the same.
- Students will know that liquids and gases are kinds of matter and that a liquid can change shape but not size.
- Students will know the effects of heating and cooling on solids, liquids, and gases.
- Students will be aware that objects can be grouped by their physical characteristics.
- Students will learn how matter is on the moon and that it weighs more than it does on Earth.
- Movement and Sound
-
- Students will grasp the concept that different things move at different speeds.
- Students will grasp the notion that there is a relationship between force and motion.
- Students will understand that forces make things move and some forces are stronger than others.
- Students will know what magnets can do and that magnetism is a force that may attract or repel certain materials.
- Students will know what kinds of sounds surround us.
- Students will know that many things in nature can make sounds.
- Suggested activities:
-
- Students will use a home weighing scale to measure various objects for weight. They will then measure the same objects in a different location and be able to observe that they are in fact the same weight no matter where they are weighed.
- Students will read books about astronauts and matter on the moon and be a scientist taking notes in their science journals.
- Students will use various different objects to compare and contrast height and weight. They will write their thoughts down on a sticky note.
- Students will have two jars filled with water and only one covered. They will take note that over time the uncovered jar evaporates.
- Students will make ice and then melt ice and notice the changes.
- Procedural Knowledge Objectives
-
- Students will be able to use their five senses to describe what is in two different paper bags.
- Students will know that a solid takes up space and will be able to group objects according to their shape.
- Students will be able to understand how matter changes, and that while certain things change in some ways, they stay the same in others.
- Students will be able to experiment with the physical properties of ice, water, and steam.
- Students will be able to experiment other ways matter can change.
- Students will be able to compare height and weight using common sense.
- The students will be able to experience and understand the effects of heating and cooling on solids, liquids, and gases.
- The Students will be able to show how sound is caused by vibrations (pulling and pushing) to cause waves.
- Students will be able to show that force gravity and speed makes objects move.
- Students will be able to observe how things move.
- Students will be able to tell and describe how sounds are made.
Unit D: Space and Technology
- Informational Knowledge Objectives
- Day and Night Sky
-
- Students will know that the sun makes heat and light and energy for Earth.
- Students will learn that the Earth is 109 times larger than the sun.
- Students will learn what is in the day sky.
- Students will know and differentiate objects seen in the day and night sky.
- Students will learn that the Earth’s rotation is causes sunsets and sunrises.
- Students will learn facts about the moon.
- Students will use graphs, picture, and written texts to observe describe and compare data.
- Students will learn that Astronauts travel to space in space shuttles.
- Suggested Activities:
-
- Students will make a model of the Sun, Moon and planets and be able to show how they function in the universe. Students will take time during centers on multiple occasions to complete this.
- Students will read books and about the sky and moon and universe and do a KWL chart as a whole group focusing on what they have learned.
- Students will make posters showing the rotation process and work as a team to write down facts and add them on their poster.
- Students will use chalk to draw different planets and the Sun and Earth.
- Students will act out rotation of the Sun using peers from their center group.
- Science in Our World
-
- Students will learn that the activities of humans affect plants and animals in many ways.
- Students will learn the vocabulary terms: technology, simple machine, wedge, screw, inclined plane, pulley, and lever and be able to apply them into their oral vocabulary.
- Students will learn that the way humans live can affect plants in many ways and that technology is the use of scientific knowledge to solve problems.
- Students will learn how builders get wood for a house.
- Students will learn what simple machines are and how they are used to help workers make things such as construction projects or farming projects.
- Students will understand the impact of information technology on their daily lives.
- Suggested activities:
-
- Students will work in groups during centers and use given materials to make a strong bridge.
- The teacher will provide a table of all sorts of different tools (child safe) and the students will explore and use them and then write and draw about their tool and its purpose.
- Students will read books about tools and write post it notes with comments or questions.
- Students will make up the perfect tool of their dreams and write about it in a story format using writers’ workshop. Students will work on their story throughout the week and share and compare and read stories to each other and write comments and questions on Friday (share day).
- Students will use tools to stack various objects around the classroom.
- Students will write a how to book about the process of how food gets from the farm to the store. We will make these into a class book to add to our class book library.
- Students will write about all kinds of different tools and what they are used for in their science journal.
- Students will cook pancakes using various tools in small groups during centers.
- Procedural Knowledge Objectives
-
- Students will use standard and non standard objects to measure things.
- Students will be able to use their bodies to show rotation of the Earth.
- Students will use a telescope and be able to understand that they make things appear closer than they are.
- Students will be able to draw and say the planets.
- Students will be able to read a calendar and understand how the moon looks at different times during the year.
- Students will be able to use simple graphs, pictures, to compare and contrast data.
- Students will be able to explore how to use tools.
- Students will be able to make a list of foods that you can eat from a farm.
- Students will be able to use various tools to help make things and some things cannot be made without tools.
- Students will be able to describe how science and technology affect people’s everyday lives.
- Students will be able to understand that screws, levers, pulleys, and inclined planes are different types of simple machines and they will be able to explore using them.
- Course Description
- Science for grade 2 is organized in four units : Life Science, the students will develop an understanding of the characteristics of living thing and the interaction between living things and their environment. Earth Science , where in the students will describe properties of earth materials and how weather changed. Physical Science ,in this unit students will develop skills to describe objects. and Space and Technology , as we go on in this unit, the students will use technology to learn about the world around them and explore the way things work.
- Course Objectives
-
At the end of this course, the students are expected to ;
1. Explain how plants and animal are adapted to different environment.
2. State some ways how do plants and animals help and live each other.
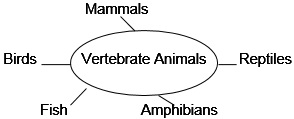
3. Differentiate vertebrate animals from invertebrate .
4. Describe how living things grow and change.
5. Match offspring with their parents.
6. Name some of our natural resources.
7. Explain how can people help protect the planet earth.
8. Discuss the water cycle.
9. Recognize the different kinds of weather.
10. Name sounds around us.
11. Describe the solar system.
12. Name ways where we use Technology.
13. Explain the importance of technology in our life.
- Resources / References
- Scott Foresman Science grade 2, gccs2.wordpress.com, Internet 4Classrooms (i4c), phsearch.yahoo.com, 42explore.com
- Course Content
-
Unit A : Life Science
Chapter 1 : All About Plants
Lesson 1 : What are the parts of the plant?
Lesson 2 : How are seeds scattered?
Lesson 3 : How are plants grouped?
Lesson 4 : How are some woodland plants adapted?
Lesson 5 : How are some prairie plants adapted?
Lesson 6 : How are some desert plants adapted?
Lesson 7 : How are some marsh adapted?
Chapter 2 : All About Animals
Lesson 1 : What are some animals with backbones?
Lesson 2 : What are some ways mammals are adapted?
Lesson 3 : What are some ways birds are adapted?
Lesson 4 : What are some ways fish are adapted?
Lesson 5 : What are some ways reptiles are adapted?
Lesson 6 : What are some ways amphibians are adapted?
Lesson 7 : What are some animals without backbones?
Chapter 3 : How Plants and Animals Live Together
Lesson 1 : What do plants and animals need?
Lesson 2 : How do plants and animals get food in a grassland?
Lesson 3 : How do plants and animals get food in an ocean?
Lesson 4 : What can cause a food web to change?
Lesson 5 : How do plants and animals help each other?
Chapter 4 : How Living Things Grow and Change
Lesson 1 : How do sea turtles grow and change?
Lesson 2 : What is the life cycle of a dragonfly?
Lesson 3 : What is the life cycle of a horse?
Lesson 4 : How are young animals like their parents?
Lesson 5 : What is the life cycle of a bean plant?
Lesson 6 : How are young plants like their parents?
Lesson 7 : How do people grow and change?
Unit B: Earth Science
Lesson 1 : What are natural resources?
Lesson 2 : What are rocks and soil like?
Lesson 3 : How do people use plants?
Lesson 4 : How does earth change?
Lesson 5 : How can people help protect Earth?
Chapter 6 : Earth’s Weather and Seasons
Lesson 1 : What are some kinds of weather?
Lesson 2 : What is the water cycle?
Lesson 3 : What is spring?
Lesson 4 : What is summer?
Lesson 5 : What is fall?
Lesson 6 : What is winter?
Lesson 7 : What are some kinds of bad weather?
Chapter 7 : Fossils and Dinosaurs
Lesson 1 : How can we learn about the past?
Lesson 2 What can we learn from fossils?
Lesson 3 : What were dinosaurs like?
Lesson 4 : What are some new discoveries?
Unit C: Physical Science
Chapter 8 : Properties of Matter
Lesson 1 : What is Matter?
Lesson 2 : What are the states of matter?
Lesson 3 : How can matter be changed?
Lesson 4 : How can cooling and heating change matter?
Chapter 9 : Energy
Time frame : March 2 – 13 ( 10 days )
Lesson 1 : What is energy?
Lesson 2 : How do living things use energy?
Lesson 3 : What are some sources of heat?
Lesson 4 : How does light move?
Lesson 5 : What are other kinds of energy?
Chapter 10 : Forces and Motion
Lesson 1 : How do objects move?
Lesson 2 : What is work?
Lesson 3 : How can you change the way things move?
Lesson 4 : How can simple machines help you do work?
Lesson 5 : What are magnets?
Chapter 11 : Sound
Lesson 1 : What is sound?
Lesson 2 : What is pitch?
Lesson 3 : How does sound travel?
Lesson 4 : How do some animals make sounds?
Lesson 5 : What are some sounds around you?
Unit D: Space and Technology
Lesson 1 : What is sun?
Lesson 2 : What causes day and night?
Lesson 3 : What causes season to change?
Lesson 4 : What can you see in the night sky?
Lesson 5 : Why does the moon seem to change?
Lesson 6 : What is the solar system?
Chapter 13 : Technology in our world
Lesson 1 : What is technology?
Lesson 2 : How does technology help us?
Lesson 3 : How do we use technology to communicate?
Lesson 4 : What are some other ways we use technology?
Lesson 5 : How do people make things?
- Learning Activities
-
- Comparing and contrasting – pointing out the similarities and differences between two or more objects
- Tracking cause and effect – determining why something is happening and what results from it.
- Brainstorming – ideas involves asking a question and rapidly listing all answers even those that are far fetched,impractical and impossible
- Experiments – with safety instructions
- Research works
- Assignments
- Projects
- Grading / Evaluation
| Each grading period will be determined by a weighted average of: | |
|---|---|
| Quizzes | 20% |
| Unit Test / Chapter Test | 25% |
| Class Participation(Recitation, Workbook, Seatwork) | 25% |
| Homework / Assignment | 10% |
| Projects(Experiments, Laboratory) | 20% |
| TOTAL | 100% |
- Weekly Informational Knowledge Overview - (Students will know...)
- That there are many different kinds of living things that live in a variety of environment.
- Weekly Procedural Knowledge Overview - (Students will be able to...)
- To explain that life occurs on or near the surface of the earth in land, air and water.
Monday
Tuesday
Wednesday
Thursday
Friday
- ***FIRST DAY OF CLASS***
- Learning Objective:
- Language Objective:
- Main Activity:
- Evaluation:
- Vocabulary:
- Homework:
- Learning Objective:
- At the end of the day, the students will be able to explain what are living things.
- Language Objective:
- At the end of the day, the students will be able to enumerate the parts of the plants.
- Main Activity:
- Ask children about their idea of what living things are, and show an ornamental plant, and ask them if it is a living thing and have children to name the parts of it.
- Evaluation:
- Point out the parts of the plant and have the students name it.
- Vocabulary:
- stem, roots, leaves, flower
- Homework:
- Learning Objective:
- At the end of the day, the students will be able to discuss the role of each part of the plant.
- Language Objective:
- At the end of the day, the students will be able to explain what are nutrients.
- Main Activity:
- Tell children that nutrients are materials that living things need to live and grow. That the roots take the nutrients and bring it to the stem, then to the leaves…
- Evaluation:
- have children draw a plant and label its parts.
- Vocabulary:
- nutrients
- Homework:
- Learning Objective:
- At the end of the day, the students will be able to enumerate the needs of the plants to be able to grow.
- Language Objective:
- At the end of the day, the students will be able to explain how does sunlight, air, water help plants to live.
- Main Activity:
- Have students guess what will happen to a plant if it has no water, sunlight and air. Then explain how these things help plants to live, and site an example like people, that we need to eat, drink and we need to breathe to be able to live.
- Evaluation:
- Ask the students to name the needs of the plants.
- Vocabulary:
- sunlight, air, water
- Homework:
- Learning Objective:
- At the end of the day, the students will be able to enumerate the needs of the plants to be able to grow.
- Language Objective:
- At the end of the day, the students will be able to explain how sunlight, air, water help plant to live.
- Main Activity:
- Workbook activity about the parts of the plants.
- Evaluation:
- Vocabulary:
- Homework:
- Materials / Resources (including technology)
- Science textbook, paper, crayons, pencils, plants
- State of Minnesota Standards Covered
-
- 2.4.2.1.1 Recognize that plants need space, water, nutrients and air, and that they fulfill these needs in different ways.
- Weekly Informational Knowledge Overview - (Students will know...)
- At the end of the lesson, the students can explain that the structural characteristics of plants are used to group them.
- Weekly Procedural Knowledge Overview - (Students will be able to...)
- At the end of the lesson, the students are expected to name different ways in which living things can be grouped.
Monday
Tuesday
Wednesday
Thursday
Friday
- Learning Objective:
- At the end of the day, the students are expected to explain the characteristics of each group of plants.
- Language Objective:
- At the end of the day, the students can list examples of each group.
- Main Activity:
- Showing different pictures of plants, flowering and non-flowering. Ask the students about what they can see on the pictures. Let them share to the class about their favorite fruits and flowers. Explain to the students the process of pollination.
- Evaluation:
- Individually ask the students to name different flowering and non flowering plants.
Tell whether angiosperm plants or gymnosperm plants
- Vocabulary:
- Pollination – is the process of moving pollen from one plant to another.
Pollen – the powder inside a flower which fertilizes other flowers.
Gymnosperm – non flowering plants
Angiosperm – flowering plants
- Homework:
- In a short sentences, describe how pine trees, mosses, and ferns are alike.
- Learning Objective:
- At the end of the lesson, the students will be able to discuss how some seeds grow into new trees.
- Language Objective:
- At the end of the lesson, the students will be able to differentiate fern, mosses, pine trees from peach trees and mango trees.
- Main Activity:
- Demonstrate how the seeds from cones grow by showing the pictures. Let the students identify which are mosses, fern and pine trees.
- Evaluation:
- Label the pictures with their appropriate names.
- Vocabulary:
- pollen cones – male pollen producing cones in conifer trees
Seed cones – female seed producing cones in conifer trees
Shady- full of shade, sheltered from the sun’s rays
- Homework:
- Learning Objective:
- At the end of the lesson, the students will be able to describe how plants adapted to live in their environment
- Language Objective:
- At the end of the lesson, the students will be able to identify the plants that live in different environment.
- Main Activity:
- Ask the students how they live in different places Relate the lesson with the answers of the children such as when they are in cold places or What they are wearing to protect themselves. Explain that plants are adapted to their environments in which they are found.
- Evaluation:
- Answer the statements below ,true or false
1. Maple trees have long elongated leaves __________
2. Pine trees are adapted to live in cold weather _______
- Vocabulary:
- Environment – the area in which something exists or lives
Adapted- to get used to something else
- Homework:
- Group children into three and each group must bring a picture of plants assigned to their group.
- Learning Objective:
- At the end of the lesson, the students will be able to describe how plants adapted to live in their environment
- Language Objective:
- At the end of the lesson, the students will be able to identify the plants that live in different environment.
- Main Activity:
- Ask the children about their ideas of four seasons.
Relate the environment where the plants lived.
From the student’s homework, Each group will discuss the ideas they collected.
- Evaluation:
- Name some plants that live in cold weather, summer or warm weather
- Vocabulary:
- moist – slightly wet, damp or humid
- Homework:
- Learning Objective:
- At the end of the lesson, the students will be able to explain how prairie plants are adapted
- Language Objective:
- At the end of the lesson, the students will be able to describe what a prairie land is.
- Main Activity:
- The students are going to draw the picture of a prairie.
Then from their drawings we are going to discuss the kind of plants that we see in prairie and how they different from woodland plants.
Showing images of prairie plants
- Evaluation:
- answer the questions in science workbook page 8
- Vocabulary:
- Prairie – extensive areas of flat or rolling grassland
- Homework:
- Write down name of the plants that you can see in the desert and marsh
- Materials / Resources (including technology)
- Pine tree cone, Scott Foresman Science 2, www.pinterest.com
- State of Minnesota Standards Covered
-
- 2.4.1.1.1 Describe and sort plants into groups in many ways, according to their physical characteristics and behaviors
- 2.4.2.1.1 Recognize that plants need space, water, nutrients and air, and that they fulfill these needs in different ways.
- Weekly Informational Knowledge Overview - (Students will know...)
- At the end of the week, the students will be able to explain that structures of living things are adapted to their function in specific environment.
- Weekly Procedural Knowledge Overview - (Students will be able to...)
- At the end of the week, the students will be able to discuss that animals and plants can be associated with their environment by an examination of their structural characteristics.
Monday
Tuesday
Wednesday
Thursday
Friday
- Learning Objective:
- At the end of the lesson, the students will be able to describe what a marsh is.
- Language Objective:
- At the end of the lesson, the students will be able to name other ways of how plants get nutrients .
- Main Activity:
- Review all the past lesson of how plants are adapted to their environment.
Show a picture of a marsh taken from the internet, let the children describe it.
Introduce plants such as sundew plant, Venus – flytrap , pitcher plants, bladder worts.
Give the characteristics of each plant and how they are adapted in marsh.
- Evaluation:
- Let the children name different plants in marsh.
Have them explain how these plants are adapted in their environment.
- Vocabulary:
-
Marsh – is an environment that is very wet.
Digest – means change food into a form that the body can use.
- Homework:
- Review for a quiz
- Learning Objective:
- At the end of the lesson, the students will be able to record their gathered data from looking at cactus leaf and fern leaf under the magnifying glass.
- Language Objective:
- At the end of the lesson, the students will be able to explain about their observation in cactus – fern activity.
- Main Activity:
- The students will be given a chance to look at the leaves of fern and cactus under the magnifying glass. They will collect data and record it on their activity book.
- Evaluation:
- Ask the students to compare the two plants.
- Vocabulary:
- data, Magnifying glass
- Homework:
- do some readings on how the animals are grouped.
- Learning Objective:
- At the end of the lesson, the students are expected to compare the characteristics of animals that live on land, in water, and in the air.
- Language Objective:
- At the end of the lesson, the students will be able to describe the vertebrate animals.
- Main Activity:
- Ask the children about what they read or know about animals. Let them share all their ideas and by considering all the answers the discussion will go on. Show pictures of different animals. Let them say what they know about the certain animals.
- Evaluation:
- Mention the animal’s names and ask the children what groups they belong to.
- Vocabulary:
- Mammals, Vertebrate animals
- Homework:
- Learning Objective:
- At the end of the lesson, the students are expected to compare the characteristics of animals that live on land, in water, and in the air.
- Language Objective:
- At the end of the lesson, the students will be able to describe the vertebrate animals.
- Main Activity:
- On the board, the groups of animals are posted. The children will paste each animal under the group where they belong.
- Evaluation:
- Workbook
- Vocabulary:
- Reptiles, Amphibians
- Homework:
- Make a word web for mammals, reptiles, amphibians.
- Learning Objective:
- At the end of the lesson, the students will be able to explain their word web.
- Language Objective:
- At the end of the lesson, the students will be able to compare the amphibians from reptiles.
- Main Activity:
- Showing the word web that the children did. Each student will present his or her work.
- Evaluation:
- complete the statement below
1. The __________________ has wings and can fly.
2. The ___________________ has fins and can swim.
- Vocabulary:
- alike, different
- Homework:
- Materials / Resources (including technology)
- Science textbook, paper, crayons, pencils, animal pictures
- State of Minnesota Standards Covered
-
- 2.1.1.2.1 Raise questions about the natural world and seek answers by making careful observations, noting what happens when you interact with an object, and sharing the answers with others.
- 2.4.1.1.1 Describe and sort plants into groups in many ways, according to their physical characteristics and behaviors
- 2.4.2.1.1 Recognize that plants need space, water, nutrients and air, and that they fulfill these needs in different ways.
- Weekly Informational Knowledge Overview - (Students will know...)
- At the end of the week, the students will be able to name the different groups of animals
- Weekly Procedural Knowledge Overview - (Students will be able to...)
- At the end of the week , the students will be able to classify vertebrates animals and invertebrates animals
Monday
Tuesday
Wednesday
Thursday
Friday
- Learning Objective:
- At the end of the lesson, the students will be able to explain the importance of bones to animals.
- Language Objective:
- At the end of the lesson ,the students will be able to name some animals that has backbones
- Main Activity:
- Let the children give their ideas about bones, backbones. Let them guess what happen if we don’t have backbones. Tell them that animals have backbones too. Introduce the word vertebrates and invertebrates
- Evaluation:
- Let individually name vertebrate animals
- Vocabulary:
- Vertebrates, Invertebrates
- Homework:
- Write down groups of animals that have backbones.
- Learning Objective:
- At the end of the lesson, the students will be able to enumerate group of animals with backbones.
- Language Objective:
- At the end of the lesson, the students will be able to describe what mammals are.
- Main Activity:
- Discuss about the mammals. Ask the students to name some animals that belong to this group.
- Evaluation:
- Let the students describe the characteristics of a mammal.
- Vocabulary:
- mammals
- Homework:
- Learning Objective:
- At the end of the lesson, the students will be able to write down the similarities and differences of worm from the snake.
- Language Objective:
- At the end of the lesson, the students will be able to gather data from making models of snake and worm.
- Main Activity:
- making models of a worm and a snake by using short and long tape , pipe cleaner, cotton squares, pasta. Fill up the chart (activity book page 35 ) by gathering data from the models.
- Evaluation:
- Vocabulary:
- alike, different
- Homework:
- Learning Objective:
- At the end of the lesson, the students will be able to describe the characteristics of reptiles.
- Language Objective:
- At the end of the lesson, the students will be able to compare the snakes, turtles, gecko
- Main Activity:
- Show pictures of reptiles in the internet, let students name them and ask what is their knowledge about the animals. Give the physical structures of snakes, turtles, gecko
- Evaluation:
- answer the questions in workbook
- Vocabulary:
- reptiles
- Homework:
- in two to three sentences differentiate reptiles from mammals.
- Learning Objective:
- At the end of the lesson, the students will be able to explain how does a backbone with many parts help an animal move.
- Language Objective:
- At the end of the lesson, the students will be able to compare vertebrates from invertebrates.
- Main Activity:
- make a model to show how the backbones help the animals to move. By using string, beads , pencil the class can demonstrate how to move with backbones of many parts.
- Evaluation:
- Fill up the activity sheet on page 42
- Vocabulary:
- backbones
- Homework:
- Materials / Resources (including technology)
- Kids.sandiegozoo.org , Scott Foresman Science
- State of Minnesota Standards Covered
- **Although animal studies are part of the textbook there are no listed Minnesota standards that apply for 2nd grade.
- Weekly Informational Knowledge Overview - (Students will know...)
- That structures of living things are adapted to their function in specific environment.
- Weekly Procedural Knowledge Overview - (Students will be able to...)
- To enumerate the different groups of animals with backbones such as mammals, birds, fish, reptiles and amphibians and describe their characteristics.
Monday
Tuesday
Wednesday
Thursday
Friday
- Learning Objective:
- At the end of the lesson, the students will be able to define what are vertebrate animals.Say the importance of backbones.
- Language Objective:
- At the end of the lesson, the students will be able to cite examples of mammals such as dogs, cats, people. At the end of the lesson, the students will be able to Name another group of animals with Backbones such as fish and the classes of fish and their characteristics.
- Main Activity:
- Do some recap about mammals and the examples given like dogs and their breeds. Introduce the new lesson about fish and the 3 classes of fish such as jawless, bony and cartilaginous fish.
- Evaluation:
- Let students describe fish, their classes and the examples given such as lion fish (these are additional information for the students to know ) as the ultimate invader , goldfish so on…
- Vocabulary:
- vertebrates, fish, cartilaginous, bony and jawless
- Homework:
- First project in Science. Animal Diary Students will start to observe around them, at home, backyard, park, school playground, educational movies. Keep a running list of the animals they see in their daily lives. Record the names of the animals they see and next to each name write notes about the animals, such as how it looks like and how it moves. They can include pictures as representation. And at the last page of their diary they will classify the animals into mammals, reptiles, birds, amphibians, fish.
- Learning Objective:
- At the end of the lesson, the students will be able to explain how the birds differ in their Features and distinct characteristics.
- Language Objective:
- At the end of the lesson, the students will be able to Name another group of animals with Backbones, the birds.
At the end of the lesson, the students will be able to discuss about the different Classifications of birds.
- Main Activity:
- Review the lesson from Tuesday. Show pictures of different birds. Mention some classification of birds such as albatrosses, herons, penguins, woodpeckers, owls
- Evaluation:
- Compare how are wings for a bird like fins for a fish? both help the animals move
- Vocabulary:
- hollow bones
- Homework:
- What are reptiles? write at least 5 animals that belong to this group
- Learning Objective:
- At the end of the lesson, the students will be able to describe the reptiles.
- Language Objective:
- At the end of the lesson, the students will be able to give examples of reptiles.
- Main Activity:
- Pictures of turtle, snake, lizards, crocodile are posted on the board. Ask the students what do they think these animals have in common. Then discussions about reptiles will go on.
- Evaluation:
- Is it a reptile, fish or bird? Heron? Owl? Lizard? Snake? Gold fish?
- Vocabulary:
- reptiles
- Homework:
- Learning Objective:
- At the end of the lesson, the students will be able to describe the amphibians.
- Language Objective:
- At the end of the lesson, the students will be able to Give names of animals that belong to Amphibian group.
- Main Activity:
- A word web was shown to the students. Ask them which group of animals has not been yet tackled. Let the students find out which animals considered an amphibian.
- Evaluation:
- Identify the following.
These are group of vertebrate animals with fins.
Group of animals with dry skin.
- Vocabulary:
- word web, amphibian
- Homework:
- Activity Sheet
Describe each group of vertebrate animals
Mammals
Reptiles
Amphibians
Fish
Birds
- Learning Objective:
- At the end of the lesson, the students will be able to Recall all the group of vertebrate animals
- Language Objective:
- At the end of the lesson, the students will be able to differentiate each group of vertebrate animals
- Main Activity:
- Students will be working in a group of 3 and 2. Each group will be assigned to a certain vertebrate animals. They will pick up from the box the name of animal group. They will draw a word web of their animal group and give examples and drawings.
- Evaluation:
- Vocabulary:
- Homework:
- Materials / Resources (including technology)
- Animals.about.com, Scott Foresman Science, livescience.com
- State of Minnesota Standards Covered
- **Although animal studies are part of the textbook there are no listed Minnesota standards that apply for 2nd grade.
- Weekly Informational Knowledge Overview - (Students will know...)
- At the end of the week, the students will be able to understand that living organisms need to be adapted to their environment to survive
- Weekly Procedural Knowledge Overview - (Students will be able to...)
- At the end of the week, the students will be able to explain how mammals and birds are adapted to their environment.
Monday
Tuesday
Wednesday
Thursday
Friday
- Learning Objective:
- Language Objective:
- Main Activity:
- Evaluation:
- Vocabulary:
- Homework:
- Learning Objective:
- At the end of the day, the students will be able to name some mammals that are adapted to their environment by camouflage.
- Language Objective:
- At the end of the day, the students will be able to define what camouflage is and how it helps animals to adapt in their environment.
- Main Activity:
- • Show pictures of mule deer in summer and in winter, flying squirrel and hedgehog.
• Ask children what can they say about the mule deer. Explain about how the mule deer change the color of its coat each summer and winter.
• Tell the children that Camouflage is a color or shape that makes a plant or animal hard to see.
• Then demonstrate by the use of black and red dots scattered on a piece of red card, and ask which is the easiest to find , the black or the red dots ?this is camouflage .
• Discuss the animals that are adapted to act in ways that help them live like the squirrel and hedgehog.
- Evaluation:
- Workbook, page 19.
- Vocabulary:
- Camouflage
- Homework:
- Name at least 3 mammals and how they are adapted to their environment.
- Learning Objective:
- At the end of the day, the students will be able to name some mammals that are adapted to their environment by camouflage.
- Language Objective:
- At the end of the day the students will be able to name some mammals and how they are adapted to their environment.
- Main Activity:
- -From the student’s homework, ask children to explain their work and help the students to elaborate more their work.
- Evaluation:
- Name the animals ;
It is adapted to glide from tree to tree. Flying squirrel
It sleeps for part of the winter. hedgehog
- Vocabulary:
- Homework:
- Learning Objective:
- At the end of the day the students will be able to name some birds and how they adapted to their environment.
- Language Objective:
- -At the end of the lesson, the students will be able to describe a penguin and how its body part use for its adaptation.
To describe the nightjar and how it is adapted.
- Main Activity:
- -Ask any idea from the students about a penguin.
-From their answers the discussion about birds will start.
-Explain the differences between these two birds.
- Evaluation:
- Individually ask the children to compare the nightjar and the penguin.
- Vocabulary:
- waterproof
- Homework:
- How are penguins and hummingbirds alike? How are they different?
- Learning Objective:
- At the end of the day the students will be able to explain how mammals and birds are adapted.
- Language Objective:
- At the end of the day the students will be able to discuss the importance of adaptation to each animal.
- Main Activity:
- Written on the board;
Mule deer , flying squirrel , hedgehog ,chipmunks , hummingbird , nightjar , penguin
Each child will be given a chance to go on the board and choose which animal he/she wants to describe and how it is adapted.
- Evaluation:
- Workbook page 20.
- Vocabulary:
- Homework:
- Materials / Resources (including technology)
- Scott Foresman Science Teacher’s Edition
- State of Minnesota Standards Covered
- **Although animal studies are part of the textbook there are no listed Minnesota standards that apply for 2nd grade.
- Weekly Informational Knowledge Overview - (Students will know...)
- At the end of the week, the students will be able to understand that living organisms need to be adapted to their environment to survive.
- Weekly Procedural Knowledge Overview - (Students will be able to...)
- At the end of the week , the students will be able to explain how birds and fish are adapted to their environment.
Monday
Tuesday
Wednesday
Thursday
Friday
- Learning Objective:
- Language Objective:
- Main Activity:
- Evaluation:
- Vocabulary:
- Homework:
- Learning Objective:
- At the end of the day the students will be able to name some birds and how they adapted
- Language Objective:
- At the end of the lesson, the students will be able to Describe a penguin and how its body part use for its adaptation.
- Main Activity:
- Ask any idea from the students about a penguin.
From their answers the discussion about birds will begin.
Tell children that penguins do not fly unlike other birds.
Their wings are adapted for swimming.
Explain the differences between these two birds.
- Evaluation:
- Each student will be asked to differentiate a penguin from other birds such as nightjar bird.
- Vocabulary:
- Water proof
- Homework:
- What does a hummingbird eat?
How do a penguin’s wings help it survive?
- Learning Objective:
- At the end of the lesson, the students will be able to, describe how porcupine fish, catfish and stingray are adapted to their environment.
- Language Objective:
- At the end of the lesson, the students will be able to explain the different ways of how porcupine fish protect themselves.
- Main Activity:
- Images of porcupine fish, catfish and stingray shown in computer.
Ask students to say something about these fishes.
Recall the characteristics of fish.
- Evaluation:
- Ask children to draw the porcupine fish and label its parts. Write something how they protect themselves.
- Vocabulary:
- Function, catfish ( cat / fish ) , stingray ( sting / ray )
- Homework:
- Learning Objective:
- At the end of the lesson, the students will be able to, describe how porcupine fish, catfish and stingray are adapted to their environment.
- Language Objective:
- At the end of the lesson, the students will be able to explain the different ways of how porcupine fish protect themselves.
- Main Activity:
- The students will decorate their porcupine fish by the use of small paper plates and they will make 2 sizes of it to show its adaptation (they become big and sharp spikes stick out from their body to protect themselves).
- Evaluation:
- Ask the students why the porcupine fish becomes big, What is the use of catfish long feelers, and what is the part of stingray that protects it.
- Vocabulary:
- feelers, spikes
- Homework:
- Learning Objective:
- At the end of the day the students will be able to compare all the animals that we tackled during the week like penguins, hummingbird, nightjar.
Compare the ways that stingray, catfish and porcupine fish protect themselves and how they feed themselves.
- Language Objective:
- The students will be able to write about the penguin’s adaptation, porcupine fish adaptation.
- Main Activity:
- Review of the bird’s adaptation and fish adaptation
Continuation of their porcupine fish model.
- Evaluation:
- True or Not true.
Penguins can fly.
Hummingbirds use their beak to drink liquid from flowers.
Catfish has feelers to find food.
- Vocabulary:
- Homework:
- Materials / Resources (including technology)
- Science textbook, paper, crayons, pencils, paper plates, popsicle sticks
- State of Minnesota Standards Covered
- **Although animal studies are part of the textbook there are no listed Minnesota standards that apply for 2nd grade.
- Weekly Informational Knowledge Overview - (Students will know...)
- At the end of the week, the students will be able to tell some ways that reptiles and amphibians adapted.
- Weekly Procedural Knowledge Overview - (Students will be able to...)
- At the end of the week, the students will be able to explain how these reptiles chameleon, snake, desert iguana
Adapted to their environment.
The students will be able to discuss the adaptation of frog and toad.
Monday
Tuesday
Wednesday
Thursday
Friday
- Learning Objective:
- At the end of the lesson the students will be able to explain how reptiles are adapted to their environment.
- Language Objective:
- At the end of the lesson, the students will be able to describe the adaptation of chameleon, snake, and desert iguana.
- Main Activity:
- In textbook, show the pictures of chameleon, and desert iguana.
Discuss the ways these reptiles are adapted.
Like the desert iguana is adapted to live in hot, sunny desert…so on…
- Evaluation:
- Individually ask the children to state some ways of these reptiles adaptation. Vocabulary:
- Vocabulary:
- Homework:
- Tell one way some snakes are adapted to get food.
- Learning Objective:
- At the end of the lesson the students will be able to explain some ways a snake adapted to get food.
- Language Objective:
- At the end of the lesson the students will be able to differentiate the adaptation of a snake from a chameleon.
- Main Activity:
- Review the chameleon’s adaptation. And how it is different from the snake when it comes in getting their food.
- Evaluation:
- Answer true or not true
Does the iguana live in hot sunny desert?
Does the chameleon have a long tongue?
- Vocabulary:
- Homework:
- Learning Objective:
- At the end of the lesson, the students will be able to give some ways how amphibians are adapted.
- Language Objective:
- At the end of the lesson, the students will be able to explain how frog and toad are adapted.
- Main Activity:
- Read science book pages about frogs and toads.
Explain to the students that frogs are adapted to live in moist environments, their smooth, wet skin helps frog to live in this environment, while the toads, they have dry and rough skin.
Write in journals the differences between frogs and toads.
- Evaluation:
- Journal writing
- Vocabulary:
- Homework:
- Review for your quiz tomorrow, from page 42 to 51 of your book.
How mammals, reptiles, birds, fish and amphibians are adapted.
- Learning Objective:
- At the end of the day the students will be able to recall all the adaptation of vertebrates group of animals
- Language Objective:
- At the end of the day the students will be able cite an examples of vertebrate groups and how they are adapted, such as mule deer use camouflage so on…
- Main Activity:
- Quiz
Review of all vertebrate groups of animals and their adaptations.
- Evaluation:
- Checking their quiz, by giving the right answers.
- Vocabulary:
- Homework:
- Learning Objective:
- Language Objective:
- Main Activity:
- Evaluation:
- Vocabulary:
- Homework:
- Materials / Resources (including technology)
- Science textbook, paper, crayons, pencils, plants
- State of Minnesota Standards Covered
- **Although animal studies are part of the textbook there are no listed Minnesota standards that apply for 2nd grade.
- Weekly Informational Knowledge Overview - (Students will know...)
- At the end of the week the students will be able to Define What is invertebrate. The students will be able to name group of animals without backbones.
- Weekly Procedural Knowledge Overview - (Students will be able to...)
- At the end of the week the students will be able to describe Insects and cite some examples of this animals.
Monday
Tuesday
Wednesday
Thursday
Friday
- Learning Objective:
- At the end of the lesson The students will be able to Define the word vertebrate.
- Language Objective:
- At the end of the lesson, the students will be able to describe what insects are.
- Main Activity:
- Show different pictures of insects such as diving beetle, walking stick,
Ask the children to describe these insects.
Explain how diving beetle adapted to water.
Have children cite more examples of insects.
- Evaluation:
- Say yes if it is an insect No if it is not.
Termite – yes
Ladybug – yes
Cat – no
Parrot - no
- Vocabulary:
- Invertebrates, insects, antennae , thorax , abdomen
- Homework:
- Aside from our examples, write down some more examples of insects.
- Learning Objective:
- At the end of the lesson the students will be able give the parts of an octopus and explain how it is adapted.
- Language Objective:
- At the end of the lesson, the students will be able to describe an octopus and how it is adapted.
- Main Activity:
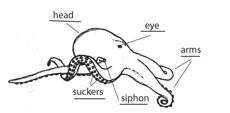
Show the different parts of an octopus.
- Evaluation:
- From the main activity ask children to say the parts of an octopus they help the octopus live in his environment.
- Vocabulary:
- Homework:
- Learning Objective:
- At the end of the lesson the students will be able to describe a spider.
- Language Objective:
- At the end of the lesson, the students will be able to explain how a spider gets food.
- Main Activity:
- Ask children about their idea of what a spider is, give the characteristics.
Make a spider model to be hung on the classroom. Have students give their spiders the correct number of legs, body parts, and eyes.
- Evaluation:
- Student spider models
- Vocabulary:
- Spider web
- Homework:
- Learning Objective:
- At the end of the lesson the students will be able to recall our lessons about the invertebrate groups.
- Language Objective:
- At the end of the lesson the students can cite names of insects, name the parts of an octopus and describe a spider.
- Main Activity:
- Continuation of our spider model and its web.
- Evaluation:
- Vocabulary:
- Homework:
- Learning Objective:
- Language Objective:
- Main Activity:
- Evaluation:
- Vocabulary:
- Homework:
- Materials / Resources (including technology)
- Science textbook, paper, crayons, pencils, construction paper, glue, scissors
- State of Minnesota Standards Covered
- **Although animal studies are part of the textbook there are no listed Minnesota standards that apply for 2nd grade.
- Weekly Informational Knowledge Overview - (Students will know...)
- At the end of the week the students will be able to name the needs of plants and animals.
- Weekly Procedural Knowledge Overview - (Students will be able to...)
- At the end of the week the students will be able to differentiate consumer from producer.
Monday
Tuesday
Wednesday
Thursday
Friday
- Learning Objective:
- At the end of the lesson the students will be able to name the basic needs of plants and animals.
- Language Objective:
- At the end of the week the students will be able to explain what a producer is and a consumer is.
- Main Activity:
- Ask children about their ideas of living things. Ask them to name some of the things they need to live and grow. (Accept reasonable answers) If necessary explain the difference between needs and wants.
Aside from human being ask the children what other living things they know.
Tell them that plants and animals have some needs to be able to live and grow.
And discuss that most green plants are producers, which means they can make their own food.
Animals are consumers, which means they can not make their own food, they get food from their habitat.
- Evaluation:
- Individually have children enumerate the needs of plants and animals.
Ask them to differentiate producer from consumer.
Vocabulary: Producer , consumer, needs , want.
- Vocabulary:
- Producer , consumer, needs , want.
- Homework:
- Answer the following questions;
1. Which kind of animal needs more food and water? a lion or a mouse ? Explain your answer .
2. Where do plants get what they need to live?
3. Where do people get what they need to live?
- Learning Objective:
- At the end of the lesson the students will be able to explain what is a cause and effect.
- Language Objective:
- At the end of the lesson the students will be able to cite an example of a cause and effect.
- Main Activity:
- Review the past lesson.
Have children present their homework and read it in the class.
Explain that large animals often need a lot of food, water, space and a large shelter, than the small animals.
Tell the children that plants and animals depend on each other and their habitat to meet their needs.
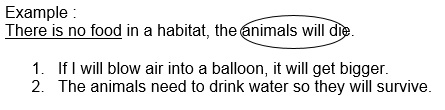
Ask the children what might happen if there is not enough food for all the animals in a habitat? (Expected answer – they will die)
- Evaluation:
- Ask children to give examples of cause and effect.
- Vocabulary:
- Cause , effect, large , small.
- Homework:
- Underline the cause and circle the effect.
- Learning Objective:
- At the end of the lesson the students will be able to explain what is a cause and effect
- Language Objective:
- At the end of the lesson the students will be able to cite an example of a cause and an effect
- Main Activity:
- Experiment .
Explore : What does yeast need to grow
Give the meaning of yeast.
Before the experiment give the safety rules and ask children to infer (What made the yeast change?) And observe with their sense of sight or seeing.
What to do.
1.Put water in the cup with yeast.
2. Add sugar 1tsp.and stir. Watch the yeast.
- Evaluation:
- Have children answer their data sheet
Infer: What would happen to the bread dough without the yeast?
- Vocabulary:
- Homework:
- based on your experiment ,
Infer: What would happen to the bread dough without the yeast?
Write the cause and effect
- Learning Objective:
- At the end of the lesson the students will be able to explain how animals in a grassland habitat depend on plants and other animals for food.
- Language Objective:
- At the end of the lesson, the students will be able to discuss a food chain. Define the word predator, prey.
- Main Activity:
- Show an illustration of a food chain. Explain how it goes and show which one is the predator and which is the prey.
- Evaluation:
- Draw a picture of a grassland food chain. Label your picture.
- Vocabulary:
- Food chain , predator , prey
- Homework:
- Learning Objective:
- At the end of the lesson the students will be able to explain how animals in a grassland habitat depend on plants and other animals for food.
- Language Objective:
- At the end of the lesson, the students will be able to discuss a food chain.
Define the word predator, prey.
- Main Activity:
- More illustrations and demonstration of food chain.
- Evaluation:
- Individually let the children discuss about each food chain.
- Vocabulary:
- Homework:
- Materials / Resources (including technology)
- Science textbook, paper, crayons, pencils, yeast, sugar
- State of Minnesota Standards Covered
- 2.4.2.1.1 Recognize that plants need space, water, nutrients and air, and that they fulfill these needs in different ways.
**Although animal studies are part of the textbook there are no listed Minnesota standards that apply for 2nd grade.
- Weekly Informational Knowledge Overview - (Students will know...)
- At the end of the week, the students will be able to discuss how animals in an ocean depend on plants and other animals for food.
- Weekly Procedural Knowledge Overview - (Students will be able to...)
- At the end of the week the students will be able to demonstrate and explain a food web in an ocean
Monday
Tuesday
Wednesday
Thursday
Friday
- Learning Objective:
- At the end of the lesson the students will be able to name the plants and animals in an ocean food chain.
- Language Objective:
- At the end of the lesson the students will be able to discuss the food chain in ocean.
- Main Activity:
- On the board, the pictures of kelp, sea urchin, and sea star are posted.
Have children identify these pictures.
Ask them where they can see these things on the board?
Remind them that plants (kelp) gets its energy from the sun. And explain how it passes through the sea urchin then to the sea star.
- Evaluation:
- Individually ask the students to explain the food chain.
- Vocabulary:
- Homework:
- Learning Objective:
- At the end of the lesson the students will be able to name the plants and animals in an ocean food chain.
- Language Objective:
- At the end of the lesson the students will be able to discuss the food web in the ocean.
- Main Activity:
- Recall the lesson about food chain in the ocean.
Show another picture of food web in the ocean.

Recall that the kelp takes in energy from the sun and passes it through the animals in the food web. Explain that in food web, there are many food chains.
- Evaluation:
- Which is the predator but not a prey in the food web?
Which animal is the most eaten in the food web?
- Vocabulary:
- Sea urchin , sea otter , orca
- Homework:
- Learning Objective:
- At the end of the lesson the students will be able to name the plants and animals in an ocean food chain.
- Language Objective:
- At the end of the lesson the students will be able to discuss the food web in the ocean.
- Main Activity:
- Cut and paste activity about the food web in the ocean.
- Evaluation:
- Have children explain their work.
- Vocabulary:
- Homework:
- Look at the food web below and answer the questions.
What does the kelp crab eat?
What does the orca eat?
Name the preys in the food web.

- Learning Objective:
- At the end of the lesson the students will be able to create their own ocean food chain.
- Language Objective:
- At the end of the lesson the students will be able to compare the grassland food chain and the ocean food chain.
- Main Activity:
- Show the food chain in grassland and the food chain in an ocean.
Have children share their knowledge about the differences and similarities of the two food chains.
- Evaluation:
- Vocabulary:
- Homework:
- Review for a quiz about food chain
- Learning Objective:
- At the end of the lesson the students will be able to create their own ocean food chain.
- Language Objective:
- At the end of the lesson the students will be able to compare the grassland food chain and the ocean food chain.
- Main Activity:
- Quiz
Show a video about food chain in an ocean.
- Evaluation:
- Ask the children which animals are the predators and preys.
- Vocabulary:
- Homework:
- Materials / Resources (including technology)
- Science textbook, paper, crayons, pencils
- State of Minnesota Standards Covered
-
2.4.2.1.1 Recognize that plants need space, water, nutrients and air, and that they fulfill these needs in different ways.
**Although animal studies are part of the textbook there are no listed Minnesota standards that apply for 2nd grade.
- Weekly Informational Knowledge Overview - (Students will know...)
- At the end of the week the students will be able to
-Explain what cause a food web to change.
-Give the positive or good effect and bad effect of changes in environment cause by human beings.
-Explain why should people try to keep the water clean.
-Give some ways how do plants and animals help each other.
- Weekly Procedural Knowledge Overview - (Students will be able to...)
- At the end of the week, the students will be able to
-Name causes of food web to change.
-Discuss how ants protect the acacia plant.
-Discuss how sea urchin protects the fish.
-Name some ways a nest is built.
Monday
Tuesday
Wednesday
Thursday
Friday
- Learning Objective:
- At the end of the lesson the students will be able to explain the effect of oil spill in food web.
- Language Objective:
- At the end of the lesson the students will be able to say the negative effect and positive effect of changes in an environment.
- Main Activity:
- Review about food web.
Ask children to name some birds that swim in water.
Then ask what will happen to the bird if oil is spilled in water?
Demonstrate what happens.
First dip a feather in a cup of water.
Then dip a feather in a cup of oil.
Have children write or draw their observation.
Then explain the bad effect of oil spill in the ocean.
By looking at the picture of a ship that had an accident, show how the oil spilled.
Have children share their ideas about this.
Explain to them how this oil spill affects a food web, like in the demonstration of a feather.
- Evaluation:
- Have children write about how this oil spill affects the food web.
- Vocabulary:
- Oil spill
- Homework:
- How could an oil spill cause a food web to change?
What happen to a food web when people make an environment dirty?
- Learning Objective:
- At the end of the lesson the students will be able to discuss how animals get shelter from plants and then protect the plants.
- Language Objective:
- At the end of the lesson the students will be able to describe how ants protect the acacia.
- Main Activity:
- Ask children why do animals need shelter? Accept all answers.
Show a picture of an ant living in an acacia tree/plant.
Explain how this ant protects the acacia tree like if other animals try to eat this plant the ants will bite them on the nose.
- Evaluation:
- Vocabulary:
- Homework:
- Write some ways on how do plants need the animals.
- Learning Objective:
- At the end of the lesson, the students will be able to explain why the cardinal fish is safe from predators.
- Language Objective:
- At the end of the lesson the students will be able to give the importance of how plants and animals help each other.
- Main Activity:
- Review the previous lessons, and then ask children if they know what animal is on the board?
What can they say about the pictures?
Then explain to them how cardinal fish is safe from its predators.
- Evaluation:
- Ask individually what do they think the importance of helping each other.
- Vocabulary:
- Homework:
- Learning Objective:
- At the end of the lesson the students will be able to explain how animals depend on plants and other animals for shelter and nesting
- Language Objective:
- At the end of the lesson the students will be able to name some ways on how animals build their nest.
- Main Activity:
- Ask children if they have a pet like hamster, gerbils or birds.
Ask them how does their nest looks like?
Show a picture of a nest. Let children guess what made up a nest?
Explain from where do animals get the materials they need to build nest.
- Evaluation:
- Individually ask the children what material does a nest of squirrel is made of?
- Vocabulary:
- Homework:
- Write 2 or 3 sentences about how a squirrel built its nest and what animal parts does the squirrel use to make its nest.
- Learning Objective:
- At the end of the lesson the students will be able to explain how a shark helps a remora fish.
At the end of the lesson the students will be able to discuss the how a boxer crab uses an anemone.
- Language Objective:
- At the end of the lesson the students will be able to say the similarities of how the boxer crab, shark, egret help other animals.
- Main Activity:
- Review all the lessons about how plants and animals help each other.
Explain how a boxer crab uses an anemone, and how the egret helps the rhino.
- Evaluation:
- Short quiz
- Vocabulary:
- Homework:
- Materials / Resources (including technology)
- Science textbook, paper, crayons, pencils, feather, oil, water
- State of Minnesota Standards Covered
- 2.4.2.1.1 Recognize that plants need space, water, nutrients and air, and that they fulfill these needs in different ways.
**Although animal studies are part of the textbook there are no listed Minnesota standards that apply for 2nd grade.
- Weekly Informational Knowledge Overview - (Students will know...)
- At the end of the week the students will be able to
• Explain that living things can reproduce and nonliving things cannot reproduce.
• Explain how do sea turtles and dragonflies grow and change.
- Weekly Procedural Knowledge Overview - (Students will be able to...)
- At the end of the week the students will be able to
• State the stages of how the sea turtles and dragonflies grow.
• Compare the parents from their babies.
Monday
Tuesday
Wednesday
Thursday
Friday
- Learning Objective:
- At the end of the lesson the students will be able to give the characteristics of a sea turtles.
- Language Objective:
- At the end of the lesson the students will be able to say the stages of how a sea turtle grows.
- Main Activity:
- On the board, show to the children a picture of a sea turtle.
Have them say something about a sea turtle.
Give its characteristics like, lives in an ocean, crawls onto a beach to lay eggs, uses its flippers to dig a hole in the sand then it lays eggs in the hole.
Have children guess if a sea turtle is born alive or hatch from the egg.
- Evaluation:
- Ask each child to give the characteristics of a sea turtle.
- Vocabulary:
- Sea turtles
- Homework:
- Where does a sea turtle lay its egg? ( in a hole in the sand )
About how long does it take for the eggs to hatch? ( about 2 months )
- Learning Objective:
- At the end of the lesson the students will be able to define Life Cycle.
- Language Objective:
- At the end of the lesson the students will be able to say the stages of how a sea turtle grows.
- Main Activity:
- Recall the lesson about the sea turtle.
Then show the children the stages of the life cycle of a sea turtle.
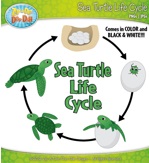
- Evaluation:
- Individually, ask children to go on the board and explain the life cycle of a sea turtle.
- Vocabulary:
- Homework:
- Learning Objective:
- At the end of the lesson, the students will be able to describe a dragonfly.
- Language Objective:
- At the end of the lesson, the students will be able to say the life cycle of a dragonfly.
- Main Activity:
- Show a dragonfly picture.
Ask children if it has a bone? If they will answer No, ask them why?
Yes, because dragonfly is an insect and insects are invertebrates animals.
Then present the cycle of how does a dragonfly grows.

- Evaluation:
- Paste words like nymph, egg, and dragonfly.
On the board ask the students to paste the words in which stage does these words match.
- Vocabulary:
- nymph
- Homework:
- Why do you think nymphs shed their outside covering as they grow ?( the old covering becomes too small as they grow )
How are a nymph looks like an adult? ( both have six legs )
- Learning Objective:
- At the end of the lesson the students will be able to define Life Cycle.
- Language Objective:
- At the end of the lesson the students will be able to draw the stages of how a sea turtle grows.
At the end of the lesson , the students will be able to draw the life cycle of a dragonfly
- Main Activity:
- The children will Draw their own life cycle of a dragonfly and the sea turtle.
- Evaluation:
- Vocabulary:
- Homework:
- Learning Objective:
- At the end of the lesson the students will be able to summarize the lesson discussed during the week.
- Language Objective:
- At the end of the lesson the students will be able to make their own model of sea turtles life cycle.
- Main Activity:
- Making their models of sea turtles life cycle.
- Evaluation:
- Identifying and explaining their works.
- Vocabulary:
- Homework:
- Materials / Resources (including technology)
- Science textbook, paper, crayons, pencils, model making materials; glue, sting, scissors, paper
- State of Minnesota Standards Covered
- 2.4.2.1.1 Recognize that plants need space, water, nutrients and air, and that they fulfill these needs in different ways.
**Although animal studies are part of the textbook there are no listed Minnesota standards that apply for 2nd grade.
- Weekly Informational Knowledge Overview - (Students will know...)
- At the end of the week , the students will be able to describe how organisms change as they grow and mature.
- Weekly Procedural Knowledge Overview - (Students will be able to...)
- At the end of the week the students will be able to explain that living things have offspring that resemble their parents.
Monday
Tuesday
Wednesday
Thursday
Friday
- Learning Objective:
- At the end of the week the students will be able to explain that living things have offspring that resemble their parents.
- Language Objective:
- At the end of the lesson the students will be able to differentiate the life cycle of a sea turtle from the life cycle of a dragonfly.
- Main Activity:
- Show the illustration of the life cycle of a sea turtle then ask each student to discuss it in the class. How does the life of a sea turtle begin and what do they call the baby sea turtle. ( hatchlings )
Then show the picture of a dragonfly life cycle, have children explain the life cycle and why does a nymph shed its outside covering as it grows.
- Evaluation:
- cut and paste activity, matching type.
On a worksheet the students will choose the sentences that describes each stages of the life cycle of a sea turtle and a life cycle of the dragonfly. They are going to arrange it in sequence and match it with the pictures.
- Vocabulary:
- Homework:
- What is a foal?
What is a male foal called?
What is a female foal called ?
- Learning Objective:
- At the end of the lesson the students will be able to explain the life cycle of a horse.
- Language Objective:
- At the end of the lesson the students will be able to give the name of a male foal and a female foal.
- Main Activity:
- Show two pictures of a horse. ( young and adult )
Ask children which one do they think is the young and the adult horse.
Ask them what do they call a baby horse?
And explain to them that the male foal is called a colt.
And the females are called fillies.
Describe how a horse grows and changes.
- Evaluation:
- Ask the students to write about the life cycle of a horse.
- Vocabulary:
- Foal, fillies, colts.
- Homework:
- Learning Objective:
- At the end of the lesson the students will be able to explain the life cycle of a horse
- Language Objective:
- At the end of the lesson the students will be able to give the name of a male foal and a female foal.
- Main Activity:
- Let the children stand in front and explain the life cycle of a horse.
Then give each child a turn to ask questions from his / her classmates.
Additional Information :
Tell children that long ago, there were no cars and machines. Horses helped people in many ways such as means of transportation.
- Evaluation:
- Vocabulary: Foal, fillies, colts.
- Vocabulary:
- Homework:
- Look on the internet for information about how horses helped people living in United States long ago, and how horses help people today.
- Learning Objective:
- At the end of the lesson, the students will be able to compare the young animals such as kitten, young giraffe, nestlings or chick, (baby penguins) to their parents.
- Language Objective:
- At the end of the lesson the students will be able to identify the ways in which the kittens, baby giraffes, nestlings or chicks look different.
- Main Activity:
- Show pictures of kittens and a cat, baby giraffe and adult giraffe, nestlings and adult penguins.
Let each child choose what animal they want and have them describe it.
Accept all explanations.
Then ask each child where these animals life begins? Born alive or hatched from eggs.
And describe each of the physical features, to let children understand the differences and similarities of the baby animals from the adult animals.
- Evaluation:
- Ask children the following questions.
How does a baby giraffe different from its parent.
What do nestlings look like?
What are the individual differences of kittens?
- Vocabulary:
- Kittens, nestling, differences, similarities
- Homework:
- Learning Objective:
- At the end of the lesson, the students will be able to compare the young animals such as kitten, young giraffe, nestlings or chick , ( baby penguins ) to their parents.
- Language Objective:
- At the end of the lesson the students will be able to identify the ways in which the kittens, baby giraffe, nestlings or chicks look different.
- Main Activity:
- Workbook support activity pg. 44, 45, 46, 47.
- Evaluation:
- From the main activity.
- Vocabulary:
- Homework:
- What is an embryo? Give the meaning of photosynthesis.
- Materials / Resources (including technology)
- Scott Foresman Science 2 , paper, crayons, pencils,
- State of Minnesota Standards Covered
- **Although animal studies are part of the textbook there are no listed Minnesota standards that apply for 2nd grade.
- Weekly Informational Knowledge Overview - (Students will know...)
- At the end of the week , the students will be able to
• Describe how organisms change as they grow and mature.
• Describe the life cycle of a bean plant.
- Weekly Procedural Knowledge Overview - (Students will be able to...)
- At the end of the week , the students will be able to compare young plants from their parents.
Monday
Tuesday
Wednesday
Thursday
Friday
- Learning Objective:
- Language Objective:
- Main Activity:
- Evaluation:
- Vocabulary:
- Homework:
- Learning Objective:
- At the end of the lesson, the students will be able to describe the life cycle of a bean plant.
- Language Objective:
- At the end of the lesson, the students will be able to
• Give the meaning of seed coat, germinate, embryo, seedling, photosynthesis.
• Write in sequence the life cycle of a bean plant.
- Main Activity:
- Recall the past lessons about the life cycles of different animals.
Tell children that plants have a life cycle too.
Ask the class about their ideas how do plants grow? Why there are many plants around us ?
Then show the picture on the board.
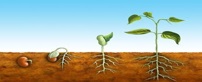
Have the children say something about the picture.
Guide the children on their explanations.
Discuss the life cycle of a bean plant.
Define the words seed coat, photosynthesis, seedling, and embryo germinate.
- Evaluation:
- Ask the following questions;
1. A seedling is a __________________ ( young plant )
2. Germinate means ________________ ( begin to grow )
Individually ask the children to stand in front and retell the life cycle of a bean plant.
And the children who are seated can ask questions.
- Vocabulary:
- Seedling - young plant
Seed coat - hard outer covering of a seed.
Embryo - the part of a seed that develops into a plant.
Photosynthesis - Plants absorb sunlight and turn that energy into food; the process is known as photosynthesis.
Germinate - begin to grow.
- Homework:
- Infer.
The adult plant makes seeds. Some seeds will grow into new plants. What will those new plants look like? ( they will look like the adult that made the seeds )
- Learning Objective:
- At the end of the lesson, the students will be able to describe the life cycle of a bean plant
- Language Objective:
- At the end of the lesson, the students will be able to
• Give the meaning of seed coat, germinate, embryo, seedling, photosynthesis.
• Write in sequence the life cycle of a bean plant
- Main Activity:
- Distribute the materials to each student. Give the instruction on how to do the experiment.
- Experiment:
- Title of the experiment: What happens when a seed germinates?
Materials; Bean seeds, paper towel, plastic sandwich bag.
Procedure:
Do not leave the towel too wet. It should stay moist in the sealed bag. If necessary, remoisten by spraying water on it.
Children should infer that the root coming out of the bean seed is evidence that the seed is germinating or growing.
What to expect : After 3 – 4 days , the seed coats of the bean seed should open and a root should start growing outward and downward.
- Evaluation:
- Ask each child about their prediction about the seeds.
- Vocabulary:
- Homework:
- cut and paste. Then number the pictures in sequence.
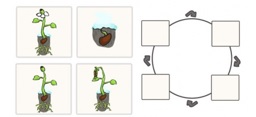
- Learning Objective:
- At the end of the lesson , the students will be able to
-Compare the young saguaro cactus from its parent.
-Give the similarities and differences of a foxglove.
- Language Objective:
- At the end of the lesson, the students will be able to draw a young saguaro cactus and an adult saguaro cactus then write their differences.
- Main Activity:
- Show the picture of young saguaro cactus and adult saguaro cactus.

Young saguaro
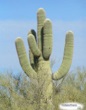
adult saguaro
- Evaluation:
- Draw a young saguaro cactus and adult saguaro cactus. Write their differences.
- Vocabulary:
- Homework:
- Look at the pictures of the young saguaro cactus (left) and the adult saguaro cactus (right) below.
How are they the same?
How are they different?
- Learning Objective:
- At the end of the lesson the students will be able to give the similarities and differences of foxgloves.
- Language Objective:
- At the end of the lesson the students will be able to compare the young foxgloves to its parents.
- Main Activity:
- Go over the homework of the children about saguaro cactus.
Then introduce another plants and show the pictures which are posted on the board.
By looking at the pictures, ask children which they think are the young foxgloves and the adult foxgloves?
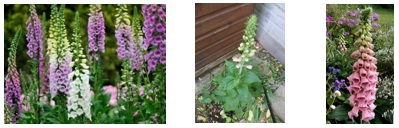
Tell about some characteristics of the foxgloves.
1. It is poisonous.
2. Foxgloves got its name because the flowers look like fingers of a glove.
- Evaluation:
- How can you differentiate the young foxgloves from the adult foxgloves?
- Vocabulary:
- Homework:
- Materials / Resources (including technology)
- Science textbook, paper, crayons, pencils, Bean seeds, paper towel, plastic sandwich bag.
- State of Minnesota Standards Covered
- 2.4.1.1.1 Describe and sort plants into groups in many ways, according to their physical characteristics and behaviors
2.4.2.1.1 Recognize that plants need space, water, nutrients and air, and that they fulfill these needs in different ways.
- Weekly Informational Knowledge Overview - (Students will know...)
- At the end of the week the students will be able to explain that plants and animals produce offspring with similar characteristics , but individual differences.
- Weekly Procedural Knowledge Overview - (Students will be able to...)
- At the end of the week the students will be able to describe how organisms changes as they grow and mature.
Monday
Tuesday
Wednesday
Thursday
Friday
- Learning Objective:
- At the end of the lesson the students will be able to identify the young foxgloves and the adult foxgloves.
- Language Objective:
- At the end of the lesson the students will be able to differentiate the young foxgloves from the adult foxgloves.
- Main Activity:
- Review the saguaro cactus and ask the children how do the young saguaro look alike/different from the adult saguaro?
Then show the images of foxgloves.
Let children guess which is on its early stage or the young foxglove? And which one do they think is the adult foxglove?
- Evaluation:
- Give each child to describe the foxgloves.
How are the young foxgloves and adult foxgloves different?
- Vocabulary:
- Foxgloves
- Homework:
- Look at the pictures below. Answer the questions.
- Learning Objective:
- At the end of the lesson the students will be able to describe how people grow and change.
- Language Objective:
- At the end of the lesson the students will be able to give the changes as people grow.
- Main Activity:
- Show pictures of child development and growth.
Let children say something about what they see from the pictures.
Ask them also if they think they pass on these stages.
Have them name some changes as they grow.
- Evaluation:
- Worksheets on how people grow and change.
- Vocabulary:
- Homework:
- When do you lose your first teeth? As a child or as an adult? When do people stop growing?
- Learning Objective:
- At the end of the lesson, the students will be able to describe how people grow and change.
- Language Objective:
- At the end of the lesson the students will be able to name individual differences.
- Main Activity:
- Review previous lesson about how people grow and change.
Show pictures of different people from different countries.
Have children describe each individual and compare it to others.
- Evaluation:
- Compare each individual. Write about their similarities and differences.
- Vocabulary:
- Individual differences.
- Homework:
- Learning Objective:
- At the end of the lesson the students will be able to describe how people grow and change.
- Language Objective:
- At the end of the lesson the students will be able to name individual differences.
- Main Activity:
- Recall all that you have learned about how people grow and change.
Ask children to name individual differences.
Elaborate more on individual differences.
Site also an example of fraternal twins and identical twins.
How they look the same and different.
- Evaluation:
- Draw a person and write sentences that tell how the people they have drawn look alike and different.
- Vocabulary:
- Homework:
- Look at the picture below.
(Picture or a family)
How are the children like their parents?
How are they different?
Do you look like your mom or dad? In what ways?
- Learning Objective:
- At the end of the lesson the students will be able to explain how do people grow and change.
- Language Objective:
- At the end of the lesson the students will be able to state some ways people can be different from each other.
- Main Activity:
- Discuss how people grow and change and complete worksheets.
- Evaluation:
- Worksheets on how people grow and change.
- Vocabulary:
- Homework:
- Materials / Resources (including technology)
- Science textbooks, paper, markers, pencils
- State of Minnesota Standards Covered
- 2.4.3.1.1 Describe the characteristics of plants at different stages of their lifecycles. For example : Use live organisms or pictures to observe the changes that occur during the life cycle of bean plants or marigolds.
**Although human studies are part of the textbook there are no listed Minnesota standards that apply for 2nd grade.
- Weekly Informational Knowledge Overview - (Students will know...)
- At the end of the week the students will be able to
-Recognize that the solid materials making up the earth come in all sizes, from boulders to grains of sand.
- Weekly Procedural Knowledge Overview - (Students will be able to...)
- At the end of the week the students will be able to -Name some of Earth’ s natural resources, including land, air and water.
Monday
Tuesday
Wednesday
Thursday
Friday
- Learning Objective:
- At the end of the lesson the students will be able to define Natural Resources.
- Language Objective:
- At the end of the lesson the students will be able to Identify renewable and non-renewable resources.
- Main Activity:
- On the board, are list of examples with pictures, of natural resources, such as sunlight, water, forest, oil, coal. Ask the children if they have heard the words natural resources?
Then give the meaning of natural resources.
Explain to the children that oil, coal, trees, sunlight, water, are examples of natural resources.
And natural resources can be classified into renewable and non-renewable.
Also, discuss what are renewable resources and what are non-renewable.
- Evaluation:
- Ask each child to give the meaning of natural resources.
Then on their worksheets let them classify the things into renewable and non renewable resources
- Vocabulary:
- Natural resources, Renewable, Non renewable
- Homework:
- Learning Objective:
- At the end of the lesson the students will be able to define natural resources.
- Language Objective:
- At the end of the lesson the students will be able to give the importance of natural resources like water, plants and their uses.
- Main Activity:
- Review the previous lesson about natural resources.
Ask children to give an example of natural resources.
Tell them that sunlight, air and water are natural resources that can never be used up.
And water is very important.
Ask them why it is important? (Accept all answers) the children will give its uses.
Explain to the children that both fresh water and salt water is a natural resource. And ¾ of the earth is covered by water.
And there are different freshwater sources, such as rivers, lakes, ponds and ground water.
And most salt water is found in the ocean.
- Evaluation:
- Ask the children, individually to name sources of fresh water. Have them give the uses of water.
- Vocabulary:
- Fresh water and salt water
- Homework:
- Give three uses of water. Name the different sources of fresh water.
- Learning Objective:
- At the end of the lesson, the students will be able to explain the importance of Air.
- Language Objective:
- At the end of the lesson the students will be able to give the uses of Air
- Main Activity:
- Ask them their ideas about air.
Plants and animals need air to live.
We also need air to make things move like the hot air balloon.
We fill some things with air to make them bigger like a soccer ball and balloons.
- Evaluation:
- Ask each student to write about ways we use air.
- Vocabulary:
- Homework:
- Learning Objective:
- At the end of the lesson the students will be able to Explain that the surface of earth is composed of different types of solid materials that come in all sizes.
- Language Objective:
- At the end of the lesson the students will be able to
-Give the similarities of boulders and sand.
-Name examples of minerals.
- Main Activity:
- Show to the children the pictures under two columns on the board.
On the left column are boulders and sand. On the right column is quartz, gold, silver, iron.
Ask them if they think that these are also natural resources.
Then show them two words, “ rocks “ and. “ minerals”.
Ask one child to take the words and paste them on the top of the columns which she / he thinks each word should be.
Rocks are natural resources.
Rocks come in many shapes, sizes, and colors.
A boulder is a big rock.
Sand is made of tiny pieces of rocks.
- Evaluation:
- How are boulders and sand the same and different?
- Vocabulary:
- Rocks, minerals, sand, boulders
- Homework:
- Think of a rocky, sandy place that you have been and write few sentences about your experiences in these places.
- Learning Objective:
- At the end of the lesson the students will be able to describe what a mineral is.
- Language Objective:
- At the end of the lesson the students will be able to name examples of minerals.
- Main Activity:
- Review the lesson about rocks and minerals.
Show them again the chart of rocks and minerals.
Explain that minerals are natural resources.
Minerals are non-living materials that come from earth.
Explain to the children what are quartz, copper etc.
- Evaluation:
- Ask children to name some minerals.
- Vocabulary:
- Minerals, Quartz, Copper, Gold, Silver
- Homework:
- Name at least two things that are made up of gold, things made up of silver, and things made up of copper.
- Materials / Resources (including technology)
- Scott Foresman science textbooks, paper, markers, pencils
- State of Minnesota Standards Covered
- 2.1.1.2.1 Raise questions about the natural world and seek answers by making careful observations, noting what happens when you interact with an object, and sharing the answers with others.
- Weekly Informational Knowledge Overview - (Students will know...)
- At the end of the week the students will be able to
• Name some minerals and their uses.
• Name the layers of the soil
- Weekly Procedural Knowledge Overview - (Students will be able to...)
- At the end of the week the students will be able to
• Describe the types of the soil.
• Describe the types of the soil.
Monday
Tuesday
Wednesday
Thursday
Friday
- Learning Objective:
- At the end of the lesson the students will be able to name some minerals
- Language Objective:
- At the end of the lesson the students will be able to identify the minerals and give some uses of these.
- Main Activity:
- Recall the lesson about Rocks.
Then tell children that Rocks are made up of minerals.
Minerals are also natural resources. They are non living materials come from earth.
Show an images of quartz, copper on the TV monitor.
Introduce to the children these two minerals, and show them where these minerals are used.
- Evaluation:
- Name the two minerals that we discussed.
What kind of mineral that we used in making pots, wires, pipes, jewelry, glass?
- Vocabulary:
- Minerals
- Homework:
- Learning Objective:
- At the end of the lesson the students will be able to name some minerals
- Language Objective:
- At the end of the lesson the students will be able to identify the minerals and give some uses of these.
- Main Activity:
- Tell children that today, we will continue talking about minerals.
Ask them what are the two minerals that we talked about? ( copper and quartz )
In the monitor, show the images of silver, gold, iron.
Then have children name the minerals as it shows in the monitor.
Then show them also some things that are made up of gold, silver, iron.
- Evaluation:
- Match the minerals with their names.
- Vocabulary:
- Homework:
- Name 5 minerals and describe each minerals in at least two sentences.
- Learning Objective:
- At the end of the week, the students will be able to give some characteristics of soil.
- Language Objective:
- At the end of the week the students will be able to identify the layers of soil.
- Main Activity:
- Review about the last lesson then tell the children that aside from minerals and rocks, Soil is also a natural resource.
On the monitor, show the sandy soil , clay soil , humus.
Have children say something about these images.
Read science book pages about soil types. Answer questions at the end in journals.
- Evaluation:
- Have children answer the questions below.
How are sandy soil and humus different?
What are many soils made of?
- Vocabulary:
- humus
- Homework:
- Which kind of soil is the best for plants, and why?
What is humus made of?
- Learning Objective:
- At the end of the week, the students will be able to give some characteristics of a soil.
- Language Objective:
- At the end of the week the students will be able to identify the layers of soil.
- Main Activity:
- Recall the past lesson; show all the pictures of sandy soil, humus and clay.
Have children name them and describe.
Then have them go around the table.
Show them the actual sandy, clay and humus.
Give each child a turn to see this soil under the magnifying glass.
Then let them record what they have seen.
- Evaluation:
- Individually let them explain their data.
- Vocabulary:
- Homework:
- Learning Objective:
- At the end of the lesson the students will be able to summarize the lessons for the whole week.
- Language Objective:
- At the end of the lesson the students will be able to stand in front and discuss the whole week lessons.
- Main Activity:
- Ask the children if somebody can volunteer to explain the whole week lesson.
Then have each one of them to stand and talk about rocks, minerals and soil.
- Evaluation:
- Each child will ask a question to the student who is discussing the lesson.
- Vocabulary:
- Homework:
- Matching type…minerals , rocks , soil.
- Materials / Resources (including technology)
- Scott Foresman science textbooks, paper, markers, pencils, sand, clay, humus soil
- State of Minnesota Standards Covered
- 2.1.1.2.1 Raise questions about the natural world and seek answers by making careful observations, noting what happens when you interact with an object, and sharing the answers with others.
- Weekly Informational Knowledge Overview - (Students will know...)
- At the end of the week the students will be able to explain that selected resources used by people for water , food , and shelter are limited and necessary for their survival.
- Weekly Procedural Knowledge Overview - (Students will be able to...)
- At the end of the week the students will be able to write a list of the uses of plants.
Monday
Tuesday
Wednesday
Thursday
Friday
- Learning Objective:
- At the end of the lesson the students will be able to describe what plants have in common.
- Language Objective:
- At the end of the lesson the students will be able to name uses of plants and write a list of things that are made from plants.
- Main Activity:
- Show images of different plants. Ask children what similarities these plants have in common?
They all have stems, leaves, flowers, green color, and the need for sunlight and water.
And let children say some uses of plants such as to make food, shelter and clothing.
Ask children if they know things made of plants such as cotton, t-shirt, wheat to make bread, people use trees to make paper.
- Evaluation:
- Have children write about the uses of a plant.
Have them give examples of things that are from plants and trees.
- Vocabulary:
- Homework:
- What are some ways plants are important to us?
Name some more things that are made from plants.
- Learning Objective:
- At the end of the lesson, the students will be able to identify the parts of the tree or plants that were used for making yarn, paper, maple syrup.
- Language Objective:
- At the end of the lesson the students will be able to write a list of the things that are made from plants.
- Main Activity:
- From the student’s homework, ask them to give more things that made of plants.
Show a video of how a yarn has been made, and also how paper goes to certain process in the factories.
After they watch the videos ask children to give some uses of papers and yarn and which part of the plant was used for these materials.
- Evaluation:
- On their worksheet the children will sort out things that are made from the leaves, stem, flowers of the plants or trees.
- Vocabulary:
- Ginning, carding
- Homework:
- Learning Objective:
- At the end of the lesson the students will be able to state two processes that cause changes in the earth.
- Language Objective:
- At the end of the lesson the students will be able to explain How Erosion and Weathering change the earth.
- Main Activity:
- Place a candy in water.have children see how long it takes the piece of candy to dissolve in the water. Tell the children that the candy dissolving in water is similar to the process by which in nature wears away or weathers, rock over time.
Then ask them also if they still remember when was the time they washed dirt or mud off their hands, feet or shoes.
Ask them where did the soil go? Explain the fact that water can wash away soil.
Tell the children erosion happens when rocks or soil are moved by water or wind.
Erosion can change earth.
Show them a video of how erosion happens.
Write in journals about erosion.
- Evaluation:
- Journal writing
- Vocabulary:
- Erosion
- Homework:
- How do plants prevent erosion?
- Learning Objective:
- At the end of the lesson the students will be able to state two processes that cause changes in the earth.
- Language Objective:
- At the end of the lesson the students will be able to Explain how Erosion and Weathering change Earth.
- Main Activity:
- Explain to the children that plants or trees help prevent erosion.
The roots of the plants hold the soil in place.
Then introduce to the children another process, which is weathering.
This is the breaking apart and changing of rocks.
There are some things that cause weathering. Water, ice, and changing temperatures cause weathering.
Weathering can change earth also, or land shape.
Discuss to the children that moving water can cut through soil and minerals over time.
Explain that when temperature drops below freezing, water in the soil and in rocks can freeze.
When it freezes, it grows bigger and this can move or break up soil.
Show on the tv monitor for children’s better understanding of weathering.
- Evaluation:
- Let the children explain weathering and how it causes landform change.
- Vocabulary:
- Homework:
- What is weathering?
Look at the pictures below; tell whether it is an erosion or weathering.
- Learning Objective:
- At the end of the lesson the students will be able to state two processes that cause changes in the earth.
- Language Objective:
- At the end of the week the students will be able to explain how erosion and weathering cause change in the earth.
- Main Activity:
- Recall all the lessons about weathering and erosion. Then ask children to draw a picture that shows change of land by erosion and change of land by weathering.
- Evaluation:
- Vocabulary:
- Homework:
- Materials / Resources (including technology)
- Scott Foresman science textbooks, paper, markers, pencils,
- State of Minnesota Standards Covered
- 2.1.1.2.1 Raise questions about the natural world and seek answers by making careful observations, noting what happens when you interact with an object, and sharing the answers with others
- Weekly Informational Knowledge Overview - (Students will know...)
- At the end of the week , the students will know ;
• That human activity affects the environment.
• How human beings cause changes in the environment and these changes can be positive or negative.
• Ways of human activity such as landfills for disposal of waste, land development for homes and industry.
• The negative effect and positive effect of deforestation, littering, contaminating water and air.
- Weekly Procedural Knowledge Overview - (Students will be able to...)
- At the end of the week the students will be able to
• Name ways that cause pollution to our environment.
• Demonstrate how to reduce, reuse and recycle things.
• Explain the negative and positive effects of deforestation, littering and contaminating water and air.
• Describe how human activity such as landfills for disposal of wastes, land development for homes and industry affects the environment.
Monday
Tuesday
Wednesday
Thursday
Friday
- Learning Objective:
- At the end of the lesson, the students will be able define pollution.
- Language Objective:
- At the end of the lesson the students will be able to
• Name ways that cause pollution
• Describe how such things cause pollution.
- Main Activity:
- Review the previous lesson about Natural Resources.
People change the earth by causing pollution.
And changing our earth into polluted earth will cause harm to our natural resources such as to the plants and animals.
Then Tell children that pollution means – adding of harmful things to land, air or water.
And this word derives from Latin word which means “ through mud “
Ask children if they can give an example of things that cause pollution.
Explain to them that pollution has many forms.
It can be air pollution, water pollution, and noise pollution.
From the examples given by the students explain how these things cause pollution.
- Evaluation:
- Ask the children individually to define pollution.
Have each one of them site an example of pollution.
- Vocabulary:
- Pollution
- Homework:
- Write two examples of ways that cause noise pollution, air pollution and water pollution.
- Learning Objective:
- At the end of the lesson the students will be able to identify noise pollution, air pollution, water pollution.
- Language Objective:
- At the end of the lesson the students will be able to describe noise pollution, water pollution, air pollution.
- Main Activity:
- Review the lesson about pollution.
From their homework let children give their examples of noise pollution, water and air pollution.
Then explain how these things cause pollution.
Example, if we throw trash on the lakes, rivers, and the water it will get dirty and our sea creatures like the fish will die.
- Evaluation:
- Ask a volunteer to demonstrate or re – enact the ways that cause pollution and other children who are seated will say or interpret the action.,
- Vocabulary:
- Noise pollution, air pollution, water pollution.
- Homework:
- Look at the pictures below.
Identify the things you think are harmful to the environment.

- Learning Objective:
- At the end of the lesson the students will be able to give the meaning of reduce, reuse and recycle.
- Language Objective:
- At the end of the lesson the students will be able to give the meaning of reduce, reuse and recycle.
- Main Activity:
- Relate the lesson from the previous lesson by asking the children “ If there are ways that cause pollution, do you think we can still save and protect our earth?
And ask some questions that will give rise to the answer, Recycle.
Unlock the words ;
Reduce – to use less
Reuse - to use again
Recycle – to change something so it can be used again.
Tell the children that these 3 R’s can help protect our environment.
Then ask children , How do they think that by reducing, reusing , recycling will help protect our earth.
Accept all answers.
- Evaluation:
- Ask each child to give more examples of ways on how to reduce, reuse or recycle. Write in journals
- Vocabulary:
- Reduce , reuse , recycle
- Homework:
- Learning Objective:
- At the end of the lesson the students will be able to explain that human activity such as disposal of waste affects the environment.
- Language Objective:
- At the end of the lesson the students will be able to describe some ways to prevent pollution and how to engage in conservation practices.
- Main Activity:
- Recall the lessons about Reduce, Reuse, Recycle.
Then explain to the children that by engaging in these practices, they are already saving the earth.
Because people activities such as dumping of garbage or waste can affect the environment.
Encourage children to develop respect and responsibility for the environment.
Tell them that even in small way they can help like for example, here in the school or even at home.
Whenever they see any trash on the ground of on the floor, they can pick it up and throw it in the proper bin, so for this reason, they already save the environment, because the trash that they picked will not go anymore to the rivers, drainages….
- Evaluation:
- Have each child share their ideas to save and protect the earth.
- Vocabulary:
- landfill
- Homework:
- Learning Objective:
- At the end of the lesson the students will be able to explain that human activity such as disposal of waste affects the environment.
- Language Objective:
- At the end of the lesson the students will be able to discuss the negative effect of landfills to our environment.
- Main Activity:
- Recall the whole week lesson.
Then tell children that landfills also have negative effects.
Because the mixture of chemicals like the bleach and ammonia can produce toxic gases.
And these gases can significantly impact the quality of air in the vicinity of the landfill.
So it will damage our earth.
And since all the trash that people throw like cleaning items or detergent were in landfill it may also cause for the death of our animals because of contamination.
- Evaluation:
- Show a video of landfill and ask children what do they think of it.
- Vocabulary:
- Homework:
- Materials / Resources (including technology)
- Scott Foresman science textbooks, paper, markers, pencils,
- State of Minnesota Standards Covered
- 2.1.1.2.1 Raise questions about the natural world and seek answers by making careful observations, noting what happens when you interact with an object, and sharing the answers with others.
- Weekly Informational Knowledge Overview - (Students will know...)
- At the end of the week, the students will know
• How to save water and electricity.
• How to reuse things that is not been used anymore.
• How to recycle things instead of putting up all in a waste.
• Some human activity brings negative effect in our environment.
• How to prevent wildfire.
- Weekly Procedural Knowledge Overview - (Students will be able to...)
- At the end of the week the students will be able to
• Give ways to help their parents save water and electricity.
• Explain how to reuse the things such as old clothes , containers….
• Name things that can be recycled.
• State causes of wild fire.
• Name ways to prevent wildfire.
Monday
Tuesday
Wednesday
Thursday
Friday
- Learning Objective:
- At the end of the lesson the students will be able to explain how to reduce the use of water and electricity.
- Language Objective:
- At the end of the lesson the students will be able to relate and apply the lesson in real life situation.
- Main Activity:
- Review the previous lessons about the meaning of reduce, reuse, recycle.
Then tell children that, in a simple way they can help save water and electricity.
Ask some ideas from the children on how they can help save water and electricity.
Discuss to them that we have to save water by means of the following ways which they can make in their own simple way such as,
-Don’t let the water continuously flow when they are brushing their teeth.
-Don’t play the water, like when somebody is using water to clean the car don’t play the water in the hose or turn it off while its not in use.
-And when there is some leakage in the pipes ask an adult to fix it or put a bucket while its not yet fixed.
And the water that you collected will be used for watering plants.
Explain to the children that in this simple way they can help conserve our natural resources such as water. And they can also help their parents to save money.
- Evaluation:
- Ask each child to write in journals about how they can save water and electricity.
- Vocabulary:
- Homework:
- Learning Objective:
- At the end of the lesson the students will be able to give the importance of recycling.
- Language Objective:
- At the end of the lesson the students will be able to name things that can be recycled
- Main Activity:
- Today we will be studying what are the things that we can recycle.
How these things can be recycled and make into new things.
Have children name things that are recyclable.
Then show on the monitor how we make new things from these old things.
- Evaluation:
- Individually ask the children to summarize the lessons.
And have them give their own opinion in what way they can help our earth clean.
- Vocabulary:
- Homework:
- Learning Objective:
- At the end of the lesson the students will be able to explain the negative effects wild fire.
- Language Objective:
- At the end of the lesson the students will be able to give ways on how to prevent wildfire.
- Main Activity:
- Relate the lesson by explaining to the children that there are some human activities that cause negative effects to our environment.
Wild fire is one. Ask if they have any ideas about what a wildfire is.
Then explain that wildfire is also known as grass fire or forest fire.
Then tell children that wildfire can damage our trees and may kill our animals too.
- Evaluation:
- How forest fires cause negative effects?
Have children explain their answers.
- Vocabulary:
- Refuge
- Homework:
- How can forest remain if trees are Cut down or destroyed by fire ?
- Learning Objective:
- At the end of the lesson the students will be able to explain how wild fire affects our environment.
- Language Objective:
- At the end of the lesson the students will be able to give some causes of wildfire.
- Main Activity:
- Review the lesson about wildfire.
Ask children if they know any causes of wild fire.
Accept all answers.
Then present the causes of wildfire like the following; human carelessness, arson
- Evaluation:
- Have children explain human carelessness and arson.
- Vocabulary:
- Homework:
- Learning Objective:
- At the end of the lesson the students will be able to explain how wildfire affects our environment.
- Language Objective:
- At the end of the lesson the students will be able to give tips on how to prevent wildfire.
- Main Activity:
- Recall the previous lessons,
Then tell children that we can still prevent wildfire.
By this we can help our trees and animals be save.
These are the tips that we can do to prevent wildfire.
1. Build the campfire on bare soil away from overhanging branches, dry grass, and leaves.
2. Circle the campfire pit with rocks and keep a bucket of water nearby.
3. Never leave a campfire unattended,
4. Never play with matches.
- Evaluation:
- Ask children ti give the tips that we can prevent wildfire.
Then proceed with some craft for mom and dad for valentines day
- Vocabulary:
- Homework:
- Materials / Resources (including technology)
- Scott Foresman science textbooks, paper, markers, pencils,
- State of Minnesota Standards Covered
- 2.1.1.2.1 Raise questions about the natural world and seek answers by making careful observations, noting what happens when you interact with an object, and sharing the answers with others.
- Weekly Informational Knowledge Overview - (Students will know...)
- At the end of the week the students will know
• That there are different kinds of weather.
• That everyday weather changes.
• Daily activities are affected as weather changes.
- Weekly Procedural Knowledge Overview - (Students will be able to...)
- At the end of the week the students will be able to
• Name the different kinds of weather.
• Differentiate wet and dry weather.
• Make a list of four different types of water that falls from the sky.
Monday
Tuesday
Wednesday
Thursday
Friday
- Learning Objective:
- At the end of the lesson, the students will be able to give the meaning of weather.
- Language Objective:
- At the end of the lesson the students will be able to name the different kinds of weather.
- Main Activity:
- Read science book pages about types of weather. Discuss different weather conditions they are/ are not familiar with. Have them write about their favorite kind of weather and share.
- Evaluation:
- Student writing about weather.
- Vocabulary:
- Homework:
- Learning Objective:
- At the end of the lesson the students will be able to identify wet and dry weather.
- Language Objective:
- At the end of the lesson the students will be able to name four different types of water that falls from the sky.
- Main Activity:
- Review the kinds of weather. Show pictures/ short videos of different weather. (Some children may not have ever seen snow or hail). Have students discuss different activities they can do in different weather conditions. Write about it journals.
- Evaluation:
- Journal writing
- Vocabulary:
- Homework:
- How is sleet different from rain?
List four types of water that falls from the sky?
- Learning Objective:
- Language Objective:
- Main Activity:
- Evaluation:
- Vocabulary:
- Homework:
- Learning Objective:
- Language Objective:
- Main Activity:
- Evaluation:
- Vocabulary:
- Homework:
- Learning Objective:
- Language Objective:
- Main Activity:
- Evaluation:
- Vocabulary:
- Homework:
- Materials / Resources (including technology)
- Scott Foresman science textbooks, paper, markers, pencils,
- State of Minnesota Standards Covered
- 2.1.1.2.1 Raise questions about the natural world and seek answers by making careful observations, noting what happens when you interact with an object, and sharing the answers with others.
2.2.1.2.1 Observe, record, and recognize that water can be a solid or a liquid and can change from one state to another.
2.3.2.2.1 Measure, record and describe weather conditions using common tools. For example: Temperature, precipitation, sunrise/sunset, and wind speed/direction.
- Weekly Informational Knowledge Overview - (Students will know...)
- At the end of the week the students will know
• That a drought can happen when it does not rain for a long time.
• Each part of the water cycle.
• How to demonstrate the steps of the water cycle.
• The difference between condensation and evaporation.
- Weekly Procedural Knowledge Overview - (Students will be able to...)
- At the end of the week the students will be able to
• Explain the effect of drought to our environment.
• Explain the steps in the water cycle.
• Show the water cycle through their drawings.
• Give the meaning of evaporation and condensation.
Monday
Tuesday
Wednesday
Thursday
Friday
- Learning Objective:
- At the end of the lesson the students will be able to explain the effects of drought on our environment.
- Language Objective:
- At the end of the lesson the students will be able to describe how the land looks in a drought.
- Main Activity:
- Recall the lessons about wet weather.
Then explain that if there is not much rain, or does not rain for a long time, it is called a drought.
Drought is a dry weather.
Ask children if they can give any place that has no rain. DESERT.
Have them describe a dry place like desert.
Ask them if they can survive in a desert? NO
Have children share their reasons and ideas about drought.
- Evaluation:
- Have each child describe what drought means.
- Vocabulary:
- drought
- Homework:
- Learning Objective:
- At the end of the lesson the students will be able to give the effect of drought to plants and animals
- Language Objective:
- At the end of the lesson the students will be able to describe a land that is very dry in a drought.
- Main Activity:
- Review the previous lesson.
Have a volunteer to tell the class about drought.
Then show some images of the places that are very dry in a drought.
Ask each child to describe it.
From the pictures, have children tell the class the effect of dry weather or drought to animals and plants.
- Evaluation:
- From the discussion, ask children to explain how drought affects our lives.
- Vocabulary:
- Homework:
- Learning Objective:
- Language Objective:
- Main Activity:
-
- Evaluation:
- Vocabulary:
- Homework:
- Learning Objective:
- At the end of the lesson the students will be able to give the meaning of water cycle.
- Language Objective:
- At the end of the lesson the students will be able to say the steps in the water cycle.
- Main Activity:
- Relate the lesson by asking the children about the kinds of weather, Wet and Dry weather.
Ask them if they have any idea why we have rain?
Then show a water cycle image on the monitor.
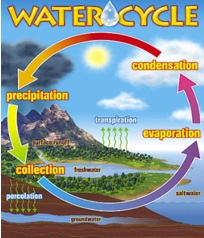
Ask the children why do we call it a water cycle?
Then tell them that the way water moves from the clouds to earth and back to the clouds again is called a water cycle.
Then by looking at the picture, show the steps of how water cycle goes. Explain each part of the cycle to the children. Give the meaning of evaporation, and condensation.
- Evaluation:
- Ask each child to retell the cycle.
- Vocabulary:
- Condensation, evaporation, water cycle.
- Homework:
- What are the steps in the water cycle?
Draw a diagram.
- Learning Objective:
- At the end of the lesson the students will be able to give the meaning of water cycle.
- Language Objective:
- At the end of the lesson the students will be able to say and explain the steps in the water cycle.
- Main Activity:
- Have a volunteer tell about the water cycle.
Have a child draw a diagram of the water cycle.
Each child will be given a chance to explain and demonstrate how the water cycle works.
- Evaluation:
- Worksheet, label the parts of the water cycle.
- Vocabulary:
- precipitation
- Homework:
- What is the difference between condensation and evaporation ?
- Materials / Resources (including technology)
- Scott Foresman science textbooks, paper, markers, pencils,
- State of Minnesota Standards Covered
- 2.1.1.2.1 Raise questions about the natural world and seek answers by making careful observations, noting what happens when you interact with an object, and sharing the answers with others.
2.2.1.2.1 Observe, record, and recognize that water can be a solid or a liquid and can change from one state to another.
2.3.2.2.1 Measure, record and describe weather conditions using common tools. For example: Temperature, precipitation, sunrise/sunset, and wind speed/direction.
- Weekly Informational Knowledge Overview - (Students will know...)
- At the end of the week, the students will know
• How to explain the water cycle.
• The meaning of evaporation, condensation and precipitation.
• The meaning of Season.
• What a Spring Season is like.
- Weekly Procedural Knowledge Overview - (Students will be able to...)
- At the end of the week the students will be able to
• Name the steps in the water cycle.
• Describe evaporation, condensation and precipitation.
• Give some things that happen during spring.
• Explain why spring is an important season.
Monday
Tuesday
Wednesday
Thursday
Friday
- Learning Objective:
- At the end of the lesson the students will be able to explain the water cycle.
- Language Objective:
- At the end of the lesson the students will be able to name the steps in the water cycle.
- Main Activity:
- Recall the introduction of water cycle last Thursday.
Then show the cycle on the board. Have students create posters showing the water cycle. Have them label the different parts with sentences that explain what is happening at each stage.
- Evaluation:
- Water cycle posters.
- Vocabulary:
- Water cycle, evaporation, condensation, precipitation.
- Homework:
- What is the water cycle?
How does water get into the air as a gas?
- Learning Objective:
- At the end of the lesson the students will be able to explain how water evaporates.
- Language Objective:
- At the end of the lesson the students will be able to record their observation from the experiment about evaporation.
- Main Activity:
- Review the water cycle.
Ask a volunteer to name the steps in the water cycle.
Then explain about the experiment on how the water evaporates.
They will use the collected empty water bottles from the recycled items.
We will put water in it. Each child will have his/her own bottle.
Top part is cut wide. We fill the water bottles with water. Mark the water level.
Then cover it with clear transparent plastic tie around with a rubber band.
Bring it outside under the sun.
Then ask children to write down on their experiment sheet their prediction to what will happen on the water in the bottle.
- Evaluation:
- After 30 minutes, collect the bottles outside and ask the children to write down their observation or results.
- Vocabulary:
- Homework:
- Learning Objective:
- At the end of the lesson the students will be able to give the meaning of season and spring.
- Language Objective:
- At the end of the lesson the students will be able to name things that during spring.
- Main Activity:
- Discuss Spring and what happens at that time of year. Show pictures/video. Have children write in journals about spring and what things they can do in that season.
- Evaluation:
- Journals
- Vocabulary:
- Homework:
- How often do the seasons repeat?
Why do you see more plants growing in the spring than in winter?
- Learning Objective:
- At the end of the lesson the students will be able to describe spring season.
- Language Objective:
- At the end of the lesson the students will be able to name things that occur in springtime.
- Main Activity:
- Review the previous lesson.
Then ask children to explain why do we see more plants growing in the spring than in the winter?
Elaborate their answers by giving them explanation on what is the importance of spring.
Then site some examples of plants that grow in spring like the tulips in Holland Michigan.
Deer give birth in the spring.
New leaves start growing on trees.
- Evaluation:
- Ask the children to draw about spring.
- Vocabulary:
- Homework:
- Review for a quiz about water cycle and spring
- Learning Objective:
- At the end of the lesson the students will be able recall the steps in water cycle and define season and spring.
- Language Objective:
- At the end of the lesson the students will be able to draw the water cycle and describe the spring season.
- Main Activity:
- Quiz
- Evaluation:
- Checking of their answers.
- Vocabulary:
- Homework:
- Materials / Resources (including technology)
- Scott Foresman science textbooks, paper, markers, pencils,
- State of Minnesota Standards Covered
- 2.3.2.2.1 Measure, record and describe weather conditions using common tools. For example: Temperature, precipitation, sunrise/sunset, and wind speed/direction.
2.1.1.2.1 Raise questions about the natural world and seek answers by making careful observations, noting what happens when you interact with an object, and sharing the answers with others.
- Weekly Informational Knowledge Overview - (Students will know...)
- At the end of the week the students will know
• That summer has more daylight hours than spring.
• What activities and things happen during summer season?
• That in some places during fall leaves of the trees change colors.
• That some animals hibernate during winter.
• That thunderstorm is dangerous.
- Weekly Procedural Knowledge Overview - (Students will be able to...)
- At the end of the week the students will be able to
• Describe the summer season and name some things happen during this season.
• Differentiate the leaves of the trees from spring, summer and fall.
• Explain why do birds need to migrate during fall season.
• Give some examples of animals that hibernate during winter season.
Monday
Tuesday
Wednesday
Thursday
Friday
- Learning Objective:
- At the end of the lesson the students will be able to describe summer season and why do we have summer season.
- Language Objective:
- At the end of the lesson the students will be able to name some things happen during summer.
- Main Activity:
- Recall the lesson about spring.
Read science book pages about summer. Show pictures of summer. Ask students what their favorite summer activities are. Write in journals about them. Share with the class.
- Evaluation:
- Journals
- Vocabulary:
- Homework:
- What is summer weather like?
What are two activities you can do in the summer?
Why is summer an important season?
- Learning Objective:
- At the end of the lesson the students will be able to describe fall/ Autumn.
- Language Objective:
- At the end of the lesson the students will be able to differentiate the leaves of the tree during fall, summer and spring.
- Main Activity:
- Review about the summer season.
Have the children draw the trees during spring, summer and fall season and ask them to differentiate each tree.
What is the weather and what are the activities that we can do during this season.
- Evaluation:
- Vocabulary:
- Migrate.
- Homework:
- Learning Objective:
- At the end of the lesson the students will be able to compare winter weather to summer weather.
- Language Objective:
- At the end of the lesson the students will be able to name some animals that hibernate during winter season.
- Main Activity:
- Review all the seasons that we discussed.
The next season is winter. Discuss what they know about winter and read science book pages related to winter and seasons.
- Evaluation:
- Ask the children to draw their favorite season and what activities they love to do during that season
- Vocabulary:
- Hibernate
- Homework:
- Why it is important for some animals to hibernate during winter?
- Learning Objective:
- At the end of the lesson the students will be able to explain what is a thunderstorm.
- Language Objective:
- At the end of the lesson the students will be able to give some safety measures when there is thunderstorm.
- Main Activity:
- Ask the children what are the two seasons that have warmer weather.
Spring and Summer has the warmer weather.
Thunderstorm tends to develop during warmer weather.
Ask the children if anybody knows what thunderstorms are.
And ask children, which comes first, lightning or thunder?
Tell them that lightning comes first before thunderstorm.
Show video of a thunderstorm.
- Evaluation:
- Ask each child to explain what a thunderstorm is.
- Vocabulary:
- Thunderstorm, lightning and thunder.
- Homework:
- Learning Objective:
- At the end of the lesson the students will be able to explain what a thunderstorm is.
- Language Objective:
- At the end of the lesson the students will be able to give some safety measures during thunderstorm.
- Main Activity:
- Review the previous lessons.
Ask each child to tell something about thunderstorm.
Then give some safety on thunderstorm.
1. Find a shelter in a building or car.
2. Stay away from water.
3. Stay away from metal objects.
4. Do not stand under a tree.
5. Do not use telephones.
6. Keep away from objects that use electricity.
Explain each safety measures to the children.
Tell them that a thunderstorm has heavy rain with thunder and lightning.
Lightning tends to strike tall objects, they should avoid these.
It also travels quickly through metal objects, water and electrical wires.
- Evaluation:
- They will watch a video or short movie about thunderstorm. Then ask each child what do they learned about thunderstorm.
- Vocabulary:
- Homework:
- What is a thunderstorm?
What things can happen during a thunderstorm?
Why can thunderstorm be dangerous?
- Materials / Resources (including technology)
- Scott Foresman science textbooks, paper, markers, pencils,
- State of Minnesota Standards Covered
- 2.1.1.2.1 Raise questions about the natural world and seek answers by making careful observations, noting what happens when you interact with an object, and sharing the answers with others.
2.3.2.2.1 Measure, record and describe weather conditions using common tools. For example: Temperature, precipitation, sunrise/sunset, and wind speed/direction.
- Weekly Informational Knowledge Overview - (Students will know...)
- At the end of the week the students will know
• That a thunderstorm is a kind of bad weather.
• The safety measures when there is thunderstorm.
• Some impacts of tornadoes.
• How is hurricane different from tornado?
- Weekly Procedural Knowledge Overview - (Students will be able to...)
- At the end of the week the students will be able to
• Describe a thunderstorm.
• Give some ways to be safe when there is a thunderstorm.
• Explain what a tornado is.
• Differentiate tornado from hurricane.
Monday
Tuesday
Wednesday
Thursday
Friday
- Learning Objective:
- At the end of the lesson the students will be able to describe thunderstorm.
- Language Objective:
- At the end of the lesson the student will be able to give ways how to be safe when there is a thunderstorm.
- Main Activity:
- Here are few science and math activities to go with a thunderstorm theme.
• Discuss thunderstorm safety precautions. Then let the students make thunderstorm posters that show ways to be safe during a storm. Hang them around the school.
• Make lightning. Blow up a balloon and turn off all of the lights in the classroom. Rub the balloon on your hair for a few seconds to build up the static electricity. Then hold the balloon near the end of a fluorescent light bulb. The bulb will light up, because the electrical charge will jump to the light bulb when the balloon touches it.
• Teach students how to tell how far away lightning is by counting the number of seconds between the time you see lightning and hear thunder. It takes five seconds for the sound of thunder to go one mile.
Simulate a thunderstorm by flashing the lights on and off to represent lightning. Then count to five slowly and yell "boom" or crash cymbals together for the thunder. The lightning is one mile away. Have students figure out how many seconds they would need to count for the lightning to be 2, 3 or 4 miles away. Then give the students some thunderstorm word problems to solve. If there were 25 seconds between the lightning and thunder, how far away is the lightning? How many seconds would there be if the lightning was 3 miles away?
• Discuss three types of storms: thunderstorms, hurricanes and tornadoes. Make a three circle Venn diagram to show how they are alike and different.
- Evaluation:
- Ask each child to describe a thunderstorm.
Have a volunteer name some ways to be safe when there is a thunderstorm.
- Vocabulary:
- Thunderstorm , lightning , thunder.
- Homework:
- What is a thunderstorm?
What things can happen during thunderstorm?
Why can thunderstorms be dangerous?
- Learning Objective:
- At the end of the lesson the students will be able to explain and describe a tornado.
- Language Objective:
- At the end of the lesson the students will be able to give safety measures when there is a tornado.
- Main Activity:
- Review about thunderstorm.
Then tell children that thunderstorms sometimes produce large funnel – shaped winds called tornadoes.
Describe what a tornado is.
Tell them that tornadoes often carry small pieces of metal or broken glass that travel very fast.
Show a video of tornado.
- Evaluation:
- Ask children to describe a tornado.
- Vocabulary:
- Tornado
- Homework:
- Learning Objective:
- At the end of the lesson the students will be able to describe a tornado.
- Language Objective:
- At the end of the lesson the students will be able to give ways how to be safe when there is a tornado.
- Main Activity:
- DIY Science Experiment #7 - Tornado in a Bottle!
Don’t worry, this mini tornado is not powerful enough to blow you away. The swirling winds of a tornado are called a vertex. In this experiment, you can create a vortex that looks like a real tornado! The water in this experiment moves similarly to air in real life.

Materials:
• Water
• A clear plastic bottle with a cap (about 8 oz)
• Dish washing liquid
• Vinegar
• Glitter (for fun)
Procedure:
1. Fill the bottle three-quarters way with water. Add 1 teaspoon of dish soap and 1 teaspoon of vinegar.
2. Add a few pinches of glitter inside of the bottle.
3. Put the cap on tightly.
4. Twist the jar to swirl the water in a circular motion for a few seconds, until you see your mini tornado forming.
5. If you are having difficult making your tornado by swirling the jar, use a butter knife to swirl the water around quickly. Make sure to have adult supervision.
So, how does it work?
When you spin the bottle in a circular motion, you create a water vortex that looks like a mini tornado. The water spins around the center of the vortex very quickly because of the centripetal force. This fancy term means that an inward force is directing the water towards the center of its circular path. Tornadoes and hurricanes are both examples of vortexes that we see in nature.
- Evaluation:
- Have children write on their journal about the tornado.
- Vocabulary:
- Homework:
- What is a tornado?
- Learning Objective:
- At the end of the lesson the students will be able to explain and describe what a hurricane is.
- Language Objective:
- At the end of the lesson the students will be able to give the impacts of a hurricane.
- Main Activity:
- Recall the previous lessons.
Ask children to give the kinds of extreme weather that we already discussed.
Today they will learn another kind of weather –hurricane/typhoon.
Ask the children if they heard the word hurricane before.
Describe what a hurricane is.
And give the impact of hurricane such as it can knock down trees and buildings.
Explain to the class that the strongest part of the hurricane is the eye wall.
This is the region of strongest wind.
Show in the class how the eye of hurricane formed.
Show a glass half filled of water.
Stir with a stick until the eye is form in the middle.
Show the children that all the pressure is formed in the middle or around the eye.
Have them watch a video of hurricane.
- Evaluation:
- Vocabulary:
- Homework:
- review for a quiz about kinds of bad weather.
- Learning Objective:
- At the end of the lesson the students will be able to explain and describe a hurricane.
- Language Objective:
- At the end of the lesson the students will be able to give the safety measures when there is a hurricane.
- Main Activity:
- Recall the lesson about hurricane.
Tell children that during hurricanes we also have to keep ourselves safe.
Give the ways on how to be safe during hurricane.
Give the quiz
- Evaluation:
- Checking of answers from their quiz.
- Vocabulary:
- Homework:
- How is hurricane different from tornado ?
- Materials / Resources (including technology)
- Scott Foresman science textbooks, paper, markers, pencils, bottle three-quarters way with water. Add 1 teaspoon of dish soap and 1 teaspoon of vinegar, balloons
- State of Minnesota Standards Covered
- 2.3.2.2.1 Measure, record and describe weather conditions using common tools. For example: Temperature, precipitation, sunrise/sunset, and wind speed/direction.
- Weekly Informational Knowledge Overview - (Students will know...)
- At the end of the week the students will know
• How hurricanes formed.
• How fossils are formed.
• The tools that the paleontologist might use in studying fossils.
• Where fossils can be found.
- Weekly Procedural Knowledge Overview - (Students will be able to...)
- At the end of the week the students will be able to
• Differentiate hurricane from thunderstorm and tornadoes.
• Name the people who study fossils.
• Describe what fossils look like.
• Explain how fossils are formed.
• Name the two major types of fossils.
Monday
Tuesday
Wednesday
Thursday
Friday
- Learning Objective:
- At the end of the lesson the students will be able to describe a hurricane.
- Language Objective:
- At the end of the lesson the students will be able to compare and contrast hurricane, thunderstorms and tornadoes.
- Main Activity:
- Recall the kinds of weather.
Compare and contrast different weather events.
- Evaluation:
- Let the children fill a chart to show the similarities and differences between thunderstorm, tornadoes and hurricanes.
- Vocabulary:
- Hurricanes
- Homework:
- What is a hurricane?
How is a hurricane different from a tornado?
- Learning Objective:
- At the end of the lesson the students will be able to describe a fossils.
- Language Objective:
- At the end of the lesson the students will be able to name the people who study fossils and what are the tools they used.
- Main Activity:
- Today they will learn about fossils.
Ask them if they hear the word before.
Define fossil, what does it mean.
And ask if somebody knows what do we call the scientist or people who study fossils.
People that study fossils are called paleontologist.
Explain to the children the reason why scientists look for fossils, (to learn about plants and animals that lived long ago) .
Dinosaur bones are examples of fossils.
The children will all give their ideas about dinosaurs.
Explain that fossils are not only from animals there are also plants fossils.
And paleontologist used different tools in studying fossils such as maps, charts, digging instruments and rulers.
- Evaluation:
- Ask a volunteer to say the meaning of a fossil.
Ask the class to name the people or scientist that study fossils.
- Vocabulary:
- Fossils, paleontologist, paleontology
- Homework:
- What is a fossil?
Why do scientists look for fossils?
- Learning Objective:
- At the end of the lesson the students will be able to describe what a fossil is.
- Language Objective:
- At the end of the lesson the students will be able to identify a plant fossil from an animal fossils.
- Main Activity:
- Review the previous lesson, ask each child to tell the class the meaning of fossils, who are the people that study fossils and what is the science that deals with the study of fossils.
Then tell them that today they are going to do an activity that shows how they can identify animal fossils and plant fossils.
The children will do matching plant and animal fossils by using puzzle cards.
The puzzle cards are made up of print out and they were already cut.
Explain to the children that the fossils and organisms are scrambled on the puzzle sheets and that they are to match them correctly.
- Evaluation:
- Check their works if the fossils match the organisms.
- Vocabulary:
- Homework:
- Learning Objective:
- At the end of the lesson the students will be able to explain how fossils formed.
- Language Objective:
- At the end of the lesson the students will be able to name the 2 major types of fossils.
- Main Activity:
- Review the previous lessons on fossils.
Distribute the textbooks to the children.
Then show to the children some images of different fossils on their book on pages 208 – 209.
Fossils are usually formed in mud or sand that has turned to rock.
This happens over a long time.
Then discuss about the fossils on the book like fossil of a lizard, a plant, and the shell.
- Evaluation:
- Have children retell how fossils formed.
- Vocabulary:
- Body fossils
- Homework:
- What are fossils made from?
Why might animals with shells make good fossils?
- Learning Objective:
- At the end of the lesson the students will be able to describe the two types of fossils.
- Language Objective:
- At the end of the lesson the students will be able to compare body fossils and trace fossils.
- Main Activity:
- Review the previous lesson about how fossils formed.
Then tell children that another type of fossil is a trace fossil.
Trace fossils record the activity of an animal, an examples are footprints, trackways coprolites (fossilized poop)
They show us how animals lived.
Show the example in the book, an animal made a footprint in the mud.
The mud turned to rock.the footprint is another kind of fossil.
Have students use shells, sticks, toy dinosaurs, etc. to make fossil impressions in modeling clay. Have them write about their fossils in their journals.
- Evaluation:
- Fossils, journals
- Vocabulary:
- Homework:
- Materials / Resources (including technology)
- Scott Foresman science textbooks, paper, markers, pencils
- State of Minnesota Standards Covered
- 2.2.1.1.1 Describe objects in terms of color, size, shape, weight, texture, flexibility, strength and the types of materials in the object.
2.1.1.2.1 Raise questions about the natural world and seek answers by making careful observations, noting what happens when you interact with an object, and sharing the answers with others.
- Weekly Informational Knowledge Overview - (Students will know...)
- At the end of the week the students will know
• How fossils are formed.
• How fossils give information about plants and animals that lived on earth long ago.
• The reasons why plants and animals become extinct.
• The different dinosaurs that lived on earth long ago.
- Weekly Procedural Knowledge Overview - (Students will be able to...)
- At the end of the week the students will be able to
• Make their own fossils or imprint of their hand.
• Explain the importance of fossils.
• Name some reasons why plants and animals become extinct.
• Compare the Archaeopteryx to a bird.
Monday
Tuesday
Wednesday
Thursday
Friday
- Learning Objective:
- At the end of the lesson the students will be able to explain how fossils are formed.
- Language Objective:
- At the end of the lesson the students will be able to give the reason why fossils are important.
- Main Activity:
- Review the lesson about fossils.
Then show different images of animals and plants fossils.
Ask them how they think that these imprints were formed.
Then explain how these images of fossils formed.
Tell children that not all fossils are actual plant or animal parts.
Petrified fossils are mineral copies of the original fossils.
Fossils can show us the shape of a plant or animal.
It can also show an animal’s footprint.
Fossils also show us how animal lived, like from their footprint fossil or from their feces( it shows what they had eaten )
- Evaluation:
- Have each child explain how fossils form.
- Vocabulary:
- Petrified, fossilization.
- Homework:
- Learning Objective:
- At the end of the lesson the students will be able to explain how fossils give information about plants and animals that lived long ago.
- Language Objective:
- At the end of the lesson the students will be able to give some reasons why some plants and animals become extinct.
- Main Activity:
- Tell the children that some fossils of plants and animals are extinct.
It means they are no longer live on earth, like the dinosaurs.
Give the reasons why they become extinct like, their habitats no longer met their needs.
Another reason is the environment changed.
Show the image of an Archaeopteryx, this is an extinct plant that looked like a tree. It shows the shape of its leaves.
Show an image of the Archaeopteryx, another extinct animal.
Ask the children what animal looks like this? A bird.
- Evaluation:
- Ask children to draw a fossil and write something about it.
- Vocabulary:
- Archaeopteryx, extinct.
- Homework:
- How does an Archaeopteryx compare to a bird today?
(It is larger, scalier, and has larger claws than many of today’s birds) What is an extinct plant or animal? (One that no longer lives on earth)
What is an extinct plant or animal?
(One that no longer lives on earth)
- Learning Objective:
- At the end of the lesson the students will be able to describe different dinosaurs that lived on earth long ago.
- Language Objective:
- At the end of the lesson the students will be able to differentiate each kind of dinosaurs such as compsognathus from barosaurus.
- Main Activity:
- Tell them that dinosaurs are extinct animals, review the word extinct, ask the children the meaning of the word.
From their examples have them give the differences of each dinosaurs. Accept all answers.
Then explain that dinosaurs have different sizes.
Show an image of compsognathus and barosaurus.
Have children differentiate these two kinds of dinosaurs.
- Evaluation:
- Have children name two dinosaurs and give their differences.
- Vocabulary:
- Homework:
- Which dinosaur was more likely to eat a compsognathus, a dilophosaurus or an iguanodon? (a dilophosaurus because it ate animals and an iguanodon ate plants.
How is a compsognathus different from a barosaurus?
- Learning Objective:
- Language Objective:
- Main Activity:
- Evaluation:
- Vocabulary:
- Homework:
- Learning Objective:
- Language Objective:
- Main Activity:
- Evaluation:
- Vocabulary:
- Homework:
- Materials / Resources (including technology) Scott Foresman science textbooks, paper, markers, pencils, clay
- State of Minnesota Standards Covered
- 2.1.1.2.1 Raise questions about the natural world and seek answers by making careful observations, noting what happens when you interact with an object, and sharing the answers with others.
- Weekly Informational Knowledge Overview - (Students will know...)
- At the end of the week the students will know
• Different dinosaurs that lived on Earth long ago.
• That some dinosaurs eat plants, some eat animals.
• The different characteristics of some dinosaurs like triceratops, tyrannosaurus rex, stegosaurus.
• How new discoveries are made by paleontologists.
- Weekly Procedural Knowledge Overview - (Students will be able to...)
- At the end of the week the students will be able to
• Describe different dinosaurs that lived on earth long ago.
• Write the differences and similarities of some dinosaurs.
• Categorize the dinosaurs as plant eater or animal eater.
• Explain how new discoveries are made by paleontologist
Monday
Tuesday
Wednesday
Thursday
Friday
- Learning Objective:
- At the end of the lesson the lesson the students will be able to name some dinosaurs.
- Language Objective:
- At the end of the lesson the students will be able to describe each kind of dinosaur.
- Main Activity:
- Recall about the previous lesson what can we learn from fossils.
Tell children that today they will learn more about dinosaurs.
Give each child a book.
Open it on page 212 – 213.
Have them look at the pictures of the dinosaurs like compsognathus, iguanodon, barosaurus, and dilophosaurus.
Ask a volunteer to name the dinosaurs on the book.
Ask a volunteer to describe compsognathus, barosaurus, dilophosaurus, iguanodon.
- Evaluation:
- Have children answer the following questions;
Which dinosaur was about a size of a chicken?
Which dinosaur ate other dinosaurs?
- Vocabulary:
- Homework:
- Have children answer the following questions;
Which dinosaur was about a size of a chicken?
Which dinosaur ate other dinosaurs?
- Learning Objective:
- At the end of the lesson the students will be able to name some dinosaurs that eat plants, herbivores and eat meat, carnivores
- Language Objective:
- At the end of the lesson the students will be able to differentiate each kind of dinosaur.
- Main Activity:
- Review on previous lesson.
Ask the children what do they still remember about the dinosaurs.
Explain that some dinosaurs eat plants so we called them herbivores like the iguanodon, stegosaurus.
And some are meat eater like the tyrannosaurus rex and dilophosaurus.
The children will share more of their ideas about dinosaurs.
They will interact and discuss what have they learned about dinosaurs.
- Evaluation:
- Have children identify the herbivore dinosaurs and carnivore dinosaurs.
- Vocabulary:
- Homework:
- Prepare for a quiz tomorrow on fossils and dinosaurs.
- Learning Objective:
- At the end of the lesson the students will be able to name dinosaurs.
- Language Objective:
- At the end of the lesson the students will be able to differentiate each kind if dinosaur.
- Main Activity:
- Quiz
- Evaluation:
- Checking of their test papers.
- Vocabulary:
- Homework:
- Learning Objective:
- At the end of the lesson the students will be able to differentiate the dinosaurs.
- Language Objective:
- At the end of the lesson the students will be able to give the differences of some dinosaurs.
- Main Activity:
- Start the lesson by asking the children, who among them wants to eat chicken? Pork? And vegetable?
Relate the lesson by telling them that dinosaurs also have differences in the food they eat as we mentioned from the past lesson.
They are also different in their sizes, movements.
Have children Watch a video on walking with dinosaurs.
- Evaluation:
- Have each child describe and retell what they watched.
- Vocabulary:
- Homework:
- Learning Objective:
- At the end of the lesson the students will be able to summarize the whole week lesson.
- Language Objective:
- At the end of the lesson the students will be able to create their own fossil.
- Main Activity:
- Fossil making.
Children will create their own choice of fossil.
They will draw or trace their fossil using the plaster of Paris.
- Evaluation:
- Ask them about their work.
- Vocabulary:
- Homework:
- Materials / Resources (including technology)
- Scott Foresman science textbooks, paper, markers, pencils
- State of Minnesota Standards Covered
- 2.1.1.2.1 Raise questions about the natural world and seek answers by making careful observations, noting what happens when you interact with an object, and sharing the answers with others.
- Weekly Informational Knowledge Overview - (Students will know...)
- At the end of the week the students will know
• What an oviraptor egg looks like.
• What are some discoveries of the paleontologists?
• The meaning of matter.
• That matter has different properties.
• The three states of matter.
- Weekly Procedural Knowledge Overview - (Students will be able to...)
- At the end of the week the students will be able to
• Retell the new discoveries of paleontologists about the oviraptor.
• Site examples of matter.
• Sort out things according to their properties.
• Describe each states of matter.
• Give examples of solid, liquid, gas
Monday
Tuesday
Wednesday
Thursday
Friday
- Learning Objective:
- At the end of the lesson the students will be able to explain how paleontologists make new discoveries.
- Language Objective:
- At the end of the lesson the students will be able to describe an oviraptor eggs.
- Main Activity:
- Review the lessons on dinosaurs.
Ask children to differentiate some of the dinosaurs.
Also recall what did paleontologists learn about a stegosaurus by looking at its bones.
Today tell children that they are going to learn about some new discoveries.
Show a picture or image of an oviraptor egg in the monitor.
Then explain to the children the findings of the paleontologists about oviraptor.
- Evaluation:
- Ask each child to retell what the paleontologists learned about the oviraptor.
- Vocabulary:
- Oviraptor
- Homework:
- How large are oviraptor eggs?
Why was it important for the oviraptor to stay close to her eggs?
- Learning Objective:
- At the end of the lesson the students will be able to define matter.
- Language Objective:
- At the end of the lesson the students will be able to site an examples of matter.
- Main Activity:
- Tell them that everything they see is made of matter.
Matter is anything that takes up space and has mass.
Mass is the amount of matter in an object.
Even some things that we cannot see like air is matter.
Crayons, boards, shoes, chair, these are all made up of matter.
Matter is made up of very small particles that we need to use a hand lens or microscope.
- Evaluation:
- Have a volunteer to say the definition of matter. Have each child give an example of matter.
- Vocabulary:
- Matter, mass
- Homework:
- Learning Objective:
- At the end of the lesson the students will be able to name the properties of matter.
- Language Objective:
- At the end of the lesson the students will be able to classify things base on their properties.
- Main Activity:
- Review the meaning of matter.
Today, tell the children that they will learn about different properties of matter.
Have them gather a group of classroom materials. Take turns describing them (hard, soft, rough, smooth, etc)
Have them pick two different items to draw and describe in their journals.
- Evaluation:
- Journal writing about properties of matter.
- Vocabulary:
- Property
- Homework:
- What are some properties of matter?
Tell four ways you can sort objects using properties.
- Learning Objective:
- At the end of the lesson the students will be able to name the states of matter.
- Language Objective:
- At the end of the lesson the students will be able to differentiate solid, liquid and gas.
- Main Activity:
- Review the meaning of matter.
Review the properties.
Today tell children that they are going to learn about the states of matter.
These are solid, liquid, gas.
Think of some solids you see everyday.
- Evaluation:
- Ask children to give more examples of solids- write in journals.
- Vocabulary:
- Solid , liquid , gas
- Homework:
- Learning Objective:
- At the end of the lesson the students will be able to name the states of matter.
- Language Objective:
- At the end of the lesson the students will be able to differentiate solid, liquid and gas.
- Main Activity:
- Review solids.
Then introduce liquids.
Show a water in a jar, and borrow the transparent juice bottle of one of the kids.
Show them to the children; have them express their ideas about the two liquids.
What can they say about this?
Liquid is a matter that does not have its own shape.
It takes the shape of their containers like these two different containers.
It takes up space and has mass.
One way to measure liquid. Is to use measuring cups.
The amount of space a liquid takes up is called volume.
What are some liquids that you know? Name three in your journal and illustrate.
- Evaluation:
- Journal
- Vocabulary:
- Homework:
- Materials / Resources (including technology)
- Scott Foresman science textbooks, paper, markers, pencils
- State of Minnesota Standards Covered
- 2.1.1.2.1 Raise questions about the natural world and seek answers by making careful observations, noting what happens when you interact with an object, and sharing the answers with others.
2.2.1.1.1 Describe objects in terms of color, size, shape, weight, texture, flexibility, strength and the types of materials in the object.
2.2.1.2.1 Observe, record, and recognize that water can be a solid or a liquid and can change from one state to another.
- Weekly Informational Knowledge Overview - (Students will know...)
- At the end of the lesson the students will know
• The properties of gases.
• That matter can be changed in different ways.
• Molding, tearing, folding and bending, can change solid matter.
• The different mixtures
- Weekly Procedural Knowledge Overview - (Students will be able to...)
- At the end of the week the students will be able to
• Describe what a gas is and give some examples of it.
• Demonstrate how solid matter can be changed .
• Differentiate physical from chemical properties.
• Observe and Compare different mixtures such as sand mixing with water, salt mixing with water, fruit salad mixing.
Monday
Tuesday
Wednesday
Thursday
Friday
- Learning Objective:
- At the end of the lesson the students will be able to explain the properties of gas.
- Language Objective:
- At the end of the lesson the students will be able to give some examples of gas.
- Main Activity:
- Review states of matter.
Introduce the third state of matter, which is Gas.
Tell whether if it is a solid, liquid and gas worksheet.
- Evaluation:
- worksheet
- Vocabulary:
- Gas, oxygen, helium, carbon dioxide
- Homework:
- How is the shape of a gas different from the shape of a solid?
What will happen to the gas inside the balloons if the balloons are popped?
Graphic organizer to fill up.
- Learning Objective:
- At the end of the lesson the students will be able to explain that solid matter can be changed in many different ways.
- Language Objective:
- At the end of the lesson the students will be able to make a different art work by cutting, tearing, molding to show that matter can change its size and shape.
- Main Activity:
- Demonstrate in the class, tearing of paper, bending a pipe cleaner, and cutting a card.
Ask children what happens to the paper and what properties have changed?
Artwork activity: Give them the materials they need like clay, scissors, glue, colored paper.
Explain that they are going to make their artwork by using any ways that matter can be changed.
- Evaluation:
- Ask each child about his/her work, how is matter changed?
- Vocabulary:
- Homework:
- Learning Objective:
- At the end of the lesson the students will be able to explain the meaning of mixture.
- Language Objective:
- At the end of the lesson the students will be able to compare and contrast the sand mixture from salt or sugar mixture.
- Main Activity:
- Recall the past lessons and the activities they did.
Tell them that today they are going to observe different mixtures.
Give the meaning of mixture.
On the table show to the children, sand, cup with water and salt and another cup with water, sugar and cup of water.
Give them their observation sheets to fill up after the demonstration.
Have them record their observation on what they can see in the mixture of sand and from the mixture of salt.
- Evaluation:
- Ask the children about their observation; let them share it with the class.
- Vocabulary:
- Homework:
- What is a mixture?
Draw 2 things being mixed.
- Learning Objective:
- At the end of the lesson the students will be able to give the meaning of mixture.
- Language Objective:
- At the end of the lesson the students will be able to separate a mixture to see its parts.
- Main Activity:
- Recall the lessons from past 3 days.
Then tell them that today they will learn that we can separate a mixture to see its parts.
Show them the different fruits like apple, banana, and pineapple in a can.
And a fruit juice.
Explain that they will make a fruit salad.
They have to observe the properties of matter and record their observation.
After the activity they can eat their yummy fruit salad.
- Evaluation:
- Describe what they saw and found out in the fruit salad making
- Vocabulary:
- Homework:
- Homework about mixture
- Learning Objective:
- Language Objective:
- Main Activity:
- Evaluation:
- Vocabulary:
- Homework:
- Materials / Resources (including technology)
- Scott Foresman science textbooks, paper, markers, pencils
- State of Minnesota Standards Covered
- 2.1.1.2.1 Raise questions about the natural world and seek answers by making careful observations, noting what happens when you interact with an object, and sharing the answers with others.
2.2.1.1.1 Describe objects in terms of color, size, shape, weight, texture, flexibility, strength and the types of materials in the object.
2.2.1.2.1 Observe, record, and recognize that water can be a solid or a liquid and can change from one state to another.
- Weekly Informational Knowledge Overview - (Students will know...)
- At the end of the week the students will know
• How to separate the substances in a mixture.
• That not all objects or things respond to change in the same way.
• How heating and cooling affects a thing.
• Different process of changing states of matter like melting.
- Weekly Procedural Knowledge Overview - (Students will be able to...)
- At the end of the week the students will be able to
• Demonstrate how to separate mixtures to see their parts.
• Explain how heating and cooling affects an object.
• Explain different processes in changing states of matter, solid to liquid, liquid to solid, liquid to gas.
• Record datas base on their experiments.
Monday
Tuesday
Wednesday
Thursday
Friday
- Learning Objective:
- At the end of the lesson the students will be able to explain what a mixture is.
- Language Objective:
- At the end of the lesson the students will be able separate mixtures to see its parts.
- Main Activity:
- Recall the activities on mixtures, such as mixing oil and water , sand and water.
Then today, tell children we will be mixing solids like fruits with liquid which is an apple juice.
Show the different fruits to the children.
Ask them are these solids or liquid?
Show apple juice; ask the children solid or liquid?
Then make two groups. Each group will do their own mixture of fruit salad.
Then when they are done with the mixture, ask them to separate the solids from liquid.
By filling the cups for each member, then they can eat their own mixture, fruit salad mixture.
- Evaluation:
- Ask the children to explain how do they separate the mixture to see its parts. Have them write it in their observation sheet.
- Vocabulary:
- Homework:
- Learning Objective:
- At the end of the lesson the students will be able to explain the effect of cooling on an object.
- Language Objective:
- At the end of the lesson the students will be able explain how liquid change to solid, liquid to gas .
- Main Activity:
- Review the lesson on mixture.
Ask the children what is the liquid that we used in those mixtures. Water.
Then tell children that today they will learn about on how liquid like water will change to solid, and liquid to gas.
Ask children if they have any idea on how water turn to solid.
- Evaluation:
- Have children explain how water can change to solid.
- Vocabulary:
- Homework:
- How is cooling a solid different from cooling a liquid.
- Learning Objective:
- At the end of the lesson the students will be able to explain the effect of heating on an object.
- Language Objective:
- At the end of the lesson the students will be able to give an examples of solid turns to liquid, liquid to gas.
- Main Activity:
- Distribute an observation sheet to the children.
Then show two cups with ice on each.
One will be placed inside the room and the other will be placed outside.
Have children write their inferences in their observation sheet.
Which will melt faster?
Ask children to go out of the classroom to show where will we place the cup with ice.
Compare the result from the cup with ice that stayed in the classroom.
Take the temperature of each cup.
- Evaluation:
- Record their observation and explain the results in their sheets.
- Vocabulary:
- Homework:
- How is melting similar to evaporation?
What will happen to the temperature of cold water that is put on a hot stove?
- Learning Objective:
- Language Objective:
- Main Activity:
- Evaluation:
- Vocabulary:
- Homework:
- Learning Objective:
- At the end of the lesson the students will be able to explain how heating affects an object.
- Language Objective:
- At the end of the lesson the students will be able to give an examples of how solid change to liquid and liquid to solid, liquid to gas.
- Main Activity:
- Then have children recall the water cycle.
Ask if anybody can explain how can water in liquid state change to water vapor, gas state.
Then give the children another observation sheet.
Show a candle.
Ask the children what will happen to candle if we will light it.
Have then write their inferences.
Give precautions as the teacher lights the candle.
Have children observe.
- Evaluation:
- Ask each child to explain his/her conclusions.
Then write it in the sheet.
- Vocabulary:
- Melting, wax
- Homework:
- Materials / Resources (including technology)
- Scott Foresman science textbooks, paper, markers, pencils
- State of Minnesota Standards Covered
- 2.1.1.2.1 Raise questions about the natural world and seek answers by making careful observations, noting what happens when you interact with an object, and sharing the answers with others.
2.2.1.2.1 Observe, record, and recognize that water can be a solid or a liquid and can change from one state to another.
- Weekly Informational Knowledge Overview - (Students will know...)
- At the end of the week, the students will be able to know
• That energy exist in many forms, such as chemical energy nuclear energy, kinetic energy, solar energy
• That sun supplies heat and light energy to earth.
• Ways energy and matter interact (example, sunlight affects plant growth)
• How to classify food groups.
• The relationship of food to the need for energy for daily activities.
- Weekly Procedural Knowledge Overview - (Students will be able to...)
- At the end of the lesson the students will be able to
• Name activities that use energy.
• Cite some forms of energy like solar energy, kinetic energy, chemical energy, and nuclear energy.
• Explain what solar energy is and how living things and the earth benefits from it.
• Explain how we get energy from different food groups.
Monday
Tuesday
Wednesday
Thursday
Friday
- Learning Objective:
- At the end of the lesson the students will be able to explain what Is Energy.
- Language Objective:
- At the end of the lesson the students will be able to name some activities that use energy.
- Main Activity:
- Have children stand and sing hop bunnies as they do the action…hopping
Then have them play the game hot potato.
After the song and game, ask them how do they feel …tired.
What did they do? Hop and move. Why? Because they have energy.
Energy is anything that can do work and cause change.
Mention more activities that you use energy such as running, walking, biking, and jumping.
Energy has different sources.
And energy has different forms such as nuclear energy, (explain) electrical (explain) geothermal energy (brief explanation) and solar energy.
We get light and heat energy from the sun.
- Evaluation:
- Ask to give the meaning of energy.
Have children give examples where we use energy.
- Vocabulary:
- Homework:
- How do you know that soccer players have energy?
What is one way that you use energy?
- Learning Objective:
- At the end of the lesson the students will be able to explain how do people use solar energy.
- Language Objective:
- At the end of the lesson the students will be able to name things or activity that needs sunlight.
- Main Activity:
- Review the lesson from the other day.
Discuss solar energy. Read science book pages related to solar energy.
What makes solar energy?
How would earth be different without sunlight?
How do we use solar energy?
Write answers in journals.
- Evaluation:
- Journals
- Vocabulary:
- Solar energy
- Homework:
- Learning Objective:
- At the end of the lesson the students will be able to identify two types of energy, Kinetic and Potential.
- Language Objective:
- At the end of the lesson the students will be able to differentiate kinetic from potential energy.
- Main Activity:
- Review the past lessons.
Then ask children to stand.
Have them clap their hands.
Tell them that when they clapped their hands , this type of energy is kinetic energy write it on the board,which means energy in motion.
Show them a pencil on the table. Roll the pencil, another kinetic energy.
Potential energy when the pencil is just on the table and not moving.
Show another example in the monitor like a boy preparing to climb a mountain.
Give more examples on kinetic and potential energy.
Write about these two types of energy in journals. List at least one of each.
- Evaluation:
- Journals
- Vocabulary:
- Kinetic and potential energy
- Homework:
- Look at the pictures below , write the number of each picture in the column where do they belong.
- Learning Objective:
- At the end of the lesson the students will be able to identify kinetic energy and potential energy.
- Language Objective:
- At the end of the lesson the students will be able to give examples of kinetic energy and potential energy.
- Main Activity:
- Review the previous lessons, and then ask the children to differentiate kinetic energy from potential energy.
Have them site examples of each.
Then ask the children where do they get their energy?
From the food we eat.
Food gives us energy to work and play.
Food gives you energy to grow.
(To be continued tomorrow)
- Evaluation:
- Have children explain kinetic and potential energy.
- Vocabulary:
- Homework:
- Learning Objective:
- At the end of the lesson the students will be able to name the food groups that our body need.
- Language Objective:
- At the end of the lesson the students will be able to classify foods into different food groups.
- Main Activity:
- Review the lesson on how we get energy and where do we get energy.
Explain to the children that we don’t only need one certain or kind of food.
There are five food groups that our body needs.
Start with fruits and vegetables.
Identify which food belongs to fruits and which belongs to vegetables.
- Evaluation:
- Ask the children to identify if it is a fruit or vegetables.
- Vocabulary:
- Homework:
- Materials / Resources (including technology)
- Scott Foresman science textbooks, paper, markers, pencils
- State of Minnesota Standards Covered
- 2.4.1.1.1 Describe and sort plants into groups in many ways, according to their physical characteristics and behaviors
- Weekly Informational Knowledge Overview - (Students will know...)
- At the end of the week the students will know
• That there are five food groups that our body needs.
• Which types of foods should they eat in the smallest amounts?
• Different sources of heat for example, friction, solar.
• That heat energy flows from warmer objects to cooler objects causing them to become warmer.
- Weekly Procedural Knowledge Overview - (Students will be able to...)
- At the end of the week the students will be able to
• Name the five food groups that our body needs.
• Classify different food into their groups.
• Give some sources of heat.
• Explain what a conductor and an insulator are.
Monday
Tuesday
Wednesday
Thursday
Friday
- Learning Objective:
- At the end of the lesson the students will be able to name the five food groups that a body needs.
- Language Objective:
- At the end of the lesson the students will be able to classify things into different groups.
- Main Activity:
- Recall the lessons from the past week.
Then show the children again the images of fruits and vegetable, have them classify them.
Introduce to the children the 3 more groups of food, protein group that includes meat, fish, eggs, dry beans.
Dairy group which includes milk, yogurt, cheese and the grains and and cereals group which includes bread and pasta .
Explain the importance of these food groups like fruits and vegetables give many vitamins and minerals that can help you stay healthy.
- Evaluation:
- Sort out and classify foods into their groups.
- Vocabulary:
- Calorie, minerals, vitamins,
- Homework:
- Name one food from each food group.
Which types of foods should you eat in the smallest amount?
- Learning Objective:
- At the end of the lesson the students will be able to name sources of heat.
- Language Objective:
- At the end of the lesson the students will be able to explain what fuel is and in which parts of the country do people need to use the most fuel to heat their homes.
- Main Activity:
- Have children think about which activities they like to do in the sun and which activities they like to do in the shade, describe and give reasons.
Elaborate their answers.
Explain that one source of heat is the sun.
Heat also gives us energy.
Mention some sources of heat like rubbing your hands together, heat from a candle, rubbing an eraser in a piece of paper.
Show an image of campfire, have children describe it.
Wood is a kind of fuel; Fuel is something that is burned to make heat.
Coal, gas, and oil are other kinds of fuels.
Name some countries like Alaska that use fuel to heat their homes.
- Evaluation:
- Workbook p. 106
- Vocabulary:
- Fuel , friction ,source
- Homework:
- What are two examples of fuels?
What is a source of heat inside your home?
- Learning Objective:
- AT the end of the lesson the students will be able to name sources of heat.
- Language Objective:
- At the end of the lesson the students will be able to explain how heat flows and explain what a conductor is.
- Main Activity:
- Review the sources of heat.
Then explain to the children that heat can move from warmer objects and places to cooler ones.
Show them an empty glass have them feel it, its cold.
Now put some hot water in it, have children feel it again.
Ask them what change happened? The glass becomes warm.
Site another examples of how heat flows like in cooking.
Heat moves from the hot burner on the stove to the pan, then heat moves from the hot pan to the cold food.
Explain to the children that some pans are made up of metals, and metals are good conductors.
A conductor is something that lets heat easily move through it.
Give precautions to the children about it.
- Evaluation:
- Give me some examples of how heat moves.
- Vocabulary:
- Homework:
- Which of these objects, conducts heat best? Piece of wood, steel, fork, cloth coat.
Which type of pot handle would be safer to hold while cooking, a metal handle or a wood handle?
- Learning Objective:
- At the end of the lesson the students will be able to retell how heat moves.
- Language Objective:
- At the end of the lesson the students will be able to differentiate a conductor and an insulator.
- Main Activity:
- Review the previous lesson.
Then Ask the children who among them uses blanket when they sleep, and why?
Explain that blankets and clothing are useful because they are insulators.
Insulators are materials that do not conduct heat very well.
Site examples.
Insulation in homes keeps heat in and out.
Just as is used to keep people warm, it can also be used to keep them cool.
- Evaluation:
- Ask the children to tell whether it is an insulator or conductor.
- Vocabulary:
- Homework:
- Learning Objective:
- At the end of the end of the lesson the students will be able to retell the lessons for the week.
- Language Objective:
- At the end of the lesson the students will be able to discuss heat sources and ways energy and matter interact.
- Main Activity:
- Ask individually to stand in front and retell the lessons for the whole week.
Have them ask questions to each other.
This will build their self confidence and communication skills.
- Evaluation:
- Assessment sheet.
- Vocabulary:
- Homework:
- Materials / Resources (including technology)
- Scott Foresman science textbooks, paper, markers, pencils
- State of Minnesota Standards Covered
- 2.1.1.2.1 Raise questions about the natural world and seek answers by making careful observations, noting what happens when you interact with an object, and sharing the answers with others.
2.1.2.2.2 Describe why some materials are better than others for making a particular object and how materials that are better in some ways may be worse in other ways. For example: Objects made of plastic or glass.
2.1.2.2.3 Explain how engineered or designed items from everyday life benefit people.
2.2.1.1.1 Describe objects in terms of color, size, shape, weight, texture, flexibility, strength and the types of materials in the object.
- Weekly Informational Knowledge Overview - (Students will know...)
- At the end of the week the students will be able to know
• How heat moves from warmer objects and places to cooler ones.
• That some materials will allow light to pass through and others will not.
• What a reflection is.
• That shadows change during the day.
- Weekly Procedural Knowledge Overview - (Students will be able to...)
- At the end of the lesson the students will be able to
• Differentiate insulator and conductor.
• Explain how and where light reflects.
• Demonstrate how shadows form.
• Explain how the shadows change during the day.
Monday
Tuesday
Wednesday
Thursday
Friday
- Learning Objective:
- At the end of the lesson the students will be able to explain how heat moves from warmer objects or places to cooler ones.
- Language Objective:
- At the end of the lesson the students will be able to differentiate conductor and insulator.
- Main Activity:
- Today tell children that they are going to learn about how heat moves from warmer objects or places to cooler ones.
Explain conductor.
Explain insulator.
Read science book pages on conductors and insulators. Give examples of each in journal and explain.
- Evaluation:
- Journals
- Vocabulary:
- Insulator , conductor.
- Homework:
- Learning Objective:
- At the end of the lesson the students will be able to explain how light passes through some objects.
- Language Objective:
- At the end of the lesson the students will be able to explain that light moves in straight line and can also change its directions.
- Main Activity:
- Dim the classroom lights. Shine a flashlight at the board.
Ask children to describe the path of the light.
Then shine the flashlight on the mirror.
Help children understand that light travels in a straight path.
- Evaluation:
- Have each child explain how light moves.
- Vocabulary:
- Homework:
- Learning Objective:
- At the end of the lesson the students will be able to explain light passes through some objects.
- Language Objective:
- At the end of the lesson the students will be able to demonstrate how light reflects.
- Main Activity:
- Review the previous lessons.
Then tell children that light can also move through some things such as clear glass.
That light reflects when it bounces off something.
It reflects well from smooth, shiny things such as a mirror.
Then dim the light again, on the flashlight pointing the tv monitor.
Show them how light reflects on this object.
- Evaluation:
- Ask a volunteer to explain how light travels and how rainbows form.
- Vocabulary:
- Reflect
- Homework:
- Learning Objective:
- At the end of the day the students will be able to explain how light moves.
- Language Objective:
- At the end of the lesson the students will be able to describe how rainbows form.
- Main Activity:
- Review the previous lesson. Then continue the discussion about rainbow formation. Have the children give the colors of the rainbow.
- Evaluation:
- Ask each child to stand in front and retell the lesson. Vocabulary:
- Vocabulary:
- Homework:
- How is rainbow made? Use crayons to show the seven colors in a rainbow.
- Learning Objective:
- At the end of the lesson the students will be able to identify which colors take in light.
- Language Objective:
- At the end of the lesson the students will be able to explain why light colors cooler to wear than dark colors.
- Main Activity:
- Recall the lessons from the whole week.
Then explain to the children that light colors reflect the sunlight so it is cooler to wear, especially during hot season.
The dark colors take in light and you might feel warm when you wear dark colors in the sunlight.
Mention the colors that are considered dark. And colors that are light.
Let children go outside the room and stay under the sunlight for few minutes.
Ask those children who wear dark colors if they feel warm.
Ask those children who wear light colors; ask them too if they feel warm or cooler.
Have the children compare how they feel.
- Evaluation:
- Workbook activity
- Vocabulary:
- Dark colors, light colors.
- Homework:
- Materials / Resources (including technology)
- Scott Foresman science textbooks, paper, markers, pencils
- State of Minnesota Standards Covered
- 2.1.1.2.1 Raise questions about the natural world and seek answers by making careful observations, noting what happens when you interact with an object, and sharing the answers with others.
2.2.1.1.1 Describe objects in terms of color, size, shape, weight, texture, flexibility, strength and the types of materials in the object.
2.2.2.1.2 Demonstrate that objects move in a variety of ways, including a straight line, a curve, a circle, back and forth, and at different speeds. For example: Spinning toy and rocking toy. Another example: Construct objects that will move in a straight line or a curve such as a marble or toy car on a track.
- Weekly Informational Knowledge Overview - (Students will know...)
- At the end of the week the students will know
• That objects exhibit different kinds of motion.
• That the amount and direction of the force exerted on an object determines how much the object will move.
• What is gravity?
• That there is a relationship between force and motion.
- Weekly Procedural Knowledge Overview - (Students will be able to...)
- At the end of the week the students will be able to
• Demonstrate how are pushes and pulls related to motion.
• Name different ways that an object can move like straight, zigzag, in a circle, back and forth.
• Explain when they might use a pulling force and a pushing force.
• Explain what would happen if there were no gravity.
Monday
Tuesday
Wednesday
Thursday
Friday
- Learning Objective:
- At the end of the lesson the students will be able to give the meaning of motion.
- Language Objective:
- At the end of the lesson the students will be able to name different ways that an object can move.
- Main Activity:
- Give the meaning of motion.
Point out to children that motion involves a change in position.
Demonstrate this by standing in the middle of the classroom and walking in different directions.
Describe how your position is changing.
Tell them that they can describe motion by telling the direction in which they are moving with such words as toward the door, away from the board, to the left, to the right, up and down.
- Evaluation:
- Group the children into 4 groups.
Then have each group demonstrate their motion.
And some groups will describe the motion.
- Vocabulary:
- Motion
- Homework:
- What is an object doing if it is in motion?
What are different ways that an object can move?
What is something that moves in a circle ?
- Learning Objective:
- At the end of the lesson the students will be able to tell the amount of the force exerted on an object.
- Language Objective:
- At the end of the lesson the students will be able to demonstrate a pulling force and a pushing force.
- Main Activity:
- Review the lesson on motion.
Then introduce the new lesson by asking children if they have played tug of war.
Have 4 volunteers to demonstrate it.
Then tell children that pulling a rope is a force.
Write the word force on the board.
Explain that a push or pull that makes something move is called a force.
Show more on push and pull activity.
- Evaluation:
- Do the action and have children identify if it is a push or pull.
- Vocabulary:
- Force, push, pull
- Homework:
- Learning Objective:
- At the end of the lesson the students will be able to explain what gravity is.
- Language Objective:
- At the end of the lesson the students will be able to discuss the importance of gravity.
- Main Activity:
- Review the lessons about motion and force.
Then introduce the new lesson, Gravity.
Ask the children on how do they understand the word gravity.
Show some activity like throwing the ball, where do the leaves go when they fall off the tree, why we are not floating, so on….
- Evaluation:
- Ask each child to explain the importance of gravity.
- Vocabulary:
- Homework:
- Learning Objective:
- At the end of the lesson the students will be able to explain the relationship between force and motion.
- Language Objective:
- At the end of the lesson the students will be able to identify when work is done or not.
- Main Activity:
- Ask one volunteer to stand and push the wall as hard as he / she can for 30 seconds.
Then another volunteer to push a pencil across a desk.
Ask the children who did work?
Explain that work happens whenever a force makes an object move.
If an object does not move, no work is done.
Site another example like pushing a shopping cart, a full shopping cart.
Is it easier or harder?
Is there work or no work done?
mphasize to the children that, Force and motion are the two things required for work to be done.
- Evaluation:
- Have children site an example where work is done.
- Vocabulary:
- work
- Homework:
- What are the two things required for work to be done?
Circle the picture where work is done. ( images provided )
Review for a quiz tomorrow.
- Learning Objective:
- At the end of the lesson the students will be able to recall the lesson that were discussed the whole week.
- Language Objective:
- At the end of the lesson the students will be able to explain how force, motion are related.
- Main Activity:
- Review the past lessons for the whole week. Quiz.
- Evaluation:
- Question and answer about the topics that we discussed.
- Vocabulary:
- Homework:
- Materials / Resources (including technology) Scott Foresman science textbooks, paper, markers, pencils, rope, ramps, toy cars
- State of Minnesota Standards Covered
- 2.1.1.2.1 Raise questions about the natural world and seek answers by making careful observations, noting what happens when you interact with an object, and sharing the answers with others.
2.2.2.1.2 Demonstrate that objects move in a variety of ways, including a straight line, a curve, a circle, back and forth, and at different speeds. For example: Spinning toy and rocking toy. Another example: Construct objects that will move in a straight line or a curve such as a marble or toy car on a track.
2.2.2.2.1 Describe how push and pull forces can make objects move. For example: Push and pull objects on smooth and rough surfaces.
2.2.2.2.2 Describe how things near Earth fall to the ground unless something holds them up.