Saint Paul American Schools
Physical Science
Curriculum > High > Clark > Science- Course Description
- Physical Science is a hands‐on, discovery based and comprehensive year‐long course introducing students to the physical world around us. The first semester is devoted to the study of Chemistry and the second semester for Physics. This course is designed for students to understand key concepts, develop 21st century skills and connect with Mathematics, Technology and Engineering. Fundamental skills in Chemistry and Physics such as measuring, data collection and manipulation, observing, and application of the scientific method will be practiced throughout the course. Students will explore the how and why of general science with the emphasis that science is a process, not just learned facts.
- Pre‐Requisites
- Physical science is an introductory science course with no prerequisites. It is appropriate for 9th and 10th grade students.
- Learning Objectives
-
In this course, we will cover the “Physical Science” learning objectives
defined in the Minnesota Academic
Standards in Science (2009). A full copy of these objectives is available
at: http://education.state.mn.us/MDE/.
Specifically, by the end of the course, students will be able to:- Communicate effectively in both written and oral forms. Students will keep a homework and bell ringer notebook and will write short essays after viewing films about entities of physical science. Students will keep a cloud journal.
- Study applications of the scientific method to information gathered by the scientific community. Students will use the scientific method during laboratory activities.
- explore the physical and chemical properties of matter, classification of matter and phase changes
- Relate the properties of an element to the structure of its atoms, including radioactive isotopes by creating atom models.
- Describe key experiments in the historical development of the atomic model by writing and illustrating a flip‐book.
- Calculate current, voltage, and resistance, and describe energy transfers, in simple electric circuits by performing data analysis on experimental results.
- Describe a chemical reaction using words, equations, and pictures.
- Explore and classify the different types of chemical reactions, identify the factors that affect reactions rates, distinguish between exothermic and endothermic reactions, balance chemical equations, and relate the law of conservation of matter and energy to chemical reactions; identify common chemical reactions
- Predict an object’s motion based on its mass and the forces acting upon on it by drawing vector diagrams.
- Compare and contrast fission and fusion in terms of reactants, products, and the conversion of matter into energy by creating a Venn‐diagram.
- Evaluate the advantages and disadvantages of generating electricity using various sources of energy by presenting the benefits and shortfalls of each type.
- Apply the law of conservation of mass by justifying experimental results and balancing chemical equations.
- Compare and contrast technologies in terms of energy efficiency and natural resource use by analyzing electronic packaging data.
- Generate unique examples illustrating Newton’s three laws of motion by creating student videos.
- Summarize and apply what they have learned in Physical Science thru creative input like jingles and models
- Language Objectives
-
In addition to the learning objectives listed above, a primary goal of this
course is to facilitate students’ development of scientific
communication skills. Each lesson will contain a specific language
objective designed to help students grow in their abilities to read,
write, listen, and speak. By the end of this course, students will be able
to:
- Read and orally discuss scientific news articles and trivia every day.
- Write a hypothesis statement relating changes in an independent variable to the predicted behavior of a dependent variable.
- Summarize the results of an experiment in a written conclusion.
- Communicate experimental results in tables and graphs.
- Listen and provide written and oral feedback to other students’ ideas.
- Textbook
-
GLENCOE Physical Science” by McGraw Hill Companies Inc. © 2012
(ISBN: 9780078880049)
- Supplies
-
Students are required to bring the following supplies to class every day of
the year:
Notebook and Pencil
Bound with at least two subjects for note taking. Well‐kept notebooks will be invaluable in future science courses. Pen is acceptable, pencil is preferred.
Calculator
A scientific or graphing calculator is required.
Three‐Ring Binder
Students should store and organize class handouts and homework assignments in a three‐ring binder.
- Learning Activities & Grading
Quarter Grade
| Tests, quizzes and projects and recitation | 50% |
| Labs | 25% |
| Daily work, homework and journals | 25% |
School Grading Policy Grading Scale:
| A+ | 97 - 100 | 4.0 |
| A | 94 - 96.99 | 4.0 |
| A- | 90 - 93.99 | 3.7 |
| B+ | 87 - 89.99 | 3.3 |
| B | 84 - 86.99 | 3.0 |
| B- | 80 - 83.99 | 2.7 |
| C+ | 77 - 79.99 | 2.3 |
| C | 74 - 76.99 | 2.0 |
| C- | 70 - 73.99 | 1.7 |
| D+ | 67 - 69.99 | 1.3 |
| D | 64 - 66.99 | 1.0 |
| D- | 60 - 63.99 | 0.7 |
| F | 0 - 59.99 | 0 |
- Exams
- Composed of multiple choice, true/false, short answer, matching and essay questions. You will be given at least one week’s notice before an exam. Exam dates will be announced in class.
- Labs
- This course places a strong emphasis on laboratory work. Lab handouts will be provided for each experiment. Due dates for lab write‐ups will be discussed when labs are assigned.
- Homework
- Assignments will typically involve some combination of problems and writing activities. Homework is due at the beginning of the class period after it was assigned.
- Quizzes
- You will be given unannounced quizzes if you badly participate in class to make sure you are prepared and putting your best effort into your homework assignments. Any material we have covered is fair game on a quiz. Quiz questions will often (but not always) be very similar to your homework problems.
- Units of Study
- This course is broken down into the following Chapters:
First Semester: Introduction to Chemistry
| CHAPTER# | NAME | ESTIMATED PACING |
| Preliminary | Observation, Measurement, and Experimental Design | 2 Weeks |
| 7 | Foundations of Chemistry | 2 Weeks |
| 8 | States of Matter | 3 Weeks |
| 9 | Understanding the Atom | 2 Weeks |
| 10 | The Periodic Table | 3 Weeks |
| 11 | Elements and Chemical Bonds | 3 Weeks |
| 12 | Chemical Reactions and Equations | 3 weeks |
First Semester: Introduction to Chemistry
| CHAPTER# | NAME | ESTIMATED PACING |
| 1 | Describing Motion | 3 Weeks |
| 2 | The Laws of Motion | 3 Weeks |
| 3 | Work and Simple Machines | 3 Weeks |
| 4 | Forces and Fluids | 2 Weeks |
| 5 | Energy and Energy Resources | 3 Weeks |
| 6 | Thermal Energy | 2 Weeks |
| 19 and 20 | Electricity and Magnetism | 2 weeks |
- Weekly Informational Knowledge Overview - (Students will know...)
- Weekly Procedural Knowledge Overview - (Students will be able to...)
Monday
Tuesday
Wednesday
Thursday
Friday
- Main Activity/Lesson:
- Evaluation:
- Vocabulary:
- Homework:
- Main Activity/Lesson:
- Evaluation:
- Vocabulary:
- Homework:
- Main Activity/Lesson:
- Evaluation:
- Vocabulary:
- Homework:
- Main Activity/Lesson:
- Evaluation:
- Vocabulary:
- Homework:
- Main Activity/Lesson:
- Evaluation:
- Vocabulary:
- Homework:
- Materials / Resources (including technology)
- Weekly Informational Knowledge Overview - (Students will know...)
- 1. The purpose of the Scientific Method
2. key terms related to the Scientific Method: observation, hypothesis, test, experiment, result, conclusion
3. The concept of scientific notation, how it is used for large and small numbers, and how to multiply and divide using scientific notation
4. the SI base units
5. The rough equivalents for the SI base units in the English system.
6. The symbols for SI units.
7. The unit prefixes and their abbreviations.
8. The derived units from the basic units for mass, length, temperature, and time.
- Weekly Procedural Knowledge Overview - (Students will be able to...)
-
1. Describe science as being a process of proposing and testing hypotheses.
2. Distinguish between statements that are testable by science and those that are not.
3. Describe the meaning and purpose of experimental controls.
4. Write a testable hypothesis.
5. Design an experiment to test a hypothesis.
6. represent numbers using scientific notation
7. convert numbers written in scientific notation to standard notation
8. State rough equivalents for the SI base units in the English system.
9. Read and write the symbols for SI units.
10. Recognize unit prefixes and their abbreviations.
11. Build derived units from the basic units for mass, length, temperature, and time.
12. Convert measurements from SI units to English, and from one prefixed unit to another
Monday
Tuesday
Wednesday
Thursday
Friday
- Main Activity/Lesson:
- Using the scientific approach; Students will learn about the scientific steps of solving a problem:
1. Make observations
2. Formulate a hypothesis
3. Test the Hypothesis
4. Draw Conclusion
5. Develop a Theory
Much emphasis will be given on how to test a hypothesis, using dependent, independent and controlled variables.
- Evaluation:
- Graded Recitation
- Vocabulary:
- Scientific Method, Observation, Hypothesis, Manipulated Variable, Responding Variable, Controlled Experiment, Scientific Theory, Scientific Law, Model
- Homework:
- Read page 14 – 19
- Main Activity/Lesson:
- Experiment using the different variables; Teacher goes over the different variables in helping solve a particular problem. Students perform an experiment using a maze to test their speed of solving. A control variable is introduced and students shall explain the importance of a control variable. Teacher introduces scientific notation.
- Evaluation:
- Graph completion; Correct answers from experiment
- Vocabulary:
- Scientific notation
- Homework:
- Ask students to answer the problems on scientific notation
- Main Activity/Lesson:
- Scientific Notation (cont), units of measurement and calculating temperature. Teacher discusses the SI basic and derived units. Students, using calculators will express scientific notation and solve equation utilizing the conversion of units. Students will identify significant figures
- Evaluation:
- Activity and Worksheets
- Vocabulary:
- length, mass, volume, density, conversion factor, precision, significant figures, accuracy, thermometers.
- Homework:
- Submit pictures/diagrams/illustrations on how to present data. Review All lessons discussed since first week.
- Main Activity/Lesson:
- Chapter 1: Science Skills
- Evaluation:
- Vocabulary:
- Homework:
- Materials / Resources (including technology)
- Powerpoint slides, projector, speakers, maze, beakers, graduated cylinder, worksheets, handouts.
- Weekly Informational Knowledge Overview - (Students will know...)
-
1. The concept of measurements and significant figures
2. How to round off significant figures
3. How to convert SI units of measurements
4. The derived units and how they are being applied
- Weekly Procedural Knowledge Overview - (Students will be able to...)
-
1. Relate the ideas of precision and accuracy to measurements & significant figures.
2. Be able to add, subtract, multiply, and divide using significant figures.
3. Be able to perform primary dimensional analysis problems (including common conversions)
4. Be able to perform beginner density calculations.
Monday
Tuesday
Wednesday
Thursday
Friday
- Main Activity/Lesson:
- Significant figures; T starts with a bellringer and reviews previous concept. T discusses the Rules for significant figures like Zeros at the end of a number and after the decimal point are significant. It is assumed that these zeros would not be shown unless they were significant
- Evaluation:
- T gives an activity worksheet of significant figures to be answered by Ss.
- Vocabulary:
- Significant figures
- Homework:
- Solve the mathematical problems such that the answers have the correct number of significant figures:
- Main Activity/Lesson:
- units of measurement and calculating temperature. Teacher discusses the SI basic and derived units. Students, using calculators will express scientific notation and solve equation utilizing the conversion of units. Students will identify significant figures
- Evaluation:
- Activity and Worksheets
- Vocabulary:
- length, mass, volume, density, conversion factor, precision, significant figures, accuracy, thermometers. Evaluation
- Homework:
- Continue the activity at home if it was not accomplished.
- Main Activity/Lesson:
- units of measurement and calculating temperature. Teacher discusses the SI basic and derived units. Students, using calculators will express scientific notation and solve equation utilizing the conversion of units. Students will identify significant figures
- Evaluation:
- Activity and Worksheets
- Vocabulary:
- length, mass, volume, density, conversion factor, precision, significant figures, accuracy, thermometers.
- Homework:
- Continue the activity at home if it was not accomplished.
- Main Activity/Lesson:
- Testing Heat and Temperature Lab Instructions:
1. Remove a glowstick from its wrapper. Bend the glowstick until you hear a snap. This will activate the glowstick.
2. Place hot water in one styrofoam cup and ice water in another sytrofoam cup.
3. Start with the cup containing the hot water. Test the temperature of the water by placing the thermometer in the water. Record the temperature. Next, place the glowstick in the hot water. Record an observation.
4. Now test the cup containing the ice water. Place the thermometer and the glowstick in the water. Record the temperature and an observation about the glowstick
- Evaluation:
- Worksheet questions to be answered by Ss
- Vocabulary:
- Fahrenheit, Kelvin, Celsius
- Homework:
- Review the units of measurement and significant figures. Prepare for a quiz on the following morning
- Main Activity/Lesson:
- Quiz on Significant Figures, units, conversion and temperature.
- Evaluation:
- Vocabulary:
- Homework:
- Materials / Resources (including technology)
- Glowstick, styrofoam cups, thermometer, ice hot and cold water, worksheets, projector, powerpoint slides, presenter.
- Weekly Informational Knowledge Overview - (Students will know...)
-
1. The concept of measurements and significant figures
2. How to round off significant figures
3. How to convert SI units of measurements
4. The derived units and how they are being applied
- Weekly Procedural Knowledge Overview - (Students will be able to...)
-
1. Relate the ideas of precision and accuracy to measurements & significant figures.
2. Be able to add, subtract, multiply, and divide using significant figures.
3. Be able to perform primary dimensional analysis problems (including common conversions)
4. Be able to perform beginner density calculations.
Monday
Tuesday
Wednesday
Thursday
Friday
- Main Activity/Lesson:
- Recalling Significant Figures and Calculations Class starts with a trivia.
T distributes test papers from last week’s quiz. T reviews all the answers and makes students do the problems again. T explains the principles, and gives students another set of drills to answer. T ensures that every student has a calculator. T reteaches how to correctly calculate and convert temperatures.
- Evaluation:
- T gives an activity worksheet of significant figures to be answered by Ss.
- Vocabulary:
- Homework:
- Solve the mathematical problems such that the answers have the correct number of significant figures; Round each calculation to the correct number of sig figs;
- Main Activity/Lesson:
- Units Of Measurement And Calculating Density.
Class starts with a trivia.
Teacher discusses the SI basic and derived units. Students, using calculators will express scientific notation and solve equation with conversion of units. Students will identify significant figures in each equation.
- Evaluation:
- Activity and Worksheets
- Vocabulary:
- length, mass, volume, density, conversion factor, precision, significant figures, accuracy, thermometers.
- Homework:
- Part A: What type of measurement is indicated by each of the following units? Choices are in the last column.
Part B: For each of the following commonly used measurements, indicate its symbol. Use the symbols to complete the following sentences with the most appropriate unit. Units may be used more than once or not at all.
Part C:Convert the following metric measurements:
- Main Activity/Lesson:
- Applying the Units of Measurement.
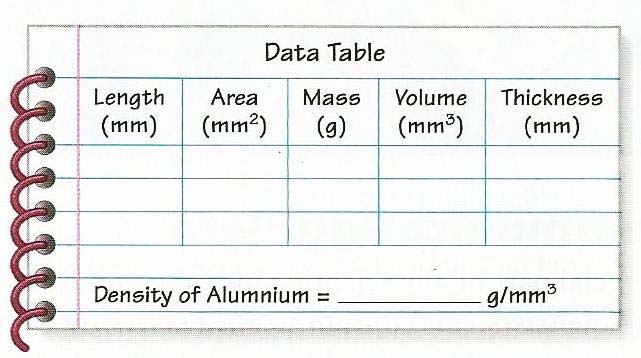
Bellringer: How can you determine the thickness of aluminum foil?
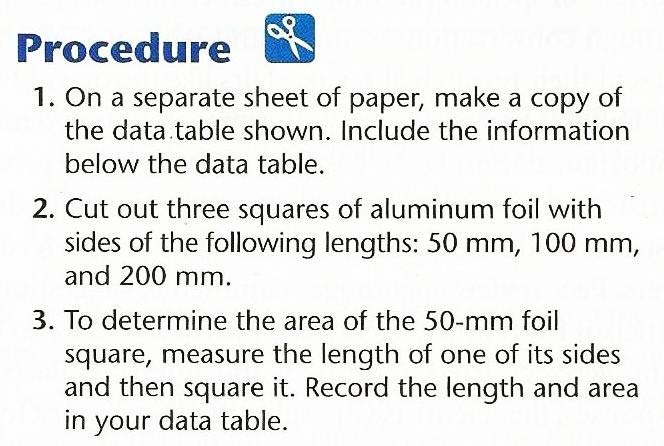
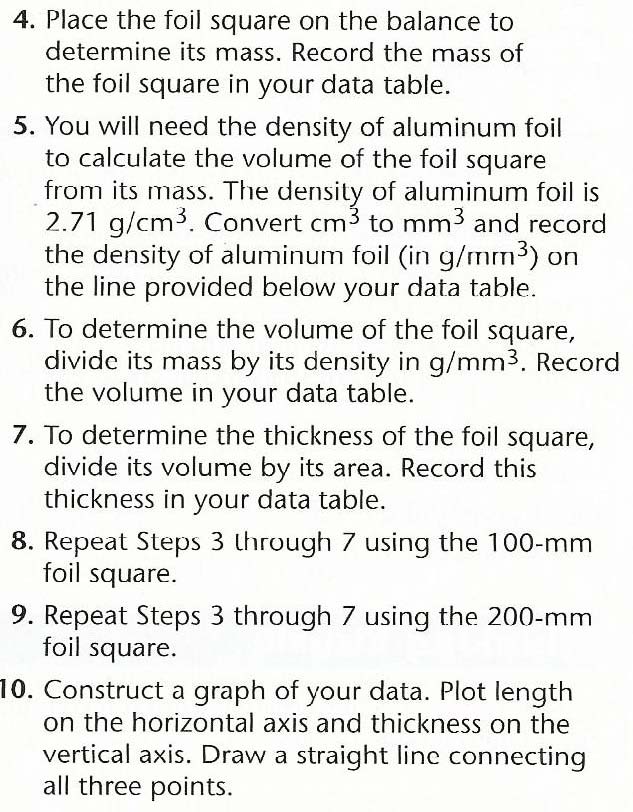
- Evaluation:
- Ss would answer the following data table:
- Vocabulary:
- Homework:
- Study the lessons about measurement and prepare for a test the following morning.
- Main Activity/Lesson:
- Quiz
- Evaluation:
- Vocabulary:
- Homework:
- Materials / Resources (including technology)
- Aluminum foil, triple beam balance scale, ruler, cardboard, ppt, charts, handout
- Weekly Informational Knowledge Overview - (Students will know...)
- 1. Define chemistry
2. Define matter
3. Classifying pure substances as elements or compounds
4. Distinguish pure substance from mixtures
5. Describe the physical and chemical properties of matter
6. Distinguish chemical and physical changes
- Weekly Procedural Knowledge Overview - (Students will be able to...)
- 1. Solve a puzzle on the different terms regarding matter
2. Perform an experiment in distinguishing physical from chemical properties of matter
3. Describe the clues that indicates that a chemical change is taking place
4. Classify mixtures as solutions, suspensions, or colloids
5. Describe the characteristics of and element and compound
Monday
Tuesday
Wednesday
Thursday
Friday
- Main Activity/Lesson:
- Chemistry and Matter
Ss start with a science trivia
Warm up: Name all the things you can observe, fell, smell and touch.
With the use of ppt, T discusses Matter and its classification. Students are introduced to the idea that matter is composed of atoms and molecules that are attracted to each other and in constant motion. Students explore the attractions and motion of atoms and molecules as they experiment with and observe the heating and cooling of a solid, liquid, and gas
- Evaluation:
- Students classify the words in the cards as matter or non matter
- Vocabulary:
- matter, element, mixture, compounds, alloy, pure substance, homogenous, heterogenous.
- Homework:
- Read the poem on the other side of this sheet. Then, answer the questions below based on the poem.
- Main Activity/Lesson:
- Matter cont. and Properties of Matter
Procedures:
Distribute 1st set of materials to each group for students to explore. (1 cloth square, 1 plastic triangle, 1 plastic tube, 1 wood cylinder) Lead students into describing the objects in their containers. Tell the students that the words or adjectives they used to describe the solids are their properties. Distribute 2nd set of materials to each group for exploration. (1 popsicle stick, 1 screw, 1 insulated wire) Ask for words that describe the properties of these objects. Use objects from both sets of materials to introduce vocabulary:
Rigid
Soft
Hard
Rough
Smooth
Transparent
Opaque
Use materials to talk about what each word means
- Evaluation:
- list the properties of matter and describe a classification scheme for it that distinguishes between types of pure substances and mixtures
- Vocabulary:
- Homework:
- Do the Nature of Matter Homework
- Main Activity/Lesson:
- Matter cont. and Properties of Matter
Procedures:
Distribute 1st set of materials to each group for students to explore. (1 cloth square, 1 plastic triangle, 1 plastic tube, 1 wood cylinder) Lead students into describing the objects in their containers. Tell the students that the words or adjectives they used to describe the solids are their properties. Distribute 2nd set of materials to each group for exploration. (1 popsicle stick, 1 screw, 1 insulated wire) Ask for words that describe the properties of these objects. Use objects from both sets of materials to introduce vocabulary:
Rigid
Soft
Hard
Rough
Smooth
Transparent
Opaque
Use materials to talk about what each word means
- Evaluation:
- list the properties of matter and describe a classification scheme for it that distinguishes between types of pure substances and mixtures
- Vocabulary:
- Homework:
- Main Activity/Lesson:
- Molecules Matter Lab
In this activity, students look closely at a drop of water and move drops of water on wax paper. They see that the water holds together well and is not so easy to separate. The goal is for students to begin thinking about water, or any substance, on the molecular level and to conclude that water molecules must be attracted to one another.
Procedure
Use the dropper to gently squeeze out a drop of water but try not to let the drop fall completely out of the dropper. See how far you can make the drop hang off the end of the dropper without the drop falling.
1. A closeup of a student examining a droplet of water as he gently squeezes it out of a dropper
2. Place 4 or 5 drops of water together on a piece of wax paper to make one medium‐size drop.
3. Gently tilt the wax paper in different directions so that the drop moves.
4. Use a popsicle stick to slowly drag the drop around the wax paper a bit. Try using your popsicle stick to separate your drop into two.
5. Use your popsicle stick to move the drops near each other. Then move one drop so that the two drops touch.
- Evaluation:
- Give students time after the activity to record their
observations by answering the following questions on their activity
sheet. Once they have answered the questions, discuss their
observations as a whole group.
1. When you squeezed the drop of water out of the dropper, did the water break apart or did it hold together?
2. When you tilted the wax paper, did the drop split apart or stay together?
3. When you were pulling the drop around the wax paper, did the water seem to hold together or come apart easily?
4. When you tried to split your drop, did the drop separate easily?
5. What happened when the two small drops touched?
- Vocabulary:
- Homework:
- Main Activity/Lesson:
- QUIZ DAY
- Evaluation:
- Vocabulary:
- Homework:
- Materials / Resources (including technology)
- Water in small cup
Dropper
2 popsicle sticks
Wax paper
2 large index cards (5” x 8”)
Tape
Ppt
Charts
Handout
PS books
presenter
- Weekly Informational Knowledge Overview - (Students will know...)
- 1. "matter" " mass" and "substance."
2. he four states of matter.
3. physical and chemical changes and give examples of each.
4. "mixture" and distinguish between heterogeneous and homogenous mixtures.
5. "reactant" and "product."
6. "precipitate."
7. the law of conservation of mass.
- Weekly Procedural Knowledge Overview - (Students will be able to...)
- 1. Distinguish between physical and
chemical properties and give examples
of each.
2. Define "solution" and "phase" and state whether a solution is a homogenous or heterogeneous mixture and whether it is formed by a physical or chemical change.
3. Name the first twenty elements and their atomic number in order from memory and be able to write their symbols correctly.
4. List the factors which indicate a chemical reaction (change).
5. Perform an experiment to analyze and interpret chemical change.
Monday
Tuesday
Wednesday
Thursday
Friday
- Main Activity/Lesson:The Structure and Properties of Matter
- Warm Up: Class starts with Science Trivia
Review: Matter is anything which takes up space and has mass (a measure of the amount of matter an object has). Matter has five states: Solid Liquid Gas Plasma and Bose Einstein Condensate
Direct Instruction: 1. T discusses about the structure of matter and its properties
2. Physical changes are changes in the physical properties of a substance (do not result in a new substance) ‐ ex. ‐ breaking a pencil (changing size).
3. Chemical changes are changes which result in a new substance. For example, burning wood changes it into mostly water and carbon dioxide.
4. T asks students to give examples of physical and chemical changes.
5. T introduces the law of conservation of mass
6. Ss will answer activity prepared by T: Identify as a Physical Change (PC) or a Chemical Change (CC).
- Evaluation:
- Completed worksheets by Ss
- Vocabulary:
- Physical changes, Chemical changes , Distillation, kinetic energy , Reactants, EPOCH, precipitate, Law of Conservation of Mass
- Homework:
- Worksheet:
What are physical and chemical changes?
Decide whether each item describes a physical change or a chemical change. Write (PC) for a physical change or (CC) for a chemical change in the spaces provided.
Decide whether each example below describes a physical property or a chemical property. Place an X in the correct column.
- Main Activity/Lesson: The Structure and Properties of Matter
- Warm up: Class starts with science trivia
T finishes the whole powerpoint presentation about properties of matter. Ss prepare for their experiment
Direct Instruction:
1. Pour vinegar into the small bottle until it is about half an inch deep.
2. Using a funnel, pour two teaspoons of baking soda into the neck of a balloon.
3. Stretch the neck of the balloon over the neck of the bottle, being careful not to let the baking soda out of the balloon.
4. Now lift the balloon so that the baking soda runs into the vinegar.
Shake the bottle. What happens?
5. You can try another experiment (adding food color this time to make it more fun!!!)
Ss will answer the following questions:
1. Hypothesis:
· What do you think will happen when baking soda is mixed with vinegar?
2. Conclusion:
· How did your baking soda react with the vinegar?
What was produced?
· What is the evidence that a chemical changed occurred? Explain
3. Summary Questions: (see Lab 5: “It’s Chemical”)
4. Related Questions: (see Lab 5: “It’s Chemical”)
- Evaluation:
- Completed Experiment worksheets
- Vocabulary:
- Physical changes, Chemical changes , Distillation, kinetic energy , Reactants, EPOCH, precipitate, Law of Conservation of Mass
- Homework:
- Read and Review handouts and books; There’s a quiz the following meeting.
- Main Activity/Lesson:The Structure and Properties of Matter
- Warm up: Class starts with science trivia
T finishes the whole powerpoint presentation about properties of matter. Ss prepare for their experiment
Direct Instruction:
1. Pour vinegar into the small bottle until it is about half an inch deep.
2. Using a funnel, pour two teaspoons of baking soda into the neck of a balloon.
3. Stretch the neck of the balloon over the neck of the bottle, being careful not to let the baking soda out of the balloon.
4. Now lift the balloon so that the baking soda runs into the vinegar.
Shake the bottle. What happens?
5. You can try another experiment (adding food color this time to make it more fun!!!)
Ss will answer the following questions:
5. Hypothesis:
· What do you think will happen when baking soda is mixed with vinegar?
6. Conclusion:
· How did your baking soda react with the vinegar?
What was produced?
· What is the evidence that a chemical changed occurred? Explain
7. Summary Questions: (see Lab 5: “It’s Chemical”)
8. Related Questions: (see Lab 5: “It’s Chemical”)
- Evaluation:
- Completed Experiment worksheets
- Vocabulary:
- Physical changes, Chemical changes , Distillation, kinetic energy , Reactants, EPOCH, precipitate, Law of Conservation of Mass
- Homework:
- Read and Review handouts and books; There’s a quiz the following meeting.
QUIZ DAY
- Main Activity/Lesson:
- Matter
Forms of Matter
States of Matter
Structure of Matter
Properties of Matter
- Evaluation:
- Vocabulary:
- Homework:
- Main Activity/Lesson:
- FIELD TRIP
- Evaluation:
- Vocabulary:
- Homework:
- Materials / Resources (including technology)
- Flask, A medium‐sized round balloon, Vinegar, Baking soda, funnel, food color, presenter, PowerPoint, handouts, PS book.
- State of Minnesota Standards Covered
 View PDF
- Weekly Informational Knowledge Overview - (Students will know...)
- 1. Assumptions of the Kinetic Molecular
Theory
2. Know similarities and differences among solids, liquids and gases in terms of energy and particle spacing.
3. The gas laws
- Weekly Procedural Knowledge Overview - (Students will be able to...)
- 1. Explore the mathematics of chemical
formulas and equations.
2. Predict how changes in volume, temperature, and pressure affect the behavior of a gas.
3. Investigate similarities and differences among solids, liquids and gases in terms of energy and particle spacing.
4. Investigate characteristics associated with the gaseous state.
5. Apply the kinetic molecular theory to describe solids, liquids, and gases.
Monday
Tuesday
Wednesday
Thursday
Friday
- Learning Objective:
- NO CLASS
- Language Objective:
- Main Activity:
- Evaluation:
- Vocabulary:
- Homework:
- Main Activity:
- Evaluation:
- Vocabulary:
- Homework:
- Main Activity:
- The Behavior of Gases: Understanding
The Kinetic Molecular Theory
Warm up
Class starts with science trivia
Periodic table drill
Bellringer: Use the photo from the book: Commercial planes fly at very high altitudes, and if the air pressure inside were the same as the outside, people need oxygen masks to breathe. Ask students:
1. Why do you think this pilot is wearing oxygen masks?
2. How do you think an airplane can carry enough oxygen for so many people for so long? How is oxygen stored?
Direct Instruction:
1. Half the class should join hands in a circle to be a container
2. Have the rest of the class represent a solid then a liquid and gas. Classmates should move like these particles.
3. Ask: Who/what exerted the greatest pressure?
Teacher discusses the Kinetic Molecular Theory using ppt presentation. Students would answer the ffg questions:
1. Why is kinetic molecular theory an appropriate name for this theory?
2. How does the molecular theory describe the behavior of a gas?
- Evaluation:
- Completed worksheets
- Vocabulary:
- Kinetic, theory
- Homework:
- Have students read page 293 – 297 and answer the Reinforcement and study guide provided.
- Main Activity: Understanding Boyle’s Law
- By performing this simulation students will understand ideal gas laws.
They will derive the ideal gas law from the Boyle’s law and the
Charles Law. This will help them understand the motion of atoms and
molecules in the gases. They will understand the relationship
between the pressure, volume, and temperature for an ideal gas. And
they will be able to use this relationship in solving numerical
problems related to ideal gas laws.
Warm up:
1.Bellringer: Review the Kinetic Molecular Theory
2. Homework Check
Prior Knowledge: The students will have the prior knowledge about pressure, volume and temperature – their measurement and units.
The students know that in the gases the molecules have kinetic properties.
Teacher will demonstrate the Boyles’ activity using a hospital syringe and the marshmallow. When the piston of the syringe is moved inwards the marshmallow contracts and when the piston of the syringe is moved outwards the marshmallow expands. Boyles’ Law is a relationship between pressure and volume. At the constant temperature for an ideal gas, there is inverse relationship between the Pressure and the Volume.
Students will do similar activity by placing a semi inflated balloon over an empty plastic bottle lid. Ask students to squeeze the bottle and observe the balloon. Squeeze the balloon and observe the plastic bottle
Teacher will discuss Boyles Law using ppt presentation. Students solve equations relating to pressure and Volume:
P1V1 = P2V2
- Evaluation:
- Completed Worksheets on the equations
- Vocabulary:
- Boyle’s Law, Pressure, Volume
- Homework:
- Solve the equations using Boyle’s Law
- Main Activity: Applying Boyle’s Law
- Warm up:
1.Bellringer: Review Boyle’s Law
2. Homework Check
Prior Knowledge: The students will have the prior knowledge about pressure, volume and temperature – their measurement and units.
The students know that in the gases the molecules have kinetic properties.
Teacher reinforces Boyle’s Law equations by showing presentations of problems. Students solve the problems using pens and calculators
- Evaluation:
- Completed worksheets on Problem Solving
- Vocabulary:
- Boyle’s Law, Pressure, Volume
- Homework:
- Read The Charles Law and Gay Lussacs Law
- Materials / Resources (including technology)
- State of Minnesota Standards Covered
- View PDF
- Weekly Informational Knowledge Overview - (Students will know...)
- 1. Charles’ Law
2. Gay‐Lussacs Law
3. The behavior of gases with pressure and temperature
- Weekly Procedural Knowledge Overview - (Students will be able to...)
- 1. Explore the mathematics of chemical
formulas and equations.
2. Predict how changes in volume, temperature, and pressure affect the behavior of a gas.
3. Investigate similarities and differences among solids, liquids and gases in terms of energy and particle spacing.
4. Investigate characteristics associated with the gaseous state.
Apply the kinetic molecular theory to describe solids, liquids, and gases.
Monday
Tuesday
Wednesday
Thursday
Friday
- Main Activity: Understanding Charles’ Law
- Warm up:
Class starts with science trivia
Bellringer: Review Boyle’s Law
Charles Law: The teacher will demonstrate the Charles’ activity using a conical flask, balloon and a heating source. The balloon will be fixed on the top of the conical flask and heated. Slowly and slowly the balloon will expand as the heat is increased. When the conical flask is removed from the heating source, the balloon contracts slowly. Charles Law is a relationship between temperature and volume. At constant pressure for an ideal gas there is a direct relationship between the temperature and the volume of the gas. Ask students:
As the temperature is increased, will the volume also increase?
Direct Instruction:
Teacher discusses Charles’ Law with a ppt presentation.:
Students Answer their Guided notes.
- Evaluation:
- Completed worksheets on Charles’ Law
- Vocabulary:
- Charles’ Law, Temperature, Pressure
- Homework:
- Practice solving the equations on Charles’ Law
- Main Activity: Applying Boyle’s and Charles’ Law Experiment
- Warm up:
How would the gas laws be applied?
EXPERIMENT A : A Cartesian diver
Introduction
This is an experiment named after René Descartes (1596–1650).
Descartes was a French scientist and philosopher. The Cartesian diver can be used to illustrate the behavior of gases and liquids when compressed. In this experiment a Cartesian diver is constructed and some of the properties observed.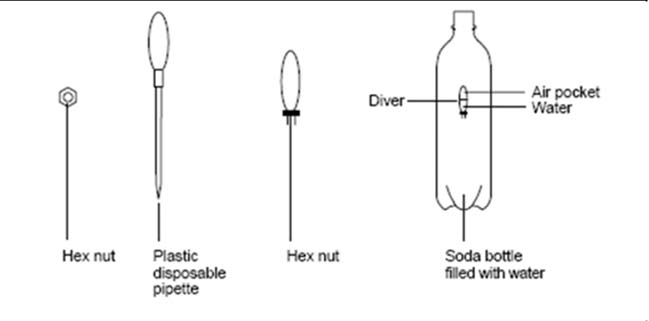
Direct Instruction:
1. Screw the hex nut onto the base of the pipette until it is held tightly in place.
2. Cut off all but 1 cm of the pipette stem. (This is the diver.)
3. Place the diver in a beaker of water. Squeeze the bulb of the pipette to force air out and release to allow water up into the diver.
Repeat this until the diver is about half full of water.
4. Does the diver still float? If adjusted properly the diver should barely float in the water. If it sinks squeeze a little water out.
5. Carefully transfer the diver to the soda bottle that is full to the brim with water. Take care not to lose water from the diver. Place the cap on the bottle.
6. Use both hands and squeeze the bottle. Watch the diver sinks when the bottle is squeezed, or floats when pressure is released.
Students answer the ffg questions:
1. What happens to the air in the diver when the bottle is squeezed?
2. Why does the air behave in this way?
3. Write a sentence that explains how the Cartesian diver works.
EXPERIMENT B: Marshmallow Madness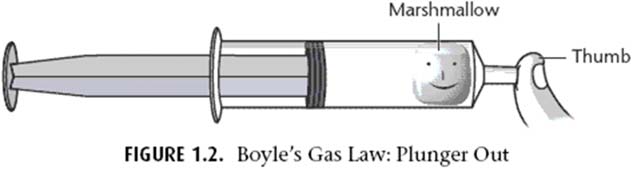
Background Info: What is a marshmallow? It is a spongy solid with air (gas) trapped inside the spaces.
Using a syringe: The inside of the syringe measures volume.
When you pull up on a syringe you are DECREASING pressure.
When you push down on a syringe you are INCREASING pressure.
Direct Instruction:
1. Make observations of both the marshmallow and balloon. Make your HYPOTHESIS.
2. Obtain a 60 mL syringe.
3.Remove the “plunger”
4. Place 2 mini‐marshmallows into the syringe.
5. Replace plunger, and slowly push plunger down to a volume of 5 mL. (Do not push the plunger down past 5 mL)
6. Seal the tip of the syringe by using the cap. This will provide a seal.
7. Once the syringe is airtight, pull up on the “plunger” and watch the marshmallow. Pull up as much as you can. Record results.
8. Take the cap off of the tip and throw away used marshmallows.
Repeat procedure, but this time start with the plunger at 60 mL, seal the tip with the cap, and push down on the syringe. Watch the marshmallow.
9. Repeat both procedures using the balloon.
Students answer the ffg questions:
1. Compare and contrast a fresh marshmallow with the one used in the syringe.
2. Why is it so hard to pull the “plunger” up once the tip has been sealed?
3. Why does the marshmallow expand?
4. What happens to the marshmallow when you push down the “plunger”? Explain.
- Evaluation:
- Completed Lab worksheets
- Vocabulary:
- Homework:
- Main Activity: Solving Charles’ Law and Gay Lussac’s Law Equations
- Prior Knowledge: The students will have the prior knowledge about
pressure, volume and temperature – their measurement and units.
The students know that in the gases the molecules have kinetic properties.
Teacher reinforces Solving Charles’ Law and Gay Lussac’s Law Equations by showing presentations of problems. Students solve the problems using pens and calculators
- Evaluation:
- Completed worksheets on Problem Solving
- Vocabulary:
- Solving Charles’ Law and Gay Lussac’s Law Equations, Pressure, Volume, Temperature
- Homework:
- Main Activity:
- QUIZ ON GAS LAWS
- Evaluation:
- Vocabulary:
- Homework:
- Materials / Resources (including technology)
- 60 mL syringe, marshmallows, balloon, rubber stopper, large soda plastic container, plastic pipettes, gloves, water, PowerPoint, presenter, projector, worksheets, lab sheets, handouts.
- State of Minnesota Standards Covered
-
- Weekly Informational Knowledge Overview - (Students will know...)
- 1. Gay‐Lussacs Law
2. The behavior of gases with pressure and temperature
- Weekly Procedural Knowledge Overview - (Students will be able to...)
- 1. describe the qualitative and quantitative
relationships between the pressure and
temperature of a gas
2. explain how flexible and rigid containers affect the pressure, volume, and temperature of a gas sample
3. complete gas law problems involving changes in pressure
Monday
Tuesday
Wednesday
Thursday
Friday
- Main Activity: SOLVING BOYLE’S and CHARLES’ LAW PROBLEMS.
- Students are given a 10‐item test that consists of problems applying
Gas laws. Students are given 50 minutes to answer the questions.
Solve the following problems using Boyle’s and Charles’ Law. (2) Show your solution on the space provided. (3) Do not round‐off your answers. (4) Do not forget the unit of your answer (5) Use the following formula as your guide:
P1V1 = P2V2
- Evaluation:
- Vocabulary:
- Homework:
- Main Activity: Introduction of Gay‐Lussac’s Law
- Warm up:
1. Class starts with trivia
2. Checking of quizzes and reviewing problems
Direct Instruction:
1. Students will start to review the entire Periodic Table of elements
2. Students will have a graded recitation on the elements
3. Teacher introduces Gay Lussac’s law
Prior Knowledge: The students will have the prior knowledge about pressure, volume and temperature – their measurement and units.
The students know that in the gases the molecules have kinetic properties.
Teacher reinforces Gay Lussac’s Law Equations by showing presentations of problems. Students solve the problems using pens and calculators
- Evaluation:
- Completed worksheets on Problem Solving
- Vocabulary:
- Gay Lussac’s Law Equations , Pressure, Volume , Temperature
- Homework:
- Compute for the following problems applying Gay‐LussacsLAw
- Main Activity: Introduction of Gay‐Lussac’s Law
- Warm up:
3. Class starts with trivia
4. Checking of quizzes and reviewing problems
Direct Instruction:
4. Students will start to review the entire Periodic Table of elements
5. Students will have a graded recitation on the elements
6. Teacher introduces Gay Lussac’s law
Prior Knowledge: The students will have the prior knowledge about pressure, volume and temperature – their measurement and units.
The students know that in the gases the molecules have kinetic properties.
Teacher reinforces Gay Lussac’s Law Equations by showing presentations of problems. Students solve the problems using pens and calculators
- Evaluation:
- Completed worksheets on Problem Solving
- Vocabulary:
- Gay Lussac’s Law Equations , Pressure, Volume , Temperature
- Homework:
- Compute for the following problems applying Gay‐Lussacs Law
- Main Activity: Egg in Bottle Experiment
- Warm up:
Ask Students: What will happen to the egg if we applied heat in the bottle?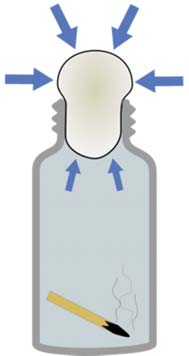
Direct Instruction:
1. Peel the boiled egg carefully.
2. Slightly moisten the inside of the bottle with water or a little vegetable oil to help the egg glide in.
3. Light a strip of the paper and place flame down into the bottle.
4. Now quickly place the egg smaller side down on the top of the bottle sealing the air inside the bottle.
5. Watch and listen to what happens.
6. Now to get the egg to come back out. Put on your oven gloves or use a tea towel to protect your hands as you are going to be heating the bottle with the heating gun.
7. Hold the bottle upside down and heat the bottle until the egg is less than half way out the opening of the bottle.
8. Now place the bottle right side up on the bench and see the egg push itself out of the bottle
Students answer the ffg questions:
1. What is pressure?
2. What happens when air is heated up?
3. At what stage do you think the air pressure in the bottle was reduced? Explain
4. How did heating the bottle help us get the egg back out of the bottle? Explain
- Evaluation:
- completed worksheets
- Vocabulary:
- Gay Lussac’s Law Equations , Pressure, Volume , Temperature
- Homework:
- Collect and Compile all materials, handouts, activities, homework, and quizzes in a file folder. Prepare for a graded recitation on November 4.
- Main Activity:
- No Class
- Evaluation:
- Vocabulary:
- Homework:
- Materials / Resources (including technology)
- A wide mouth glass bottle with the opening just a little smaller than the egg eg. Juice bottle, 1 hardboiled egg (boiled in vinegar to help you peel it), Water or vegetable oil, Several strips of paper (~1cm x 10cm depending on depth of bottle) , Matches, Heat gun, Tea towel or oven glove, projector, powerpoint, presenter, handouts, worksheets.
- State of Minnesota Standards Covered
- View PDF
- Weekly Informational Knowledge Overview - (Students will know...)
- 1. The concepts learned in the topics
previously discussed
2. The concepts learned about gas laws, scientific method, matter, periodic table etc. in an engaging game
- Weekly Procedural Knowledge Overview - (Students will be able to...)
- 1. reinforce concepts learned in the
topics previously discussed by:
• Creating a vocabulary card
• Solving temperature
conversions, and gas laws
• Participating in the round
robin activity
Monday
Tuesday
Wednesday
Thursday
Friday
- Main Activity: Review
- Warm Up
Class starts with science trivia
Review Activities:
1. Students create a vocabulary card by:
a. Writing a word in the middle of the index card
b. Writing the definition of the word in the upper right hand corner of the card
c. Writing related vocabulary words in the upper left hand corner
d. Writing down examples of the word
e. Drawing/ illustrating the word
2. Students are arranged in a semi‐circle for the round robin activity.
Teacher will say a word/concept and the students have to give an example (branches of Science, scientific notations, physical change, malleability etc.)
3. Students will be asked to solve some problems with regard to all major discussions like gas laws, scientific notation, temperature conversions etc.)
- Evaluation:
- Short Quiz
- Vocabulary:
- Homework:
Review
- Main Activity:
- Warm Up
Checking/collection of Midterm requirements and notebooks Bell Ringer: Students answer 5 T/F questions.
Review Proper:
Students play “Who wants to be a millionaire?” Students take turns in being the contestant. They answer questions from the lowest level of difficulty to the highest until they reach 1 million. Once a wrong answer is given, the student stops answering questions and his/her score is commensurate to the level reached.
- Evaluation:
- Students’ scores in the game activity
- Vocabulary:
- Homework:
- Learning Objective: Review
- Language Objective:
- Main Activity:
- Warm Up
Checking/collection of Midterm requirements and notebooks Bell Ringer: Students answer 5 T/F questions.
Review Proper:
Students play “Who wants to be a millionaire?” Students take turns in being the contestant. They answer questions from the lowest level of difficulty to the highest until they reach 1 million. Once a wrong answer is given, the student stops answering questions and his/her score is commensurate to the level reached.
- Evaluation:
- Students’ scores in the game activity
- Vocabulary:
- Homework:
- Main Activity:
- 1st Quarter Exams part 1
- Evaluation:
- Vocabulary:
- Homework:
- Main Activity:
- 1st Quarter Exams part 2
- Evaluation:
- Vocabulary:
- Homework:
- Materials / Resources (including technology)
- Index cards, books, notes, board markers, Scoreboard, PowerPoint, presenter
- State of Minnesota Standards Covered
- View PDF
- Weekly Informational Knowledge Overview - (Students will know...)
- 1. Democritus’s ideas about atoms.
2. Dalton’s atomic theory
3. What instrument is used to observe individual atoms.
4. Three types of subatomic particles.
5. Describe the structure of atoms, according to the Rutherford atomic model.
6. Explain what makes elements and isotopes different from each other.
- Weekly Procedural Knowledge Overview - (Students will be able to...)
- 1. Describe the particle theory of
matter.
2. Use the Bohr model to differentiate among the three basic particles in the atom (proton, neutron, and electron) and their charges, relative masses, and locations.
3. Compare the Bohr atomic model to the electron cloud model with respect to their ability to represent accurately the structure of the atom
4. Calculate the number of neutrons in an atom.
5. Calculate the atomic mass of an element.
6. Explain why chemists use the periodic table.
Monday
Tuesday
Wednesday
Thursday
Friday
- Main Activity:
- Midterm Re‐checking
Completion of Requirements
Evaluation of the Bulletin Project
New set of classroom rules and policies
- Evaluation:
- Vocabulary:
- Homework:
- Read page 312 to 322 and answer the Reinforcement and study guide handout.
- Main Activity: The Atomic Theory
- Warm up:
Class starts with Science Trivia
Students are asked: How many atoms are there on a tip of a lead pencil. What are atoms? What are atoms made up of?
Direct Instruction:
1. Teacher distributes worksheets of Atomic structure to be answered and submitted after discussion
2. Teacher gives out handouts for students to use during discussion
3. Teacher discusses the Atomic theory Timeline as well as the atomic structure
4. Students ask questions and complete their worksheets
- Evaluation:
- Completed worksheets
- Vocabulary:
- Atom, protons, neutrons, electrons, quarks, Thomson Model, Bohr Model, Rutherford Model, Modern Atomic Model
- Homework:
- Read page 312 to 322 and answer the Reinforcement and study guide handout.
- Main Activity:
- Activity is divided into two parts:
1. IT lab quest of atoms
2. Dream journey Poster
Students are deployed in the IT lab to do the Scavenger Hunt Chemistry. Students visit the Chemistry Links page at the Kid Zone to find these sites: http://sciencespot.net/ and click the Kid Zone graphic!
Students Explore the Dream Journey Poster and solve the clues embedded on the questionnaire.
- Evaluation:
- Completed Worksheets
- Vocabulary:
- Atom, protons, neutrons, electrons, quarks, Thomson Model, Bohr Model, Rutherford Model, Modern Atomic Model
- Homework:
- Finish the Bulletin board project
- Main Activity:
- FIELD TRIP
- Evaluation:
- Vocabulary:
- Homework:
- Materials / Resources (including technology)
- State of Minnesota Standards Covered
-
View PDF
- Weekly Informational Knowledge Overview - (Students will know...)
- 1. What instrument is used to observe
individual atoms.
2. Three types of subatomic particles.
3. Explain what makes elements and isotopes different from each other.
4. The periodic table and the properties of elemets
- Weekly Procedural Knowledge Overview - (Students will be able to...)
- 1. Calculate the number of neutrons in
an atom.
2. Calculate the atomic mass of an element.
3. Explain why chemists use the periodic table.
4. Classify elements in the periodic table as metals, nonmetals, and metalloids based on their position in the periodic table
5. Identify the keys used in the periodic table and identify elements based on their group and period.
6. Create their own table by organizing the pens and pencils according to properties
Monday
Tuesday
Wednesday
Thursday
Friday
- Main Activity: The Periodic Table
- Educational Target:
Students will be able to:
Materials:
Periodic table, flashcards, timeline materials, mini lab worksheet, Chemistry book
Differentiation Strategies
These strategies are used to meet the varied needs of all learners:
-Varying academic levels: uses mixed‐ability groups to allow students to learn from one another
-Visual learners: uses periodic tables in locating elements, identifying groups, periods, classification, and organizing timeline
-Auditory learners: listens to discussion on how elements are arranged in the periodic table Kinesthetic learners: collect pens and pencils and organize them according to properties, engage in class drills
Warm Up
Bell Ringer: Students will complete the following statements.
1. This states that properties of the elements are a periodic function of their _______________.
2. In the periodic table, all elements in a horizontal row are referred to as _______________.
3. All elements in the same vertical column are referred to as _____________.
4. Elements in the periodic table are represented by _____________ usually consists of one or more letters.
5. The elements ______________ is equal to the number of protons.
Direct Instruction
1. Designing a periodic table mini lab: T instructs students in each group to collect the pens and pencils of their classmates. They decide what properties of the pens and pencil they will use to organize them into a periodic table. They draw their own table and analyze the data.
2. Relate the activity to the organization of elements in the periodic table. “Elements are grouped according to similar properties”
3. Review development of the periodic table by asking students to arrange the events (Scientist and contribution) to a timeline on the board.
4. Direct students’ attention to the periodic table and take note of the keys. Do exercise on element keys.
5. Recall difference between periods and groups. Start a two‐part group game. Students will be drilled on identifying elements by giving the group and period number.
6. Recall arrangement of metals, nonmetals, and metalloids in the periodic table. Continue with the 2nd part of the game by giving out elements and students identifying the classification.
Reinforement/Practice
Mini Lab: Designing a periodic Table
Group Practice: Students are divided into mixed ability groups and play a two‐part game on identifying elements based on group and period numbers and classifying elements based on their location in the periodic table.
- Evaluation:
- Informal: Ability to correctly identify the elements based on
group, period, and atomic number
Formal: Mini Lab report data and analysis
Closure
Students describe how elements are arranged in a periodic table;
point at periods and groups, symbol and atomic numbers of elements in the periodic table.
- Vocabulary:
- Atomic number, group, symbol, period, metals, nonmetals, metalloids, periodic law
- Homework:
- Students answer practice problem page 353.
- Main Activity: Proton, Electrons and Neutrons Lab
- **Do an activity to show that electrons and protons attract each
other.
Students can see evidence of the charges of protons and electrons by doing an activity with static electricity.
Note: When two materials are rubbed together in a static electricity activity, one material tends to lose electrons while the other material tends to gain electron. In this activity, human skin tends to lose electrons while the plastic bag, made of polyethylene, tends to gain electrons.
Question to investigate:
What makes objects attract or repel each other?
Materials for each group:
Plastic grocery bag
Scissors
Procedure, part 1:
CHARGED PLASTIC AND CHARGED SKIN
1. Cut 2 strips from a plastic grocery bag so that each is about 2–4 cm wide and about 20 cm long.
2. Hold the plastic strip firmly at one end. Then grasp the plastic strip between the thumb and fingers of your other hand as shown.
3. A student holds a long strip of plastic between her thumb and index fingers.
4. Quickly pull your top hand up so that the plastic strip runs through your fingers. Do this three or four times.
5. Allow the strip to hang down. Then bring your other hand near it.
6. Write “attract” or “repel” in the chart on the activity sheet to describe what happened.
Expected results:
The plastic will be attracted to your hand and move toward it.
Students may notice that the plastic is also attracted to their arms and sleeves. Let students know that later in this lesson they will investigate why the plastic strip is also attracted to surfaces that have not been charged (neutral).
A student holds a long strip of plastic in one hand with his other hand nearby.
Note: If students find that their plastic strip does not move toward their hand, it must not have been charged well enough. Have them try charging their plastic strip by holding it down on their pants or shirt and then quickly pulling it with the other hand. Then they should test to see if the plastic is attracted to their clothes. If not, students should try charging the plastic again.
Explain:
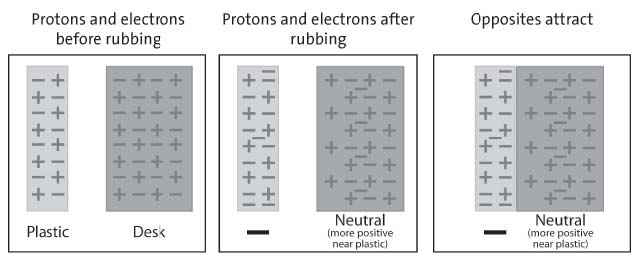
Show students models comparing the number of protons and electrons in the plastic and skin before and after rubbing them together.
Tell students that the plastic strip and their skin are made of molecules that are made of atoms. Tell students to assume that the plastic and their skin are neutral—that they have the same number of protons as electrons.
Project the image Charged plastic and hand.
Point out that before the students pulled the plastic between their fingers, the number of protons and electrons in each is the same.
Then, when students pulled the plastic through their fingers, electrons from their skin got onto the plastic. Since the plastic has more electrons than protons, it has a negative charge. Since their fingers gave up some electrons, their skin now has more protons than electrons so it has a positive charge. The positive skin and the negative plastic attract each other because positive and negative attract.
Explore:
Have students investigate what happens when a rubbed plastic strip is held near a desk or chair.
Procedure, part 2:
CHARGED PLASTIC AND NEUTRAL DESK
1. Charge one strip of plastic the same way you did previously.
2. This time, bring the plastic strip toward your desk or chair.
3. A student brings a piece of charged plastic near the edge of a desk
4. Write “attract” or “repel” in the chart.
Expected results:
The plastic moves toward the desk.
Explain to students why the plastic is attracted to the desk. The answer takes a couple of steps, so you can guide students by drawing or projecting a magnified illustration of the plastic and desk.
After pulling the plastic between their fingers, the plastic gains extra electrons and a negative charge. The desk has the same number of protons as electrons and is neutral. When the plastic gets close to the desk, the negatively charged plastic repels electrons on the surface of the desk. This makes the surface of the desk near the plastic slightly positive. The negatively charged plastic is attracted to this positive area, so the plastic moves toward it.

A series of 3 diagrams explaining how the movement of electrons causes the plastic to be attracted to the desk.
Have students charge two pieces of plastic and hold them near each other to see if electrons repel one other.
Ask students to make a prediction:
What do you think will happen if you charge two strips of plastic and bring them near each other?
Procedure, part 3:
2 PIECES OF CHARGED PLASTIC
1. Charge two strips of plastic
2. Slowly bring the two strips of plastic near each other.
3. Write “attract” or “repel” in the chart on the activity sheet.
4. A series of diagrams showing how the movement of electrons between two plastic pieces causes them to repel one another
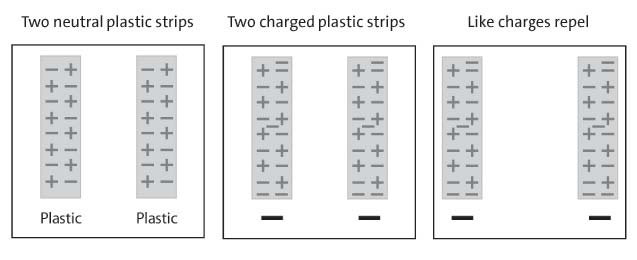
Expected results:
The strips will move away or repel each other. Since both strips have extra electrons on them, they each have extra negative charge. Since the same charges repel one another, the strips move away from each other.
Ask students:
1. What happened when you brought the two pieces of plastic near each other?
The ends of the strips moved away from each other.
2. Use what you know about electrons and charges to explain why this happens.
Each strip has extra electrons so they are both negatively charged.
Because like charges repel, the pieces of plastic repelled each other.
EXPLORE:
Have students apply their understanding of protons and electrons to explain what happens when a charged balloon is brought near pieces of paper.
Materials for each group:
Inflated balloon
Small pieces of paper, confetti‐size
Procedure:
1. Rub a balloon on your hair or clothes.
2. Bring the balloon slowly toward small pieces of paper.
Expected results:
The pieces of paper will jump up and stick on the balloon.
Ask students:
1. What did you observe when the charged balloon was held near the pieces of paper?
The paper pieces moved up and stuck on the balloon.
2. Use what you know about electrons, protons, and charges to explain why this happens.
When you rub the balloon on your hair or clothes it picks up extra electrons, giving the balloon a negative charge. When you bring the balloon near the paper, the electrons from the balloon repel the electrons in the paper. Since more protons are at the surface of the paper, it has a positive change. The electrons are still on the paper, just not at the surface, so overall the paper is neutral. Opposites attract, so the paper moves up toward the balloon.

A series of 3 diagrams explaining how the movement of electrons causes a balloon to be attracted to a piece of paper.
In the simulation, check the boxes “show all charges” and “Wall”. Uncheck everything else.
In this simulation, you can rub the balloon a little bit on the sweater and see that some of the electrons from the sweater move onto the balloon. This gives the balloon a negative charge. Since the sweater lost some electrons, it has more protons than electrons, so it has a positive charge. If you move the balloon toward the sweater, it will be attracted. This is like moving the charged plastic strip toward the cloth it was rubbed on.
You can also move the balloon toward the wall. The excess negative charge on the balloon repels negative charge on the surface of the wall. This leaves more positive charge on the surface of the wall. The negatively charged balloon is attracted to the positive area on the wall. This is like moving the charged plastic strip toward the finger.
- Evaluation:
- Vocabulary:
- Homework:
- EXTRA EXTEND:
Demonstrate how electrons can attract a stream of water.
Either do the following demonstration or show the video Balloon and Water.
Materials for the demonstration:
Sink
Balloon
Procedure
1. Rub a balloon on your shirt or pants to give it a static charge.
2. Turn on the faucet so that there is a very thin stream of water.
3. Slowly bring the charged part of the balloon close to the stream of water.
Expected results
The stream of water should bend as it is attracted to the balloon. Ask students:
1. What did you observe when the charged balloon was held near the stream of water?
The stream of water bent toward the balloon.
2. Use what you know about electrons, protons, and charges to explain why this happens.
When you rub the balloon on your hair or clothes it picks up extra electrons, giving the balloon a negative charge. When you bring the balloon near the stream of water, the electrons from the balloon repel the electrons in the water. Since more protons are at the surface of the water, it has a positive change. Opposites attract, so the water moves toward the balloon.
- Main Activity: Proton, Electrons and Neutrons Lab
- **Do an activity to show that electrons and protons attract each
other.
Students can see evidence of the charges of protons and electrons by doing an activity with static electricity.
Note: When two materials are rubbed together in a static electricity activity, one material tends to lose electrons while the other material tends to gain electron. In this activity, human skin tends to lose electrons while the plastic bag, made of polyethylene, tends to gain electrons.
Question to investigate:
What makes objects attract or repel each other?
Materials for each group:
Plastic grocery bag
Scissors
Procedure, part 1:
CHARGED PLASTIC AND CHARGED SKIN
7. Cut 2 strips from a plastic grocery bag so that each is about 2–4 cm wide and about 20 cm long.
8. Hold the plastic strip firmly at one end. Then grasp the plastic strip between the thumb and fingers of your other hand as shown.
9. A student holds a long strip of plastic between her thumb and index fingers.
10. Quickly pull your top hand up so that the plastic strip runs through your fingers. Do this three or four times.
11. Allow the strip to hang down. Then bring your other hand near it.
12. Write “attract” or “repel” in the chart on the activity sheet to describe what happened.
Expected results:
The plastic will be attracted to your hand and move toward it.
Students may notice that the plastic is also attracted to their arms and sleeves. Let students know that later in this lesson they will investigate why the plastic strip is also attracted to surfaces that have not been charged (neutral).
A student holds a long strip of plastic in one hand with his other hand nearby.
Note: If students find that their plastic strip does not move toward their hand, it must not have been charged well enough. Have them try charging their plastic strip by holding it down on their pants or shirt and then quickly pulling it with the other hand. Then they should test to see if the plastic is attracted to their clothes. If not, students should try charging the plastic again.
Explain:
Show students models comparing the number of protons and electrons in the plastic and skin before and after rubbing them together.
Tell students that the plastic strip and their skin are made of molecules that are made of atoms. Tell students to assume that the plastic and their skin are neutral—that they have the same number of protons as electrons.
Project the image Charged plastic and hand.
Point out that before the students pulled the plastic between their fingers, the number of protons and electrons in each is the same.
Then, when students pulled the plastic through their fingers, electrons from their skin got onto the plastic. Since the plastic has more electrons than protons, it has a negative charge. Since their fingers gave up some electrons, their skin now has more protons than electrons so it has a positive charge. The positive skin and the negative plastic attract each other because positive and negative attract.
Explore:
Have students investigate what happens when a rubbed plastic strip is held near a desk or chair.
Procedure, part 2:
CHARGED PLASTIC AND NEUTRAL DESK
5. Charge one strip of plastic the same way you did previously.
6. This time, bring the plastic strip toward your desk or chair.
7. A student brings a piece of charged plastic near the edge of a desk
8. Write “attract” or “repel” in the chart.
Expected results:
The plastic moves toward the desk.
Explain to students why the plastic is attracted to the desk. The answer takes a couple of steps, so you can guide students by drawing or projecting a magnified illustration of the plastic and desk.
After pulling the plastic between their fingers, the plastic gains extra electrons and a negative charge. The desk has the same number of protons as electrons and is neutral. When the plastic gets close to the desk, the negatively charged plastic repels electrons on the surface of the desk. This makes the surface of the desk near the plastic slightly positive. The negatively charged plastic is attracted to this positive area, so the plastic moves toward it.
A series of 3 diagrams explaining how the movement of electrons causes the plastic to be attracted to the desk.
Have students charge two pieces of plastic and hold them near each other to see if electrons repel one other.
Ask students to make a prediction:
What do you think will happen if you charge two strips of plastic and bring them near each other?
Procedure, part 3:
2 PIECES OF CHARGED PLASTIC
5. Charge two strips of plastic
6. Slowly bring the two strips of plastic near each other.
7. Write “attract” or “repel” in the chart on the activity sheet.
8. A series of diagrams showing how the movement of electrons between two plastic pieces causes them to repel one another

Expected results:
The strips will move away or repel each other. Since both strips have extra electrons on them, they each have extra negative charge. Since the same charges repel one another, the strips move away from each other.
Ask students:
3. What happened when you brought the two pieces of plastic near each other?
The ends of the strips moved away from each other.
4. Use what you know about electrons and charges to explain why this happens.
Each strip has extra electrons so they are both negatively charged.
Because like charges repel, the pieces of plastic repelled each other.
EXPLORE:
Have students apply their understanding of protons and electrons to explain what happens when a charged balloon is brought near pieces of paper.
Materials for each group:
Inflated balloon
Small pieces of paper, confetti‐size
Procedure:
3. Rub a balloon on your hair or clothes.
4. Bring the balloon slowly toward small pieces of paper.
Expected results:
The pieces of paper will jump up and stick on the balloon.
Ask students:
3. What did you observe when the charged balloon was held near the pieces of paper?
The paper pieces moved up and stuck on the balloon.
4. Use what you know about electrons, protons, and charges to explain why this happens.
When you rub the balloon on your hair or clothes it picks up extra electrons, giving the balloon a negative charge. When you bring the balloon near the paper, the electrons from the balloon repel the electrons in the paper. Since more protons are at the surface of the paper, it has a positive change. The electrons are still on the paper, just not at the surface, so overall the paper is neutral. Opposites attract, so the paper moves up toward the balloon.
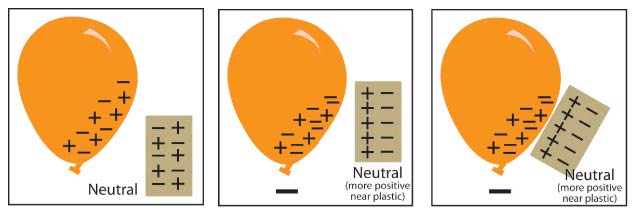
A series of 3 diagrams explaining how the movement of electrons causes a balloon to be attracted to a piece of paper.
In the simulation, check the boxes “show all charges” and “Wall”.
Uncheck everything else.
In this simulation, you can rub the balloon a little bit on the sweater and see that some of the electrons from the sweater move onto the balloon. This gives the balloon a negative charge. Since the sweater lost some electrons, it has more protons than electrons, so it has a positive charge. If you move the balloon toward the sweater, it will be attracted. This is like moving the charged plastic strip toward the cloth it was rubbed on.
You can also move the balloon toward the wall. The excess negative charge on the balloon repels negative charge on the surface of the wall. This leaves more positive charge on the surface of the wall. The negatively charged balloon is attracted to the positive area on the wall. This is like moving the charged plastic strip toward the finger.
- Evaluation:
- Vocabulary:
- Homework:
- EXTRA EXTEND:
Demonstrate how electrons can attract a stream of water.
Either do the following demonstration or show the video Balloon and Water.
Materials for the demonstration:
Sink
Balloon
Procedure:
4. Rub a balloon on your shirt or pants to give it a static charge.
5. Turn on the faucet so that there is a very thin stream of water.
6. Slowly bring the charged part of the balloon close to the stream of water.
Expected results:
The stream of water should bend as it is attracted to the balloon.
Ask students:
3. What did you observe when the charged balloon was held near the stream of water?
The stream of water bent toward the balloon.
4. Use what you know about electrons, protons, and charges to explain why this happens.
When you rub the balloon on your hair or clothes it picks up extra electrons, giving the balloon a negative charge. When you bring the balloon near the stream of water, the electrons from the balloon repel the electrons in the water. Since more protons are at the surface of the water, it has a positive change. Opposites attract, so the water moves toward the balloon.
- Main Activity:
- METALS, NONMETALS AND
METALLOIDS
Educational Target:
Students will be able to:
· Identify metals, nonmetals, and metalloids on the periodic table
· Describe their properties
Materials:
PPT presentation, notes, foldable worksheet, worksheets, book, periodic table
Differentiation Strategies
These strategies are used to meet the varied needs of all learners:
-Varying academic levels: uses mixed‐ability groups to allow students to learn from one another
-Visual learners: usesfoldable, notes, periodic table to check on location and characteristics of metals, nonmetals, and metalloids
-Auditory learners: listens to discussion on the properties of metals, nonmetals and metalloids
-Kinesthetic learners: arrange properties in correct columns, create a metal foldable
Warm Up
Bell Ringer: Students will use their periodic tables to complete the chart
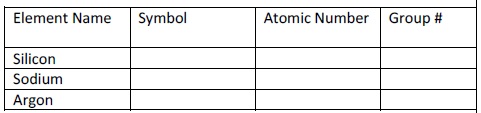
Homework Check
Direct Instruction
1. Review: Locate Metals, nonmetals and metalloids using the periodic table.
2. Go over the PPT presentation on the properties of metals,nonmetals and metalloids. Students take notes.
Reinforcement/Practice
Students label their foldable
Students classify elements as metals, nonmetals or metalloids based on their location in the periodic table
- Evaluation:
- Informal: Ability to correctly identify the classification of
elements using the periodic table
Formal: Place properties in the proper columns for metals, nonmetals, and metalloids
Closure -Metals are ductile, malleable, have luster and are good conductors of heat and electricity. They are usually solid at room temperature. They tend to lose electrons during chemical bonding. -Nonmetals are brittle, lack luster, and are poor conductors of heat and electricity. They are usually gases at room temperature. They tend to gain electrons during chemical bonding. -Metalloids share properties of both metals and nonmetals.
- Vocabulary:
- Metals , nonmetals, metalloids, luster, ductile, malleable, melting point, dense, conductor, dull, brittle
- Homework:
- Answer concept review 360 and 370.
- Main Activity: ATOMIC STRUCTURE
- Educational target:
Students will be able to:
· Use the periodic table to identify the number of proton, electron, neutron and the element’s atomic mass
· Draw the electron shell model and identify the valence electron
Materials:
Worksheets, book, periodic table
Differentiation Strategies
These strategies are used to meet the varied needs of all learners:
-Varying academic levels: uses worksheets
of varying levels of difficulties
-Visual learners: uses periodic table to locate elements, looks at and makes electron shell models
-Auditory learners: listens to discussion on identifying number of p,e,n, and drawing electron shell models
-Kinesthetic learners: draw electron shell models
-Mathematical: calculates the number of p,e,n using only the information on the periodic table
Warm Up Bell Ringer: Place the letters of the properties below in the correct column.

a. Malleable
b. Have luster
c. Dull
d. Brittle
e. Dense
f. poor conductor
g. ductile
h. lose electrons
i. low melting point
j. low density
Homework check
Direct Instruction
1. Discuss: atom (Describe the parts of an atom and illustrate it on the board. Differentiate the charges of each atomic particle.)
2. Using the periodic table, locate the atomic number of a sample element. State that atomic # is equal to the # of protons. Atoms are neutral so the # of protons is equal to the number of electrons. # of neutrons is calculated by subtracting the atomic number to its atomic mass.
3. Provide students with more examples and worksheet to work on their own.
4. Describe the shell basics and suborbital basics relating them to previous topic on electron configuration.
5. Instruct how to draw the electron shell model. Give guided and individual practice. State the role of the valence electron(electrons in the outermost cells)
Practice
Identifying the # of protons, electrons, neutrons Drawing Electron Shell Model
- Evaluation:
- Informal: Ability to correctly identify the # of particles in a given
atom.
Formal: Drawing electron Shell model,calculating # of p,e,n
Closure
Atoms consist of protons (+), electrons (‐) and neutrons (). Protons and neutrons are found in the nucleus. The number of protons is equal to the number of electrons. Electrons are found in energy levels or shells. The electrons in the outermost level are called valence electrons. These are the ones lost/shared/gained during chemical bonding.
- Vocabulary:
- Atom, nucleus, protons, electrons, neutrons, Energy levels, valence electron
- Homework:
- Draw the electron shell model of the following element.
Indicate the # of protons, electrons and neutrons
Neon
Calcium
- Materials / Resources (including technology)
- State of Minnesota Standards Covered
- View PDF
- Weekly Informational Knowledge Overview - (Students will know...)
- 1. The difference between elements and
isotopes
2. The number of neutrons in an atom
3. The atomic mass of an element
- Weekly Procedural Knowledge Overview - (Students will be able to...)
- 1. Explain the difference between
elements and isotopes
2. Calculate the number of neutrons in an atom
3. Calculate the atomic mass of an element.
4. Participate in the Elemental Hangman Game
5. Explore the IT lab with the given Scavenger Hunt 2 activity
Monday
Tuesday
Wednesday
Thursday
Friday
- Main Activity:
- The Atomic Structure
Warm up:
1. Distribute quiz papers
2. Acknowledge top students
3. Class starts with Trivia
Procedure:
1. Teacher opens up the topic on atomic mass
2. T shows a Powerpoint presentation on the atomic structure of elements
3. Students ask questions
4. T discusses what isotopes are
5. Students are given some worksheets to answer
6. Ss calculate the number of protons, neutrons and electrons of an element
- Evaluation:
- Completed worksheets
Verbal answers from students
- Vocabulary:
- Protons, electrons, Neutrons, Isotopes, Atomic number, Atomic Mass, elements
- Homework:
- Read pp 326‐333 in your textbook and answer the Reinforcement and Study Guide. Study the periodic table and Prepare for an interactive game next meeting
- Main Activity: Calculating Atomic Mass and Introduction to Periodic Table
- Warm up:
1. Class starts with trivia
2. Checking of Homework
Procedure:
1. T asks students if they understood the lesson yesterday/last meeting
2. If so, T distributes worksheet activities and students solve the number of protons, electrons, neutrons.
3. If not, T repeats discussion
4. Students prepare for the interactive Hangman game of elements.
5. Ss are divided into two groups, with a leader to manage the team
6. T projects the game:
7. Ss will give individual letters to solve the problem. Each question has a clue in it. Students have chances to complete the word before the smiley is killed
8. The group with the most number of answers wins the game!
- Evaluation:
- Completed worksheets Completed Game play
- Vocabulary:
- Protons, electrons, Neutrons, Isotopes, Atomic number, Atomic Mass, elements
- Homework:
- Main Activity: Calculating Atomic Mass and Introduction to Periodic Table
- Warm up:
3. Class starts with trivia
4. Checking of Homework
Procedure:
9. T asks students if they understood the lesson yesterday/last meeting
10. If so, T distributes worksheet activities and students solve the number of protons, electrons, neutrons.
11. If not, T repeats discussion
12. Students prepare for the interactive Hangman game of elements.
13. Ss are divided into two groups, with a leader to manage the team
14. T projects the game:
15. Ss will give individual letters to solve the problem. Each question has a clue in it. Students have chances to complete the word before the smiley is killed
16. The group with the most number of answers wins the game!
- Evaluation:
- Completed worksheets Completed Game play
- Vocabulary:
- Protons, electrons, Neutrons, Isotopes, Atomic number, Atomic Mass, elements
- Homework:
- Main Activity: Scavenger Hunt 2
- Students are deployed in the IT lab to do the Scavenger Hunt
Chemistry. Students visit the Chemistry Links page at the Kid Zone to
find these sites: http://sciencespot.net/ and click the Kid Zone
graphic!
Direct Instructions:
1. Go to the “Atoms & Structure” area to find the answers to these questions.
· Who developed the idea of electron shells, also called orbital shells?
· Who developed the idea of electron shells, also called orbital What are the three “pieces” to an atom? ____________ ____________
2. Go to the “Atoms & Naming” area to find the answers to these questions.
1. How many chlorine atoms would be in a compound with the name:
a. dichloride? b. tetrachloride? c. decachloride?
2. What do you get when you add the following atoms together?
a. one carbon and one oxygen?
b. one carbon and two oxygen?
c. one carbon and four chlorine?
3. Choose the “Common Chemicals” game.
Play the game to discover the names of these common chemicals:
· Acetic acid = ______________________
· Sodium bicarbonate = ______________________
· Ascorbic acid = ______________________
· Sucrose = ______________________
· Retinol= ______________________
· Sodium chloride = ______________________
· Acetylsalicylic acid = ______________________
· Sodium hydroxide = ______________________
· Thiamine = ______________________
· Cobalamin = ______________________
- Evaluation:
- Completed IT lab worksheets
- Vocabulary:
- Homework:
- Main Activity:
- Quiz
- Evaluation:
- Vocabulary:
- Homework:
- Memorize as many elements that you can
- Materials / Resources (including technology)
- State of Minnesota Standards Covered
- View PDF
- Weekly Informational Knowledge Overview - (Students will know...)
- 1. Students will identify different
atoms by the number of protons in
the nucleus and realize that the
number of electrons equals the
number of protons in a neutral
atom.
2. They will also be able to explain the meaning of atomic number and atomic mass
- Weekly Procedural Knowledge Overview - (Students will be able to...)
- 1. Accomplish a crossword puzzle by
analyzing the periodic table
2. Complete their guided notes
3. Submit homework about Metals
4. Evaluate themselves in a form of a quiz
Monday
Tuesday
Wednesday
Thursday
Friday
- Main Activity: The Periodic Table
- Key Concepts:
1. The periodic table is a chart containing information about the atoms that make up all matter.
2. An element is a substance made up of only one type of atom.
3. The atomic number of an atom is equal to the number of protons in its nucleus.
4. The number of electrons surrounding the nucleus of an atom is equal to the number of protons in its nucleus.
5. Different atoms of the same element can have a different number of neutrons.
6. Atoms of the same element with different numbers of neutrons are called “isotopes” of that element.
7. The atomic mass of an element is the average mass of the different isotopes of the element.
8. The atoms in the periodic table are arranged to show characteristics and relationships between atoms and groups of atoms
Students will begin to look closely at the periodic table. They will be introduced to the basic information given for the elements in most periodic tables: the name, symbol, atomic number, and atomic mass for each element. Students will focus on the first 20 elements. They will try to correctly match cards with information about an element to each of the first 20 elements. Students will then watch several videos of some interesting chemical reactions involving some of these elements (See attached)
- Evaluation:
- Accomplished Element Cards
- Vocabulary:
- Groups, Period, Atomic mass, Atomic number
- Homework:
- Read page 355‐357 and answer the question on the Reinforcement and Study Guide.
- Main Activity: The Periodic Table (cont.)
- Warm up:
Class starts with Science Trivia
Checking of Homework
Procedure:
1. Teacher opens up a presentation of the Periodic Table
2. Families of elements would be tackled
3. T presents a video song that can help students remember elements easily
4. Students will do a crossword puzzle after the discussion.
5. Students utilize their Periodic Table of elements to successfully answer the questions in the puzzle:
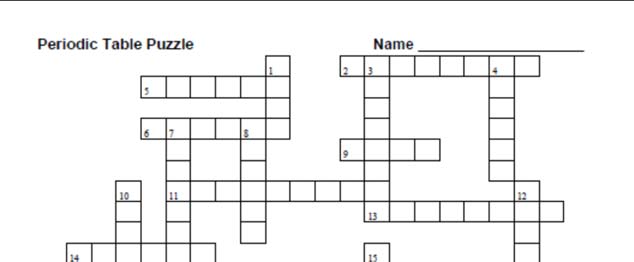
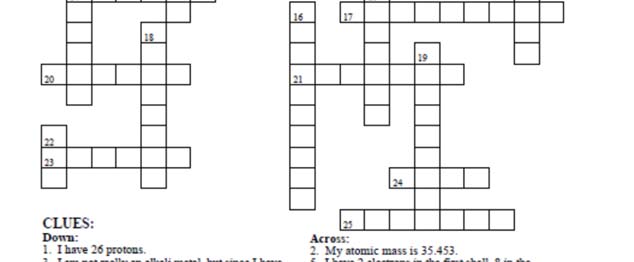
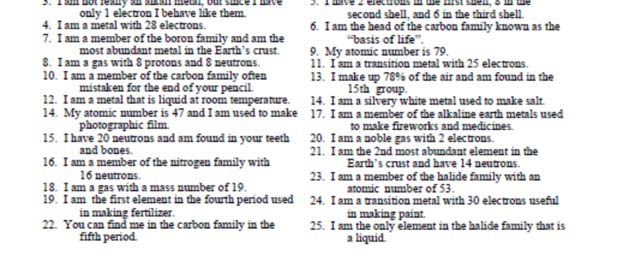
- Evaluation:
- Completed Puzzle
- Vocabulary:
- Metal, non metal, metalloids, actinide, lanthanide, noble gas, boron family, carbon family, oxygen family.
- Homework:
- Memorize at least 30 elements
- Main Activity: The Periodic Table (cont.)
- Warm up:
Class starts with Science Trivia
Checking of Homework
Procedure:
1. Teacher opens up a presentation of the Periodic Table
2. Families of elements would be tackled
3. T presents a video song that can help students remember elements easily
4. Students will do a crossword puzzle after the discussion.
5. Students utilize their Periodic Table of elements to successfully answer the questions in the puzzle:
- Evaluation:
- Completed Puzzle
- Vocabulary:
- Metal, non metal, metalloids, actinide, lanthanide, noble gas, boron family, carbon family, oxygen family.
- Homework:
- Memorize at least 30 elements
- Main Activity: Periodic Table (cont.)
- Scavenger Hunt 2
Students are deployed in the IT lab to do the Scavenger Hunt Chemistry. Students visit the Chemistry Links page at the Kid Zone to find these sites: http://sciencespot.net/ and click the Kid Zone graphic!
Direct Instructions:
1. Go to the “Atoms & Structure” area to find the answers to these questions.
· Who developed the idea of electron shells, also called orbital shells?
· What are the three “pieces” to an atom? ____________ ____________
2. Go to the “Atoms & Naming” area to find the answers to these questions.
1. How many chlorine atoms would be in a compound with the name:
a. dichloride? b. tetrachloride? c. decachloride?
2. What do you get when you add the following atoms together?
a. one carbon and one oxygen?
b. one carbon and two oxygen?
c. one carbon and four chlorine?
3. Choose the “Common Chemicals” game.
Play the game to discover the names of these common chemicals:
· Acetic acid = ______________________
· Sodium bicarbonate = ______________________
· Ascorbic acid = ______________________
· Sucrose = ______________________
· Retinol= ______________________
· Sodium chloride = ______________________
· Acetylsalicylic acid = ______________________
· Sodium hydroxide = ______________________
· Thiamine = ______________________
· Cobalamin = ______________________
- Evaluation:
- Completed IT lab worksheets
- Vocabulary:
- Homework:
- HW: Review Concepts studied and prepare for a quiz tomorrow
- Main Activity:
- Quiz
- Evaluation:
- Vocabulary:
- Homework:
- Materials / Resources (including technology)
- Worksheets, handouts, powerpoint, presenter, notes, crossword puzzle
- State of Minnesota Standards Covered
- View PDF
- Weekly Informational Knowledge Overview - (Students will know...)
- 1. That every element is classified as a
metal, nonmetal or semimetal
(metalloid) based on its individual
properties.
2. How to classify an element as a metal, nonmetal or semimetal based on experimental observations of physical and chemical properties.
3. That metals and non‐metals have different characteristics
4. That metals can be placed in an order of reactivity
5. How to predict the outcome of reactions between metals
- Weekly Procedural Knowledge Overview - (Students will be able to...)
- 1. Classify an element as a metal,
nonmetal or semimetal (metalloid)
based on its individual properties
through a laboratory activity.
2. Participate in studying elements through Bingo Game
3. Read an English story with elements inculcated in it.
4. Answer questions with regard metals, non metals and metalloids through a quiz.
Monday
Tuesday
Wednesday
Thursday
Friday
- Main Activity: Metals and Non Metals
- Warm up:
Class starts with science trivia
Checking of Homework
Direct Instruction:
1. Students review the periodic table with fun by answering the Elemental Tale: Gold Dust Kid
2. T goes over another topic and uses powerpoint presentation
3. Students ask questions
4. T gives homework on metals and metalloids
- Evaluation:
- Completed worksheets
- Vocabulary:
- Metals, Non Metals, Metalloids, Luster, Malleability, Ductility, Conductivity
- Homework:
- Read textbook and answer the following questions:
- Main Activity: Metals, Non Metals and Metalloids Lab
- Purpose: To investigate several properties of seven elements and
based on those properties identify each element as metal, nonmetal,
or metalloid.
Materials: Seven elements, Conductivity tester, Hammer, 1M HCl, Procedure:
1. At each lab table a different element is located. You will perform the same tests and/or observations at each station. You will move at the direction of the teacher.
2. Appearance: Observe and record the appearance of each element, including physical properties such as color, luster, and form.
3. Conductivity: You will test the conductivity of each element. An element is either a conductor or a nonconductor.
4. Crushing: Gently tap each element with your hammer. Each element is either brittle (shatters when struck) or malleable (flattens in a thin sheet).
5. Reactivity with acid: Place a small piece of the element in a well place with 15‐20 drops of 1M HCl.
Remember the indicators of a chemical reaction.
6. Observe and record your results at each lab station.

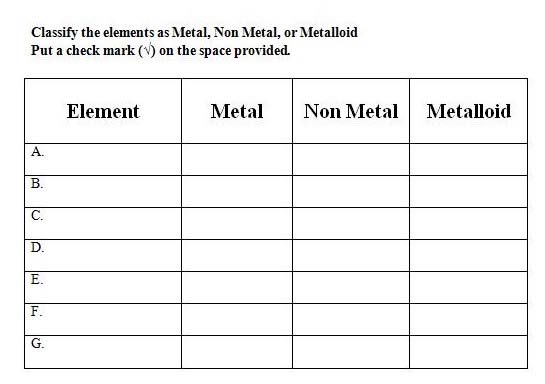
- Evaluation:
- Completed lab sheets
- Vocabulary:
- Metals, Non Metals, Metalloids, Luster, Malleability, Ductility, Conductivity
- Homework:
- Main Activity: Metals, Non Metals and Metalloids Lab
- Purpose: To investigate several properties of seven elements and
based on those properties identify each element as metal, nonmetal,
or metalloid.
Materials: Seven elements, Conductivity tester, Hammer, 1M HCl, Procedure:
7. At each lab table a different element is located. You will perform the same tests and/or observations at each station. You will move at the direction of the teacher.
8. Appearance: Observe and record the appearance of each element, including physical properties such as color, luster, and form.
9. Conductivity: You will test the conductivity of each element. An element is either a conductor or a nonconductor.
10. Crushing: Gently tap each element with your hammer. Each element is either brittle (shatters when struck) or malleable (flattens in a thin sheet).
11. Reactivity with acid: Place a small piece of the element in a well place with 15‐20 drops of 1M HCl.
Remember the indicators of a chemical reaction.
12. Observe and record your results at each lab station.
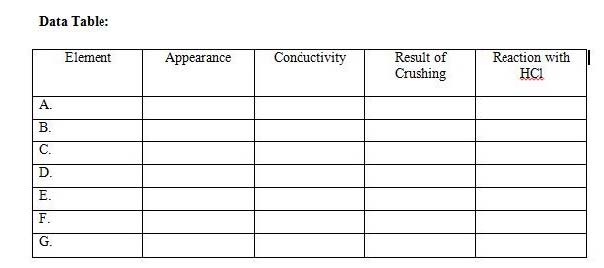

- Evaluation:
- Completed labsheets
- Vocabulary:
- Metals, Non Metals, Metalloids, Luster, Malleability, Ductility, Conductivity
- Homework:
- Main Activity: Elemental Bingo Game
- Warm up:
Class starts with trivia
Checking of Homeworks
Direct Instruction:
1. T finishes the lesson in Metals and Metalloids
2. Students cut their own Science Bingo cards and get ready to listen
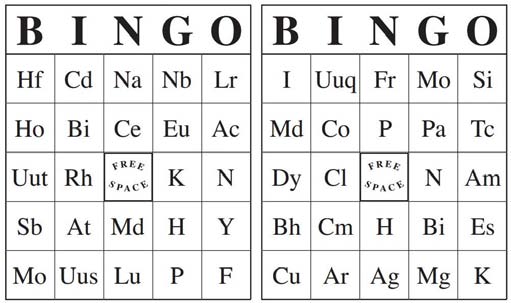
3. Play "Elements Bingo" by randomly selecting elements from a paper copy of the periodic table, randomly selecting an element and calling out the name of the element while crossing it off the periodic table. Students mark the symbol of that element on their bingo cards.
- Evaluation:
- Accomplished Bingo Cards
- Vocabulary:
- Metals, Non Metals, Metalloids, Luster, Malleability, Ductility, Conductivity
- Homework:
- Main Activity:
- Quiz
- Evaluation:
- Vocabulary:
- Homework:
- Materials / Resources (including technology)
- State of Minnesota Standards Covered
- View PDF
- Weekly Informational Knowledge Overview - (Students will know...)
- 1. Interpret the information given in the periodic table to describe the arrangement of electrons on the energy levels around an atom.
- Weekly Procedural Knowledge Overview - (Students will be able to...)
- 1. Focus on the first 20 elements.
2. Look at a diagram and animation to understand the basic pattern of the arrangement of electrons on energy levels around an atom.
3. Correctly match the cards with each element.
Monday
Tuesday
Wednesday
Thursday
Friday
- Main Activity: Energy Levels and Valence Electrons
- Warm up:
Class starts with science trivia
Distribution of quiz papers
Direct Instruction:
1. Introduce students to the idea that electrons surround the nucleus of an atom in regions called energy levels.
2. Review with students that in lesson two they focused on the number of protons, neutrons, and electrons in the atoms in each element. In this lesson, they will focus on the arrangement of the electrons in each element.
3. Project the Periodic table of energy levels and discuss the arrangement of electrons as students complete their activity sheet.
4. Project the image Periodic table of energy levels.
5. The image contains all of the electrons for elements 1–20.
However, the periodic table on the activity sheet contains electrons only for the elements at the beginning and end of each period. Discuss the arrangement of electrons within the energy levels for these atoms and have students fill in the electrons for the other atoms.
In the energy level diagrams, the electrons are spread out evenly in the level. Some books show them spread out this way and some show them in pairs. The pairing of electrons is meant to represent that electrons are in separate orbitals within each energy level. At the middle school level, it is not necessary for students to learn about electron orbitals. This information is offered so that it is clearer to you why electrons are often shown in pairs in energy level diagrams and in the dot diagrams used as an extension at the end of this chapter. An orbital defines a region within an energy level where there is a high probability of finding a pair of electrons. There can be a maximum of two electrons in each orbital. This is why the electrons are often shown in pairs within an energy level.
6. Tell students that the rows across on the periodic table are called periods.
Period 1
· Hydrogen
- Explain that hydrogen has 1 proton and 1 electron.
The 1 electron is on the first energy level.
· Helium
- Explain that helium has 2 protons and 2 electrons.
The 2 electrons are on the first energy level.
Period 2
· Lithium
- Explain that lithium has 3 protons and 3 electrons.
There are 2 electrons on the first energy level and 1 electron on the second. Explain that the first energy level can only have 2 electrons so the next electron in lithium is on the next (second) level.
· Neon
- Explain that neon has 10 protons and 10 electrons.
There are 2 electrons on the first energy level and 8 electrons on the second level.
· Beryllium–fluorine
- Help students fill in the correct number of electrons in the energy levels for the rest of the atoms in period 2.
Period 3
· Sodium
- Explain that sodium has 11 protons and 11
electrons. There are 2 electrons on the first energy level, 8 electrons on the second level, and 1 electron on the third energy level. Explain that the second energy level can only have 8 electrons so the next electron in sodium has to be on the next (third) level.
· Argon
- Explain that argon has 18 protons and 18 electrons. There are 2 electrons on the first energy level, 8 electrons on the second level, and 8 electrons on the third energy level. Have students complete the energy level model for argon in their periodic table.
· Magnesium–chlorine
- Help students fill in the correct number of electrons in the energy levels for the rest of the atoms in period 3.
Period 4
· Potassium
- Explain that potassium has 19 protons and 19 electrons. There are 2 electrons on the first energy level, 8 electrons on the second level, 8 electrons on the third energy level, and 1 on the fourth energy level. Explain that after the third energy level has 8 electrons, the next electron goes into the fourth level.
· Calcium
- Help students fill in the correct number of electrons in the energy levels for calcium.
- Evaluation:
- Vocabulary:
- Homework:
- Main Activity: The Chernobyl Diaries
- Students will watch a movie and realize the effects of radioactive
fallout from nuclear power plant emissions and explosion.
Ask students:
What might be the reason behind all mutations from the movie?
Can that happen in real life situations?
What elements are considered radioactive?
- Evaluation:
- Vocabulary:
- Homework:
- Main Activity: Energy Levels and Valence Electrons (cont..)
- Have students look for patterns in rows and columns of the first 20
elements in the periodic table.
Continue to project the image Periodic table of energy levels for elements 1–20 and have students look at their activity sheets to find patterns in the number of electrons within each energy level.
Have students look at the periods (rows going across).
Number of energy levels in each period
The atoms in the first period have electrons in 1 energy level.
The atoms in the second period have electrons in 2 energy levels.
The atoms in the third period have electrons in 3 energy levels.
The atoms in the fourth period have electrons in 4 energy levels.
How the electrons fill in the energy levels
First energy level = 1, 2
Second energy level = 1, 2, 3, …8
Third energy level = 1, 2, 3, …8
Fourth energy level = 1, 2
- Evaluation:
- Vocabulary:
- Homework:
- Main Activity: Elemental BINGO GAME
- Start lesson by distributing out blank “element bingo” sheets (blank 4x4 grid).
·Go over rules:
-No notes, no shouting out answers, must use pen, first person to get a line wins a prize.
-Cover up P.T. on wall.
-Get students to fill in there blank grid using element symbols from the first 18 elements (symbols listed on students’ sheets).
-Call out the name of randomly selected elements and students must cross off the correct symbol, if they have it.
-Play one or two games.

- Evaluation:
- Vocabulary:
- Homework:
- Materials / Resources (including technology)
- Worksheets, handouts, powerpoint, presenter, notes, Bingo cards, 8 elements,
- State of Minnesota Standards Covered
- View PDF
- Weekly Informational Knowledge Overview - (Students will know...)
- 1. Interpret the information given in the periodic table to describe the arrangement of electrons on the energy levels around an atom.
- Weekly Procedural Knowledge Overview - (Students will be able to...)
- 1. Focus on the first 20 elements.
2. Look at a diagram and animation to understand the basic pattern of the arrangement of electrons on energy levels around an atom.
3. Correctly match the cards with each element.
Monday
Tuesday
Wednesday
Thursday
Friday
- Main Activity: Energy Levels and Valence Electrons
- Warm up:
Class starts with science trivia
Distribution of quiz papers
Direct Instruction:
1. Introduce students to the idea that electrons surround the nucleus of an atom in regions called energy levels.
2. Review with students that in lesson two they focused on the number of protons, neutrons, and electrons in the atoms in each element. In this lesson, they will focus on the arrangement of the electrons in each element.
3. Project the Periodic table of energy levels and discuss the arrangement of electrons as students complete their activity sheet.
4. Project the image Periodic table of energy levels.
5. The image contains all of the electrons for elements 1–20.
However, the periodic table on the activity sheet contains electrons only for the elements at the beginning and end of each period. Discuss the arrangement of electrons within the energy levels for these atoms and have students fill in the electrons for the other atoms.
In the energy level diagrams, the electrons are spread out evenly in the level. Some books show them spread out this way and some show them in pairs. The pairing of electrons is meant to represent that electrons are in separate orbitals within each energy level. At the middle school level, it is not necessary for students to learn about electron orbitals. This information is offered so that it is clearer to you why electrons are often shown in pairs in energy level diagrams and in the dot diagrams used as an extension at the end of this chapter. An orbital defines a region within an energy level where there is a high probability of finding a pair of electrons. There can be a maximum of two electrons in each orbital. This is why the electrons are often shown in pairs within an energy level.
6. Tell students that the rows across on the periodic table are called periods.
Period 1
· Hydrogen
- Explain that hydrogen has 1 proton and 1 electron.
The 1 electron is on the first energy level.
· Helium
- Explain that helium has 2 protons and 2 electrons.
The 2 electrons are on the first energy level.
Period 2
· Lithium
- Explain that lithium has 3 protons and 3 electrons.
There are 2 electrons on the first energy level and 1 electron on the second. Explain that the first energy level can only have 2 electrons so the next electron in lithium is on the next (second) level.
· Neon
- Explain that neon has 10 protons and 10 electrons.
There are 2 electrons on the first energy level and 8 electrons on the second level.
· Beryllium–fluorine
- Help students fill in the correct number of electrons in the energy levels for the rest of the atoms in period 2.
Period 3 · Sodium
- Explain that sodium has 11 protons and 11 electrons. There are 2 electrons on the first energy level, 8 electrons on the second level, and 1 electron on the third energy level. Explain that the second energy level can only have 8 electrons so the next electron in sodium has to be on the next (third) level.
· Argon
-Explain that argon has 18 protons and 18 electrons. There are 2 electrons on the first energy level, 8 electrons on the second level, and 8 electrons on the third energy level. Have students complete the energy level model for argon in their periodic table.
· Magnesium–chlorine
-Help students fill in the correct number of electrons in the energy levels for the rest of the atoms in period 3.
Period 4
· Potassium
-Explain that potassium has 19 protons and 19 electrons. There are 2 electrons on the first energy level, 8 electrons on the second level, 8 electrons on the third energy level, and 1 on the fourth energy level. Explain that after the third energy level has 8 electrons, the next electron goes into the fourth level.
· Calcium
-Help students fill in the correct number of electrons in the energy levels for calcium.
- Evaluation:
- Vocabulary:
- Homework:
- Main Activity: The Chernobyl Diaries
- Students will watch a movie and realize the effects of radioactive
fallout from nuclear power plant emissions and explosion.
Ask students:
What might be the reason behind all mutations from the movie?
Can that happen in real life situations?
What elements are considered radioactive?
- Evaluation:
- Vocabulary:
- Homework:
- Main Activity: Energy Levels and Valence Electrons (cont..)
- Have students look for patterns in rows and columns of the first 20
elements in the periodic table.
Continue to project the image Periodic table of energy levels for elements 1–20 and have students look at their activity sheets to find patterns in the number of electrons within each energy level.
Have students look at the periods (rows going across).
Number of energy levels in each period
The atoms in the first period have electrons in 1 energy level.
The atoms in the second period have electrons in 2 energy levels.
The atoms in the third period have electrons in 3 energy levels.
The atoms in the fourth period have electrons in 4 energy levels.
How the electrons fill in the energy levels
First energy level = 1, 2
Second energy level = 1, 2, 3, …8
Third energy level = 1, 2, 3, …8
Fourth energy level = 1, 2
- Evaluation:
- Vocabulary:
- Homework:
- Main Activity: Fill in the Spaces (Worksheet file attached.))
- Evaluation:
- Vocabulary:
- Homework:
- Materials / Resources (including technology)
- Worksheets, handouts, powerpoint, presenter, notes, , 8 elements,
- State of Minnesota Standards Covered
- View PDF
- Weekly Informational Knowledge Overview - (Students will know...)
- Weekly Procedural Knowledge Overview - (Students will be able to...)
Monday
Tuesday
Wednesday
Thursday
Friday
- Main Activity:
- 1. Show an animation to introduce the process of covalent
bonding.
Introduce the question students will investigate in this lesson:
If atoms have an equal number of protons and electrons, why do atoms bond to other atoms? Why don’t they just stay separate?
Begin to answer this question by using hydrogen as an example.
Project the animation Covalent bond in hydrogen.
Make sure students see that each hydrogen atom has 1 proton and 1 electron. Remind students that the electron and its own proton are attracted to each other. Explain that if the atoms get close enough to each other, the electron from each hydrogen atom feels the attraction from the proton of the other hydrogen atom (shown by the double‐headed arrow). Point out to students that the attractions are not strong enough to pull the electron completely away from its own proton. But the attractions are strong enough to pull the two atoms close enough together so that the electrons feel the attraction from both protons and are shared by both atoms. At the end of the animation, explain that the individual hydrogen atoms have now bonded to become the molecule H2. This type of bond is called a covalent bond. In a covalent bond, electrons from each atom are attracted or “shared” by both atoms.
2. Discuss the conditions needed for covalent bonding and the stable molecule that is formed.
Project the image Covalent bond in hydrogen.
Note: This model of covalent bonding for the hydrogen molecule (H2) starts with 2 individual hydrogen atoms. In reality, hydrogen atoms are never separate to start with. They are always bonded with something else. To simplify the process, this model does not show the hydrogen atoms breaking their bonds from other atoms. It only focuses on the process of forming covalent bonds between two hydrogen atoms.
Two hydrogen atoms are near each other.
When two hydrogen atoms come close enough to each other, their electrons are attracted to the proton of the other atom.
Because there is both a strong enough attraction betweeen atoms and room for electrons in the outer energy level of both atoms, the atoms share electrons. This forms a covalent bond.
Tell students that there are two main reasons why two hydrogen atoms bond together to make one hydrogen molecule:
There needs to be a strong enough attraction between the electrons of each atom for the protons of the other atom.
There needs to be room in the outer energy level of both atoms.
Once bonded, the hydrogen molecule is more stable than the individual hydrogen atoms. Explain to students that by being part of a covalent bond, the electron from each hydrogen atom gets to be near two protons instead of only the one proton it started with. Since the electrons are closer to more protons, the molecule of two bonded hydrogen atoms is more stable than the two individual unbonded hydrogen atoms.
This is why it is very rare to find a hydrogen atom that is not bonded to other atoms. Hydrogen atoms bond with other hydrogen atoms to make hydrogen gas (H2). Or they can bond with other atoms like oxygen to make water (H2O) or carbon to make methane (CH4) or many other atoms.
3. Show students that when two hydrogen atoms bond together, the outer energy level becomes full.
4. Have students describe covalent bonding in a hydrogen molecule on their activity sheet and then review their answers.
5. Discuss the process of covalent bonding in a water molecule
- Evaluation:
- Vocabulary:
- Homework:
- Main Activity:
- Have students use electricity to break the covalent bonds in water
molecules.
Tell students that electrical energy can be used to break the covalent bonds in water molecules to produce hydrogen atoms and oxygen atoms. Two hydrogen atoms then bond to form hydrogen gas (H2) and two oxygen atoms bond to form oxygen gas (O2).
Question to investigate:
What is produced when the covalent bond in water molecules is broken?
Procedure
1. Place a battery between 2 pencils. Be sure that the battery is more than half‐way up.
2. With the help of a partner, wrap tape around the pencils and battery as shown.
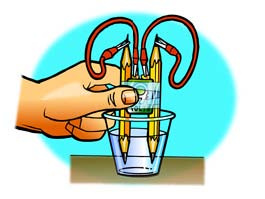
3. Two pencils taped on either side of a 9 volt battery, with alligator clips leading from the terminals of the battery to a sharpened end of the pencil. At the other end of the pencil, the lead is also sharpened, and the whole apparetus is held in a shallow cup of water.
4. Add water to a clear plastic cup until it is about ½‐full.
5. Add about ½ teaspoon of salt to the water and stir until the salt dissolves.
6. Connect one alligator clip to one terminal of the battery.
7. Using the other wire, connect one alligator clip to the other terminal of the battery.
8. Connect one end of the pencil lead to the alligator clip at the end of one of the wires.
9. Using the other wire, connect one end of the other pencil lead to the alligator clip at the end of the wire.
10. Place the ends of the pencil into the water as shown.
Expected results:
Bubbles will form and rise initially from one pencil lead. Soon, bubbles will form and rise from the other. Students should be able to see that there is more of one gas than the other. The gas that forms the small bubbles that comes off first is hydrogen. The other gas that forms the larger bubbles and lags behind a bit is oxygen.
Note: There will be bubbling when hydrogen and oxygen gas form on the pencil leads. Be sure students do not get the misconception that the bubbles they see mean that the water is boiling. In boiling, the bonds holding the atoms together in water molecules do not come apart. In the process of electrolysis, the bonds holding the atoms together do come apart.
Discuss student observations.
Ask students:
What are the bubbles made out of in the activity?
Hydrogen gas (H2) and oxygen gas (O2)
Why was there more hydrogen gas produced than oxygen gas?
Each water molecule breaks into 2 hydrogen atoms and 1 oxygen
atom. Two hydrogen atoms then bond to form hydrogen gas (H2) and 2 oxygen atoms bond to form oxygen gas (O2). Each water molecule has all the atoms needed to make 1 molecule of hydrogen gas. But with only 1 oxygen atom, a water molecule only has half of what is needed to make 1 molecule of oxygen gas. So, 2 water molecules will produce 2 molecules of hydrogen gas but only 1 molecule of oxygen gas.
- Evaluation:
- Vocabulary:
- Homework:
- Main Activity:
- Have students use electricity to break the covalent bonds in water
molecules.
Tell students that electrical energy can be used to break the covalent bonds in water molecules to produce hydrogen atoms and oxygen atoms. Two hydrogen atoms then bond to form hydrogen gas (H2) and two oxygen atoms bond to form oxygen gas (O2).
Question to investigate:
What is produced when the covalent bond in water molecules is broken?
Procedure
1. Place a battery between 2 pencils. Be sure that the battery is more than half‐way up.
2. With the help of a partner, wrap tape around the pencils and battery as shown.
3. Two pencils taped on either side of a 9 volt battery, with alligator clips leading from the terminals of the battery to a sharpened end of the pencil. At the other end of the pencil, the lead is also sharpened, and the whole apparetus is held in a shallow cup of water.
4. Add water to a clear plastic cup until it is about ½‐full.
5. Add about ½ teaspoon of salt to the water and stir until the salt dissolves.
6. Connect one alligator clip to one terminal of the battery.
7. Using the other wire, connect one alligator clip to the other terminal of the battery.
8. Connect one end of the pencil lead to the alligator clip at the end of one of the wires.
9. Using the other wire, connect one end of the other pencil lead to the alligator clip at the end of the wire.
10. Place the ends of the pencil into the water as shown.
Expected results:
Bubbles will form and rise initially from one pencil lead. Soon, bubbles will form and rise from the other. Students should be able to see that there is more of one gas than the other. The gas that forms the small bubbles that comes off first is hydrogen. The other gas that forms the larger bubbles and lags behind a bit is oxygen.
Note: There will be bubbling when hydrogen and oxygen gas form on the pencil leads. Be sure students do not get the misconception that the bubbles they see mean that the water is boiling. In boiling, the bonds holding the atoms together in water molecules do not come apart. In the process of electrolysis, the bonds holding the atoms together do come apart
Discuss student observations.
Ask students:
What are the bubbles made out of in the activity?
Hydrogen gas (H2) and oxygen gas (O2)
Why was there more hydrogen gas produced than oxygen gas?
Each water molecule breaks into 2 hydrogen atoms and 1 oxygen atom. Two hydrogen atoms then bond to form hydrogen gas (H2) and 2 oxygen atoms bond to form oxygen gas (O2). Each water molecule has all the atoms needed to make 1 molecule of hydrogen gas. But with only 1 oxygen atom, a water molecule only has half of what is needed to make 1 molecule of oxygen gas. So, 2 water molecules will produce 2 molecules of hydrogen gas but only 1 molecule of oxygen gas.
- Evaluation:
- Vocabulary:
- Homework:
- Main Activity:
- 1. Help students understand how atoms combine to form the
molecules of oxygen, methane, and carbon dioxide.
2. Remind students that in this lesson they looked at the covalent bonds in hydrogen molecules and in water molecules. Tell them that they will look at the covalent bonds in three other common substances.
3. Project the animation Oxygen’s double bond.
4. Explain to students that the oxygen molecules that are present in our air are made up of 2 oxygen atoms. This animation will show them what the covalent bond between 2 oxygen atoms is like. Narrate the animation by pointing out that each oxygen atom has 6 valence electrons. When the oxygen atoms get close together, the attractions from the nucleus of both atoms attract the outer electrons. In this case, 2 electrons from each atom are shared. This is called a double bond.
5. Each oxygen atom has 6 valence electrons in its outer energy level
6. When two oxygen atoms get close to each other, the attractions from the nucleus of both atoms attract the outer electrons.
7. In this case, two electrons from each atom are shared. This is called a double bond.
8. Project the image Oxygen’s double bond II.
9. Project the before and after pictures Covalent bonding of methane.
Ask students:
Briefly describe the process of covalent bonding between the carbon and the four hydrogen atoms to make a methane molecule. Be sure to mention attractions between electrons and protons and the number of electrons in the outer energy level for the atoms in the final molecule.
Be sure students realize that the protons of each atom attracts the other atoms electrons, which brings the atoms together. Atoms continue to bond with other atoms until their outer energy levels are full.
10. Project the before and after pictures Covalent bonding of carbon dioxide gas.
Ask students:
Briefly describe the process of covalent bonding between the carbon and the two oxygen atoms to make a carbon dioxide molecule. Be sure to mention attractions between electrons and protons and the number of electrons in the outer energy level for the atoms in the final molecule.
Be sure students realize that the protons of each atom attracts the other atoms electrons, which brings the atoms together. Atoms continue to bond with other atoms until their outer energy levels are full
- Evaluation:
- Vocabulary:
- Homework:
- Main Activity:
- Quiz
- Evaluation:
- Vocabulary:
- Homework:
- Materials / Resources (including technology)
- 9‐volt battery, 2 wires with alligator clips on both ends, 2 pencils sharpened at both ends, Water, Salt, Clear plastic cup, Tape, Presenter, Powerpoint, Computer, projector
- State of Minnesota Standards Covered
- View PDF
- Weekly Informational Knowledge Overview - (Students will know...)
- 1. The concepts learned in the topics
previously discussed
2. The concepts learned about lewis structures, bohr models, atomic structures, periodic table etc. in an engaging game
- Weekly Procedural Knowledge Overview - (Students will be able to...)
- 1. reinforce concepts learned in the
topics previously discussed by:
• Creating a vocabulary card • Solving atomic mass units • Participating in the round robin activity
Monday
Tuesday
Wednesday
Thursday
Friday
- Main Activity: Review
- Warm Up
Class starts with science trivia
Review Activities:
1. Students create a vocabulary card by:
a. Writing a word in the middle of the index card
b. Writing the definition of the word in the upper right hand corner of the card
c. Writing related vocabulary words in the upper left hand corner
d. Writing down examples of the word
e. Drawing/ illustrating the word
2. Students are arranged in a semi‐circle for the round robin activity.
Teacher will say a word/concept and the students have to give an example (elements, compounds, malleability etc.)
3. Students will be asked to solve some problems with regard to all major discussions like atomic mass units, mass numbers etc.
- Evaluation:
- Short Quiz
- Vocabulary:
- Homework:
- Main Activity:
- Review
Warm Up
Checking/collection of Midterm requirements and notebooks Bell Ringer: Students answer 5 T/F questions.
Review Proper:
Students play “Who wants to be a millionaire?” Students take turns in being the contestant. They answer questions from the lowest level of difficulty to the highest until they reach 1 million. Once a wrong answer is given, the student stops answering questions and his/her score is commensurate to the level reached.
- Evaluation:
- Students’ scores in the game activity
- Vocabulary:
- Homework:
- Main Activity:
- FINAL EXAM
- Evaluation:
- Vocabulary:
- Homework:
- Main Activity:
- FINAL EXAM
- Evaluation:
- Vocabulary:
- Homework:
- Main Activity:
- FINAL EXAM
- Evaluation:
- Vocabulary:
- Homework:
- Materials / Resources (including technology)
- Index cards, books, notes, board markers, Scoreboard, PowerPoint, presenter
- State of Minnesota Standards Covered
- View PDF
- Weekly Informational Knowledge Overview - (Students will know...)
- 1. Covalent bonding
2. Sharing of valence electrons
- Weekly Procedural Knowledge Overview - (Students will be able to...)
- 1. Look at animations and refer to the
energy level models they have been
using to make drawings of the process of
covalent bonding. Students will consider
why atoms bond to form molecules like
H2 (hydrogen), H2O (water), O2
(oxygen), CH4 (methane), and CO2
(carbon dioxide).
2. Explain that attraction between the protons and electrons of two atoms cause them to bond. Students will be able to draw a model of the covalent bonds between the atoms in H2 (hydrogen), H2O (water), O2 (oxygen), CH4 (methane), and CO2 (carbon dioxide).
Monday
Tuesday
Wednesday
Thursday
Friday
- Main Activity:
- Final Exam Re‐checking
Completion of Requirements
New set of classroom rules and policies
- Evaluation:
- Vocabulary:
- Homework:
- Main Activity: Covalent Bonding
- Show an animation to introduce the process of covalent bonding.
Introduce the question students will investigate in this lesson:
If atoms have an equal number of protons and electrons, why do atoms bond to other atoms? Why don’t they just stay separate?
Begin to answer this question by using hydrogen as an example.
Project the animation Covalent bond in hydrogen.
Make sure students see that each hydrogen atom has 1 proton and 1 electron. Remind students that the electron and its own proton are attracted to each other. Explain that if the atoms get close enough to each other, the electron from each hydrogen atom feels the attraction from the proton of the other hydrogen atom (shown by the double‐headed arrow). Point out to students that the attractions are not strong enough to pull the electron completely away from its own proton. But the attractions are strong enough to pull the two atoms close enough together so that the electrons feel the attraction from both protons and are shared by both atoms. At the end of the animation, explain that the individual hydrogen atoms have now bonded to become the molecule H2. This type of bond is called a covalent bond. In a covalent bond, electrons from each atom are attracted or “shared” by both atoms.
1. Discuss the conditions needed for covalent bonding and the stable molecule that is formed.
Project the image Covalent bond in hydrogen.
Note: This model of covalent bonding for the hydrogen molecule (H2) starts with 2 individual hydrogen atoms. In reality, hydrogen atoms are never separate to start with. They are always bonded with something else. To simplify the process, this model does not show the hydrogen atoms breaking their bonds from other atoms. It only focuses on the process of forming covalent bonds between two hydrogen atoms.
Two hydrogen atoms are near each other.
When two hydrogen atoms come close enough to each other, their electrons are attracted to the proton of the other atom.
Because there is both a strong enough attraction betweeen atoms and room for electrons in the outer energy level of both atoms, the atoms share electrons. This forms a covalent bond.
Tell students that there are two main reasons why two hydrogen atoms bond together to make one hydrogen molecule:
There needs to be a strong enough attraction between the electrons of each atom for the protons of the other atom.
There needs to be room in the outer energy level of both atoms.
Once bonded, the hydrogen molecule is more stable than the individual hydrogen atoms. Explain to students that by being part of a covalent bond, the electron from each hydrogen atom gets to be near two protons instead of only the one proton it started with. Since the electrons are closer to more protons, the molecule of two bonded hydrogen atoms is more stable than the two individual unbonded hydrogen atoms.
This is why it is very rare to find a hydrogen atom that is not bonded to other atoms. Hydrogen atoms bond with other hydrogen atoms to make hydrogen gas (H2). Or they can bond with other atoms like oxygen to make water (H2O) or carbon to make methane (CH4) or many other atoms.
2. Show students that when two hydrogen atoms bond together, the outer energy level becomes full.
3. Have students describe covalent bonding in a hydrogen molecule on their activity sheet and then review their answers.
4. Discuss the process of covalent bonding in a water molecule
- Evaluation:
- Vocabulary:
- Homework:
- Main Activity:
- Have students use electricity to break the covalent bonds in water
molecules.
Tell students that electrical energy can be used to break the covalent bonds in water molecules to produce hydrogen atoms and oxygen atoms. Two hydrogen atoms then bond to form hydrogen gas (H2) and two oxygen atoms bond to form oxygen gas (O2).
Question to investigate:
What is produced when the covalent bond in water molecules is broken?
Procedure
1. Place a battery between 2 pencils. Be sure that the battery is more than half‐way up.
2. With the help of a partner, wrap tape around the pencils and battery as shown.
3. Two pencils taped on either side of a 9 volt battery, with alligator clips leading from the terminals of the battery to a sharpened end of the pencil. At the other end of the pencil, the lead is also sharpened, and the whole apparetus is held in a shallow cup of water.
4. Add water to a clear plastic cup until it is about ½‐full.
5. Add about ½ teaspoon of salt to the water and stir until the salt dissolves.
6. Connect one alligator clip to one terminal of the battery.
7. Using the other wire, connect one alligator clip to the other terminal of the battery.
8. Connect one end of the pencil lead to the alligator clip at the end of one of the wires.
9. Using the other wire, connect one end of the other pencil lead to the alligator clip at the end of the wire.
10. Place the ends of the pencil into the water as shown.
Expected results:
Bubbles will form and rise initially from one pencil lead. Soon, bubbles will form and rise from the other. Students should be able to see that there is more of one gas than the other. The gas that forms the small bubbles that comes off first is hydrogen. The other gas that forms the larger bubbles and lags behind a bit is oxygen.
Note: There will be bubbling when hydrogen and oxygen gas form on the pencil leads. Be sure students do not get the misconception that the bubbles they see mean that the water is boiling. In boiling, the bonds holding the atoms together in water molecules do not come apart. In the process of electrolysis, the bonds holding the atoms together do come apart
Discuss student observations.
Ask students:
What are the bubbles made out of in the activity?
Hydrogen gas (H2) and oxygen gas (O2)
Why was there more hydrogen gas produced than oxygen gas?
Each water molecule breaks into 2 hydrogen atoms and 1 oxygen atom. Two hydrogen atoms then bond to form hydrogen gas (H2) and 2 oxygen atoms bond to form oxygen gas (O2). Each water molecule has all the atoms needed to make 1 molecule of hydrogen gas. But with only 1 oxygen atom, a water molecule only has half of what is needed to make 1 molecule of oxygen gas. So, 2 water molecules will produce 2 molecules of hydrogen gas but only 1 molecule of oxygen gas.
- Evaluation:
- Vocabulary:
- Homework:
- Main Activity:
- 1. Help students understand how atoms combine to form the
molecules of oxygen, methane, and carbon dioxide.
2. Remind students that in this lesson they looked at the covalent bonds in hydrogen molecules and in water molecules. Tell them that they will look at the covalent bonds in three other common substances.
3. Project the animation Oxygen’s double bond.
4. Explain to students that the oxygen molecules that are present in our air are made up of 2 oxygen atoms. This animation will show them what the covalent bond between 2 oxygen atoms is like. Narrate the animation by pointing out that each oxygen atom has 6 valence electrons. When the oxygen atoms get close together, the attractions from the nucleus of both atoms attract the outer electrons. In this case, 2 electrons from each atom are shared. This is called a double bond.
5. Each oxygen atom has 6 valence electrons in its outer energy level
6. When two oxygen atoms get close to each other, the attractions from the nucleus of both atoms attract the outer electrons.
7. In this case, two electrons from each atom are shared. This is called a double bond.
8. Project the image Oxygen’s double bond II.
9. Project the before and after pictures Covalent bonding of methane.
Ask students(1):
Briefly describe the process of covalent bonding between the carbon and the four hydrogen atoms to make a methane molecule. Be sure to mention attractions between electrons and protons and the number of electrons in the outer energy level for the atoms in the final molecule.
Be sure students realize that the protons of each atom attracts the other atoms electrons, which brings the atoms together. Atoms continue to bond with other atoms until their outer energy levels are full.
10. Project the before and after pictures Covalent bonding of carbon dioxide gas.
Ask students(2):
Briefly describe the process of covalent bonding between the carbon and the two oxygen atoms to make a carbon dioxide molecule. Be sure to mention attractions between electrons and protons and the number of electrons in the outer energy level for the atoms in the final molecule.
Be sure students realize that the protons of each atom attracts the other atoms electrons, which brings the atoms together. Atoms continue to bond with other atoms until their outer energy levels are full.
- Evaluation:
- Vocabulary:
- Homework:
- Materials / Resources (including technology)
- State of Minnesota Standards Covered
-
- Weekly Informational Knowledge Overview - (Students will know...)
- 1. How to describe motion
2. How to solve mathematical equation
of motion, speed and velocity
- Weekly Procedural Knowledge Overview - (Students will be able to...)
Monday
Tuesday
Wednesday
Thursday
Friday
- Main Activity:
- Ss solve motion problems; ss are arranged into groups of 3 and given the lab materials, ss will measure a distance, take turns running, measure and record the time it took to travel the distance, perform several trials; ss record the data and then their calculation and plot them on a d‐t graph, ss will complete answering questions in their lab worksheet.
- Evaluation:
- Vocabulary:
- Homework:
- Main Activity:
- Start with a bell ringer; students describe motion using diagrams( ticker‐tape, vector diagrams, p‐t graphs and v‐t graphs), students complete notes and answer worksheets to check understanding.
- Evaluation:
- Vocabulary:
- Homework:
- Main Activity:
- (Cont… Tues contents)
- Evaluation:
- Vocabulary:
- Homework:
- Main Activity:
- ss start off with a bell ringer; ss describe motion using equations, model the problem solving strategy steps: Construct a diagram of the situation; Identify and list the given and unknown information in variable form; Identify and list the equation that will be used; Substitute known values into the equation and use appropriate algebraic steps to solve for the unknown information; ss answer sets of problems.
- Evaluation:
- Vocabulary:
- Homework:
- Main Activity:
- Ss start with a bell ringer; Ss review concepts previously discussed; T re‐teaches concepts that are not clear; ss are given time to review silently; ss take a quiz.
- Evaluation:
- Vocabulary:
- Homework:
- Materials / Resources (including technology)
- State of Minnesota Standards Covered
- View PDF
- Weekly Informational Knowledge Overview - (Students will know...)
- 1. motion problems
2. motion using equations,model the problem solving strategy steps:
Construct a diagram of the situation;
- Weekly Procedural Knowledge Overview - (Students will be able to...)
- 3. solve motion problems
4. record the data and then their
calculation and plot them on a d‐t
graph,
5. describe motion using diagrams (ticker‐tape, vector diagrams, p‐t graphs and v‐t graphs), complete notes and answer worksheets to check understanding
6. describe motion using equations, model the problem solving strategy steps: Construct a diagram of the situation;
7. Identify and list the given and unknown information in variable form;
8. Identify and list the equation that will be used ;
9. Substitute known values into the equation and use appropriate algebraic steps to solve for the unknown information;
10. answer sets of problems
11. concepts previously discussed
12. take a quiz
Monday
Tuesday
Wednesday
Thursday
Friday
- Main Activity: Speed Calculations Practice
- Warm up:
Homework Check
Direct Instruction:
1. Teacher gives worksheets for speed and velocity problems.
2. Students calculate using scientific calculators
3. After 30 minutes, a representative would go to the board and solve problems.
4. Check solutions thorughpowerpoint presentations.
5. Discuss about graphs
- Evaluation:
- Completed worksheets
- Vocabulary:
- Speed, average speed, time, distance, displacement, velocity
- Homework:
- Read page 9 – 15 and answer the Reinforcement and study guide
- Main Activity:
- Quiz on Speed Calculations
- Evaluation:
- Vocabulary:
- Homework:
- Main Activity:
- Quiz on Speed Calculations
- Evaluation:
- Vocabulary:
- Homework:
- Main Activity:
- Acceleration
- Evaluation:
- Vocabulary:
- Homework:
- Main Activity: Blob in a bottle
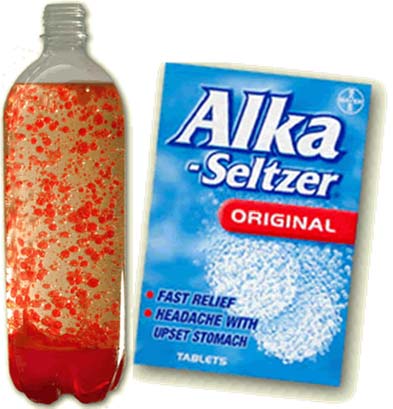
1. Pour the water into the bottle.
2. Use a measuring cup or funnel to slowly pour the vegetable oil into the bottle until it's almost full. You may have to wait a few minutes for the oil and water separate.
3. Add 10 drops of food coloring to the bottle (we like red, but any color will look great.) The drops will pass through the oil and then mix with the water below.
4. Break a seltzer tablet in half and drop the half tablet into the bottle. Watch it sink to the bottom and let the blobby greatness begin!
5. To keep the effect going, just add another tablet piece. For a true lava lamp effect, shine a flashlight through the bottom of the bottle. To begin, the oil stays above the water because the oil is lighter than the water or, more specifically, less dense than water. The oil and water do not mix because of something called "intermolecular polarity." That term is fun to bring up in dinner conversation.
Molecular polarity basically means that water molecules are attracted to other water molecules. They get along fine, and can loosely bond together (drops.) This is similar to magnets that are attracted to each other. Oil molecules are attracted to other oil molecules, they get along fine as well. But the structures of the two molecules do not allow them to bond together. Of course, there’s a lot more fancy scientific language to describe density and molecular polarity, but maybe now you’ll at least look at that vinegrette salad dressing in a whole new way.
When you added the tablet piece, it sank to the bottom and started dissolving and creating a gas. As the gas bubbles rose, they took some of the colored water with them. When the blob of water reached the top, the gas escaped and down went the water. Cool, huh? By the way, you can store your "Blobs In A Bottle" with the cap on, and then anytime you want to bring it back to life, just add another tablet piece.
- Evaluation:
- Vocabulary:
- Homework:
- Materials / Resources (including technology)
- A clean 1 liter clear soda bottle
3/4 cup of water
Vegetable Oil
Fizzing tablets (such as Alka Seltzer), Food coloring Powerpoint , Presenter
- State of Minnesota Standards Covered
- View PDF
- Weekly Informational Knowledge Overview - (Students will know...)
- 1. Newton's first law of motion
2. Newton's second law of motion?
3. the relationship between force, mass, and acceleration
4. Newton's third law of motion
5. examples of force pairs
- Weekly Procedural Knowledge Overview - (Students will be able to...)
Monday
Tuesday
Wednesday
Thursday
Friday
- Main Activity:
- Warm up:
Class starts with science trivia
Finish the discussion on Force Motion and Acceleration
Introduce Newton’s Laws of Motion
- Evaluation:
- Vocabulary:
- Homework:
- Main Activity: Moving Bodies
- Question: How does the amount of mass of a body in motion affect
its tendency to remain in motion?
Hypothesis:
Materials:
2 Meter sticks String Rubber bands
3 marbles Wooden block Paper cup
Procedure:
1. Use the string to make “guard rails” down the length of the meter stick.
1. Fasten the strings to the meter stick with the rubber bands.
2. Make a ramp from the wooden block and the meter stick.
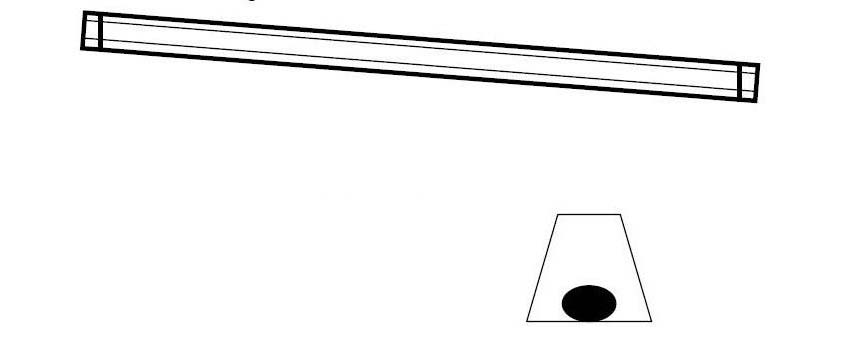
3. Cut a small hole in the paper cup.
4. Put the cup at the end of the meter stick ramp. Face the hole in the cupso that a marble can roll down the ramp and into the cup.
5. Put a marble at the top of the meter stick ramp and let it roll down theramp and into the cup.
6. Use the second meter stick to measure how far the cup moved. Recordyour data.
7. Repeat for a total of 5 trials.

8. Add a second marble to the top of the meter stick, so that two marbles rolldown the ramp. Roll both marbles together.
Repeat steps 5 – 7.
9. Add the third marble to the top of the meter stick so that three marbles roll down the ramp. Roll all 3 marbles together. Repeat steps .
Conclusion:
Write a brief paragraph answering the original question. Describe whether or not your data supports your hypothesis. Use actual data from your investigation as evidence.
- Evaluation:
- Vocabulary:
- Homework:
- Main Activity: Moving Bodies
- Question: How does the amount of mass of a body in motion affect
its tendency to remain in motion?
Hypothesis:
Materials:
2 Meter sticks String Rubber bands
3 marbles Wooden block Paper cup
Procedure:
2. Use the string to make “guard rails” down the length of the meter stick.
10. Fasten the strings to the meter stick with the rubber bands.
11. Make a ramp from the wooden block and the meter stick.
12. Cut a small hole in the paper cup.
13. Put the cup at the end of the meter stick ramp. Face the hole in the cup so that a marble can roll down the ramp and into the cup.
14. Put a marble at the top of the meter stick ramp and let it roll down the ramp and into the cup.
15. Use the second meter stick to measure how far the cup moved. Record your data.
16. Repeat for a total of 5 trials.
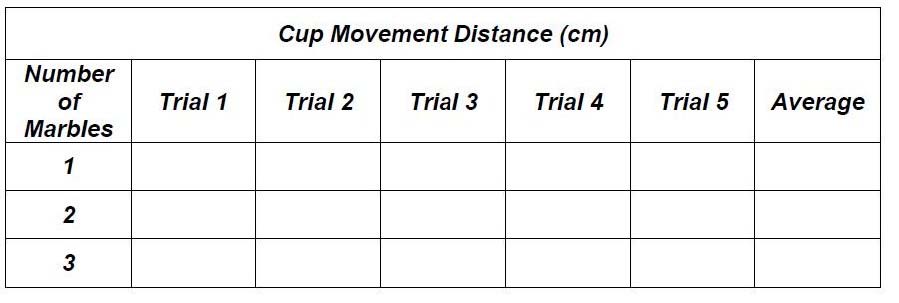
17. Add a second marble to the top of the meter stick, so that two marbles roll down the ramp. Roll both marbles together. Repeat steps 5 – 7. 18. Add the third marble to the top of the meter stick so that three marbles roll down the ramp. Roll all 3 marbles together. Repeat steps .

Conclusion:
Write a brief paragraph answering the original question. Describe whether or not your data supports your hypothesis. Use actual data from your investigation as evidence.
- Evaluation:
- Vocabulary:
- Homework:
- Evaluation:
- Vocabulary:
- Homework:
- Main Activity:
- Quiz
- Evaluation:
- Vocabulary:
- Homework:
- Materials / Resources (including technology)
- State of Minnesota Standards Covered
- View PDF
- Weekly Informational Knowledge Overview - (Students will know...)
- Weekly Procedural Knowledge Overview - (Students will be able to...)
Monday
Tuesday
Wednesday
Thursday
Friday
- Main Activity:
- NO CLASS
- Evaluation:
- Vocabulary:
- Homework:
- Main Activity:
- NO CLASS
- Evaluation:
- Vocabulary:
- Homework:
- Learning Objective:
- Language Objective:
- Main Activity: A closer look at Newton’s First Law of Motion
- With the use of PowerPoint presentation and graphics, teacher explains the Law of Inertia and how an object remains at rest unless an unbalanced force acts on the object to make it move.
- Evaluation:
- Question‐answer activity
- Vocabulary:
- Inertia, Balanced force, Unbalanced force, gravity, friction
- Homework:
- Answer the questions in the reinforcement and study guide handout
- Main Activity: The Penny High Dive! Experiment
- applying the Law of inertia
Materials:
A penny
A piece of card stock or stiff paper
A film canister, baby food jar, or other similar size container with a
mouth slightly larger than a penny
Pencil or pen
Scissors
What to do:
1. Cut the cardstock paper into a long strip about .75 inches (2 cm) wide and form it into a hoop as shown. The paper should be stiff enough to hold the hoop shape on its own and the hoop works best when it is between 3‐4 inches (8‐10 cm) across.
2. For dramatic effect, fill the film canister with water and place on a level surface.
3. Place the hoop on the film canister as shown and balance the penny on the top of the hoop.
4. Time for Penny's big moment! Place a pencil through the center of the hoop and in one swift motion fling the hoop off to the side as pictured. If you do this correctly, the hoop will fly out of the way, and the penny will fall straight down into the canister with a splash. 10 points for Penny!
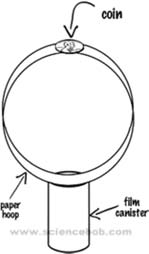
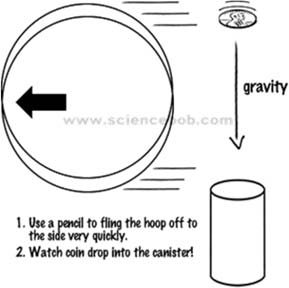
- Evaluation:
- Vocabulary:
- Homework:
- Main Activity:
- Quiz
- Evaluation:
- Vocabulary:
- Homework:
- Materials / Resources (including technology)
- State of Minnesota Standards Covered
- View PDF
- Weekly Informational Knowledge Overview - (Students will know...)
- 1. How net force, mass, and
acceleration influence the motion of
an object.
2. Some examples of Newton’s second law of motion.
3. Newton’s second law of motion through mathematical equations
4. The difference between a direct proportion and an inverse proportion using the formula F=ma
- Weekly Procedural Knowledge Overview - (Students will be able to...)
- 1. Learn how net force, mass, and
acceleration influence the motion of
an object.
2. Provide examples of Newton’s second law of motion.
3. Describe Newton’s second law of motion mathematically
4. Visualize and differentiate the difference between a direct proportion and an inverse proportion using the formula F=ma
5. Perform an experiment applying the law of acceleration
6. Solve mathematical equations pertaining to Newton’s 2nd law
Monday
Tuesday
Wednesday
Thursday
Friday
- Main Activity: Introduction to Law of Acceleration
- Warm up:
Checking of Homework
Distribute quiz papers
Direct Instruction:
With the use of PowerPoint presentations, teacher will provide information of the following concepts:
1. Tell students that an object accelerates when a force acts on it.
2. Ask the students to recall the definition of acceleration:
·The cause of acceleration is force.
·Unbalanced forces acting on an object cause the object to accelerate.
·For a constant force, an increase in the mass will result in a decrease in the acceleration.
3. Reveal Newton’s second law:
·Newton’s second law states that the acceleration produced by a net force on an object is directly proportional to the magnitude of the net force, is in the same direction as the net force, and is inversely proportional to the mass of the object.
4. Emphasize the Units to remember!
·Force N or kg•m/s2
· Acceleration m/s2
· Mass kg
5. Ask students to analyze and think!
If a car can accelerate at 2 m/s2, what acceleration can it attain if it is towing another car of equal mass?
Expected Answer: The same force on twice the mass produces half the acceleration, or 1 m/s2.
- Evaluation:
- Verbalization of understanding through question‐answer activity
- Vocabulary:
- net force, friction, acceleration, mass, directly proportional, inversely proportional
- Homework:
- Read pages 61‐67 and answer the Reinforcement and study guide handout.
- Main Activity: Newton’s Second Law (Balls in Motion)
- Background Information:
Isaac Newton's 2nd law of motion, also called the Law of Acceleration, states that the acceleration of an object is proportional (similar) to the force that's applied to it, and inversely proportional (opposite) to the mass of the object. In other words, if the force remains constant (the same as the mass of an object increases) its acceleration will decrease and vice versa. Force is calculated by multiplying mass times acceleration or F= m x a
Materials:
ping pong ball, small marble, golf ball, softball, straw, meter sticks and tray with raised side to capture moving balls
Procedure:
1. Set ball over marked area of the tray and apply force by blowing through a straw on the bail to reach the other side of the tray with the raised side. Record the acceleration rate on the table as slow, medium, or fast by placing a check on which applies.
2. Apply the same force (blow with the same force) on the next ball and record your observation.
3. Repeat the same procedure with the other balls and record your observations.

4. Make a bar graph to show the relationship between the weight of the bans and the acceleration rate. Put the weight of the balls on the x‐axis and the acceleration rate on the y‐axis (slow, medium, fast). Mark slow, medium, and fast rates with distances on the graph. An example will be shown for you
Take it further:
How does this activity relate to Newton's 2nd Law of Motion (Law of Acceleration)? Use the keywords: Net force, mass, acceleration, directly proportional, inversely proportional.
- Evaluation:
- Accomplished worksheets and lab sheets
- Vocabulary:
- net force, friction, acceleration, mass, directly proportional, inversely proportional
- Homework:
- Learning Objective:
- Language Objective:
- Main Activity: Exploring Newton’s Second Law (Balls in Motion)
- Background Information:
Isaac Newton's 2nd law of motion, also called the Law of Acceleration, states that the acceleration of an object is proportional (similar) to the force that's applied to it, and inversely proportional (opposite) to the mass of the object. In other words, if the force remains constant (the same as the mass of an object increases) its acceleration will decrease and vice versa. Force is calculated by multiplying mass times acceleration
or F= m x a
Materials:
ping pong ball, small marble, golf ball, softball, straw, meter sticks and tray with raised side to capture moving balls
Procedure:
1. Set ball over marked area of the tray and apply force by blowing through a straw on the bail to reach the other side of the tray with the raised side. Record the acceleration rate on the table as slow, medium, or fast by placing a check on which applies.
2. Apply the same force (blow with the same force) on the next ball and record your observation.
3. Repeat the same procedure with the other balls and record your observations.
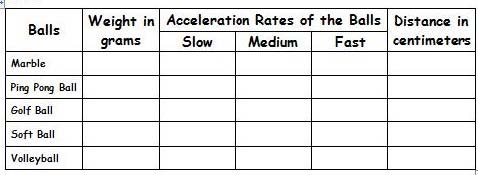
4. Make a bar graph to show the relationship between the weight of the bans and the acceleration rate. Put the weight of the balls on the x‐axis and the acceleration rate on the y‐axis (slow, medium, fast). Mark slow, medium, and fast rates with distances on the graph. An example will be shown for you
Take it further:
How does this activity relate to Newton's 2nd Law of Motion (Law of Acceleration)? Use the keywords: Net force, mass, acceleration, directly proportional, inversely proportional.
- Evaluation:
- Accomplished worksheets and lab sheets
- Vocabulary:
- net force, friction, acceleration, mass, directly proportional, inversely proportional
- Homework:
- Main Activity: Applying Newton’s 2nd law
- Teacher lets students apply the law of acceleration through
mathematical equations:
1. do the math!
· A car has a mass of 1000 kg. What is the acceleration produced by a force of 2000 N?
2. do the math!
· If the force is 4000 N, what is the acceleration?
· Doubling the force on the same mass simply doubles the acceleration.
· How much force, or thrust, must a 30,000‐kg jet plane develop to achieve an acceleration of 1.5 m/s2?
Arrange Newton’s second law to read:
force = mass × acceleration
F = ma
= (30,000 kg)(1.5 m/s2)
= 45,000 kg•m/s2
= 45,000 N
3. The force of friction between the surfaces depends on the kinds of material in contact and how much the surfaces are pressed together.
4. Conclude with the following question:
o Two forces act on a book resting on a table: its weight and the support force from the table. Does a force of friction act as well?
Answer: No, not unless the book tends to slide or does slide across the table. Friction forces occur only when an object tends to slide or is sliding.
- Evaluation:
- Vocabulary:
- Homework:
- Main Activity:
- Quiz
- Evaluation:
- Vocabulary:
- Homework:
- Materials / Resources (including technology)
- ping pong ball, small marble, golf ball, softball, straw, meter sticks and tray with raised side to capture moving balls, PowerPoint, handouts, presenter, projector, worksheets
- State of Minnesota Standards Covered
- View PDF
- Weekly Informational Knowledge Overview - (Students will know...)
- Weekly Procedural Knowledge Overview - (Students will be able to...)
- · Create a balloon powered race
car for maximum speed and
distance
· Calculate velocity, acceleration, momentum and force of the car
· Graph distance vs. time for a moving object
· Relate Newton’s Laws of Motion to a moving object
Monday
Tuesday
Wednesday
Thursday
Friday
- Main Activity: Newton’s 3rd Law of Motion
- Warm up:
Class starts with trivia.
Distribute quiz papers.
Direct Instruction:
1. Teacher opens up the discussion by reviewing he Laws of Motion
2. Teacher introduces the 3rd law of motion: for every action, there’s an equal and opposite reaction
3. Students will give an example of how Newton’s 3rd Law is being applied
4. Teacher will demonstrate some examples and students will identify the force being applied.
5. Class ends with a conclusion
- Evaluation:
- Question‐answer activity
- Vocabulary:
- force pairs, air resistance, action, reaction, momentum
- Homework:
- Main Activity:
- Finish Newtons 3rd law
- Evaluation:
- Vocabulary:
- Homework:
- Main Activity:
- Finish Newtons 3rd law
- Evaluation:
- Vocabulary:
- Homework:
- Main Activity:
- Balloon – Powered Race Car
(Worksheet file is attached.)
- Evaluation:
- Vocabulary:
- Homework:
- Main Activity:
- Balloon – Powered Race Car
- Evaluation:
- Vocabulary:
- Homework:
- Materials / Resources (including technology)
- State of Minnesota Standards Covered
- View PDF
- Weekly Informational Knowledge Overview - (Students will know...)
- 1. The 3rd law of motion
2. Momentum
3. Distance‐time traveled by a hand made rocket
- Weekly Procedural Knowledge Overview - (Students will be able to...)
- 1. create a powered race car for maximum
speed and distance
2. calculate velocity, acceleration, momentum and force of the car
3. graph distance vs. time for a moving object
4. relate Newton’s Laws of Motion to a moving object
5. build and test soda straw rockets –just like a NASA engineer
Monday
Tuesday
Wednesday
Thursday
Friday
- Main Activity: Finalize the Balloon‐Powered Car
- Warm up:
Class stars with science trivia
Direct Instruction:
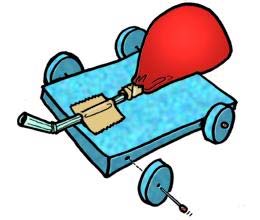
1. The car can be powered by 1 or 2 balloons. 2 Balloons is not always better.
2. You can build the car base out of anything. The lighter it is the better.
3. It must have at least 3 wheels. Wheels are defined as anything round that goes around. They can NOT be from a toy car. They must be made from something that was not originally meant to be used as wheels.
4. The car may not leave the ground at any time during the race and must move on its wheels – not slide.
5. Do not take your car apart after you race. We will display them around the room and vote for the best looking car.
Awards: (for cars that follow the rules and actually move)
1. Best looking car (you will vote)
2. Fastest car (in first 5 meters)
3. Farthest distance traveled
Tell students about the Balloon Car rubric:
• Made up of recycled materials 20%
• Creative car 10%
• moved on wheels/turbine 20%
• fully assembled 20%
• exhibited force and acceleration 30% =100%
Procedure 1) Create a blueprint of your design
2) Fill out the Materials and tools sections
3) Bring materials from home and work on your car IN CLASS.
4) When your car is finished go back and update the Materials and Step by Step directions – you probably have changed some things.
5) Fill out the Challenges and Technical Difficulties
Procedure
1) Create a blueprint of your design
2) Fill out the Materials and tools sections
3) Bring materials from home and work on your car IN CLASS.
4) When your car is finished go back and update the Materials and Step by Step directions – you probably have changed some things.
5) Fill out the Challenges and Technical Difficulties Objectives of the week:
Informational knowledge ‐ (Students will know . . . ) 1. The 3rd law of motion
2. Momentum
3. Distance‐time traveled by a hand made rocket
section. You must list at least 3 problems (and solutions) you had when designing, building, or testing your car.
6) Practice racing your car, but be careful…too much practice can wear your car out
Race Day:
(On race day we will set up a track. The time will be taken at 1 m, 2 m, and the finish line. The total distance will be measured. Each car will be allowed three trial runs. This allows a second or third chance if the car turns, material malfunctions, etc. Many cars need to be raced. If your car takes too long to prepare, another group will race and you will get pushed to the end of the line.)
Race Day: (On race day we will set up a track. The time will be taken at 1 m, 2 m, and the finish line. The total distance will be measured. Each car will be allowed three trial runs. This allows a second or third chance if the car turns, material malfunctions, etc. Many cars need to be raced. If your car takes too long to prepare, another group will race and you will get pushed to the end of the line.)
Race your car. You MUST be finished with everything above before you are allowed to race.
Conclusion – Show all work:
1‐3) Determine your car’s velocity using the formula below:
V (velocity) = d (total distance)/t (total time)
*Use the numbers from your data table above. Your units for velocity will be m/s
Velocity = _____________________
4‐6) Calculate the acceleration of your balloon car using the total time from your data table and the velocity (m/s) from #1‐3. Use the acceleration formula below and show all of your work:
a (acceleration)= V (velocity)
t (total time)
Acceleration = ____________________________
7‐9) Calculate the force that your balloon needed to move your car.
Use the mass in Kg from the data table. Use the acceleration that you calculated above in #4‐6. Use the 2nd law formula below:
F = m x a
Force = _________________________
10‐12) Calculate the momentum of your balloon car. Use the mass in Kg from your data table. Use your velocity (m/s) from #1‐3 and the formula below. Show all of your work:
p (momentum) = m x v
Momentum = ___________________________
13) List below what you would change to make a better balloon car next time:
_________________________________________________________
_________________________________________________________
_________________________________________________________
- Evaluation:
- Accomplished Worksheets Vocab: Momentum, Acceleration, Velocity, Mass, Force Pairs, Action, Reaction
- Vocabulary:
- Homework:
- Main Activity: Soda Straw Rocket
- Warm up:
Class starts with Science trivia
Background Information:
Newton’s 3rd Law of Motion states that for every action there is an equal but opposite reaction. These actions are forces, so you can remember this law as being every force has an equal and opposite force. Remember that these are two separate forces. Either force in an interaction can be the "action" force or the "reaction" force.
Equal means two things:
• Both forces are exactly the same size. They are equal in strength.
• Both forces exist at exactly the same time. They both start at exactly the same instant, and they both stop at exactly the same instant. They are equal in time.
Opposite means that the two forces always act in opposite directions.
Directions:
1. Carefully cut out the rectangle. This will be the body tube of the rocket. Wrap the rectangle around a pencil lengthwise and tape the rectangle so that it forms a tube.
2. Carefully cut out the two fin units. Align the rectangle that extends between the two fins with the end of your body tube and tape it to the body tube. Nothing should stick out past the body tube! Do the same thing for the other fin unit, but tape it on the other side of the pencil, so you have a “fin sandwich”.
3. Bend the one fin on each fin unit 90 degrees so that each fin is at a right angle to its neighbor. When you look along the back of the rocket, the fins should form a “+” mark.
4. Using the sharpened end of your pencil, twist the top of the body tube into a nose cone.
5. Remove the pencil and replace it with a soda straw. Blow into the straw to launch your rocket! Observe the results.
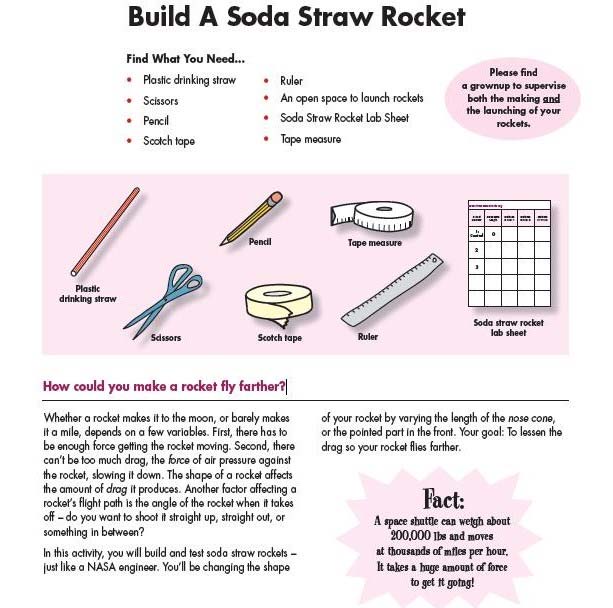
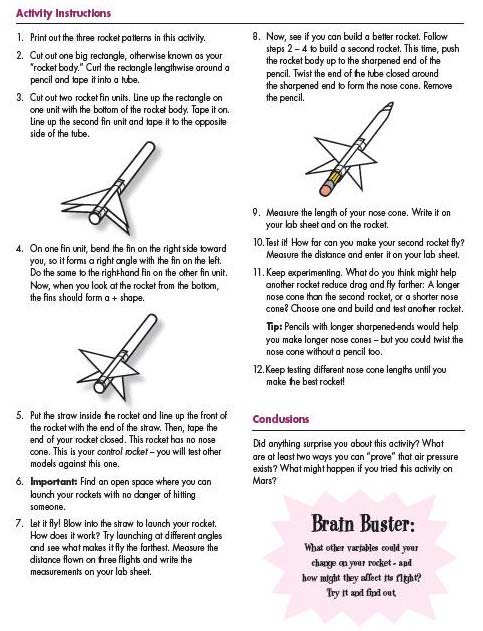
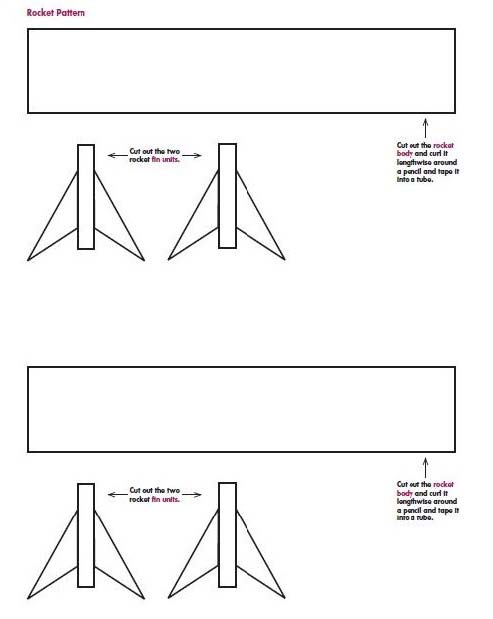
Students will answer the ffgQuestion:
1. What is the action force in this investigation?
2. What is the reaction force in this investigation?
3. What is the action force acting on in this investigation?
4. What is the reaction force acting on in this investigation?
- Evaluation:
- Accomplished worksheets
- Vocabulary:
- Momentum, Acceleration, Velocity, Mass, Force Pairs, Action, Reaction
- Homework:
- Main Activity: Soda Straw Rocket
- Warm up:
Class starts with Science trivia
Background Information:
Newton’s 3rd Law of Motion states that for every action there is an equal but opposite reaction. These actions are forces, so you can remember this law as being every force has an equal and opposite force. Remember that these are two separate forces. Either force in an interaction can be the "action" force or the "reaction" force.
Equal means two things:
• Both forces are exactly the same size. They are equal in strength.
• Both forces exist at exactly the same time. They both start at exactly the same instant, and they both stop at exactly the same instant. They are equal in time.
Opposite means that the two forces always act in opposite directions.
Directions:
1. Carefully cut out the rectangle. This will be the body tube of the rocket. Wrap the rectangle around a pencil lengthwise and tape the rectangle so that it forms a tube.
2. Carefully cut out the two fin units. Align the rectangle that extends between the two fins with the end of your body tube and tape it to the body tube. Nothing should stick out past the body tube! Do the same thing for the other fin unit, but tape it on the other side of the pencil, so you have a “fin sandwich”.
3. Bend the one fin on each fin unit 90 degrees so that each fin is at a right angle to its neighbor. When you look along the back of the rocket, the fins should form a “+” mark.
4. Using the sharpened end of your pencil, twist the top of the body tube into a nose cone.
5. Remove the pencil and replace it with a soda straw. Blow into the straw to launch your rocket! Observe the results.
Students will answer the ffgQuestion:
1. What is the action force in this investigation?
2. What is the reaction force in this investigation?
3. What is the action force acting on in this investigation?
4. What is the reaction force acting on in this investigation?
- Evaluation:
- Accomplished worksheets
- Vocabulary:
- Momentum, Acceleration, Velocity, Mass, Force Pairs, Action, Reaction
- Homework:
- Main Activity:Balloon Rally
- Step 1: Attach a balloon to the end of a flexible straw with tape.
Choose the end that is furthest away from the bend.
Step 2: Push a straight pin through the straw about halfway between the balloon and the bend in the straw. Fasten the pin in the eraser of a pencil.
Blow up the balloon and bend your straw to a 90o angle before allowing the air to escape. What happens?
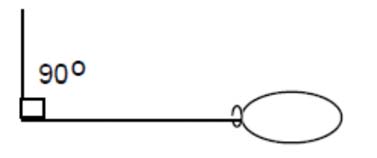
Blow up the balloon and bend your straw to a 45o angle before allowing the air to escape. What happens?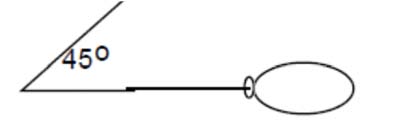
Blow up the balloon, but leave your straw straight (180o angle). Release the air in the balloon. What happens?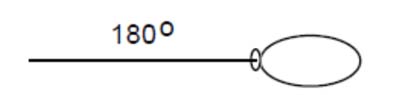
- Evaluation:
- Vocabulary:
- Homework:
- Main Activity:
- Quiz
- Evaluation:
- Vocabulary:
- Homework:
- Materials / Resources (including technology)
- 1. 9 inch balloon (standard size)
2. Regular school supplies like tape,
glue, markers, paper, etc.
3. Regular sized drinking straws
4. Base for the car
5. Wheels for the car
6. Pipe or tube to let air in and out of the balloon
7. Powerpoint
8. Presenter
9. Handout
10. Worksheets
11. Lab sheets
12. Scissors
13. Pencil
14. Scotch tape
15. Scotch tape Ruler
16. Ruler
17. An open space to launch rockets
18. Soda Straw Rocket Lab Sheet
19. Tape measure
- State of Minnesota Standards Covered
-
View PDF
- Weekly Informational Knowledge Overview - (Students will know...)
- 1. Understand the difference between
work and power
2. Describe what causes variations in the amount of work and power
3. Apply knowledge of work and power to a real‐world situation
- Weekly Procedural Knowledge Overview - (Students will be able to...)
- 1. Apply their knowledge on work and
power on simple reality situations
2. Use the resources in order to calculate work and power
3. Perform cognitive activities thru homework and exercises
Monday
Tuesday
Wednesday
Thursday
Friday
- Main Activity/Lesson:Work and Power
- Warm up:
Distribute quiz papers.
Class starts with science trivia.
Direct Instruction:
1. Teacher would ask what is work?
·The product of the force applied to an object and the distance through which that force is applied.
· The distance that the object moves must be in the same direction as the force applied to the object.
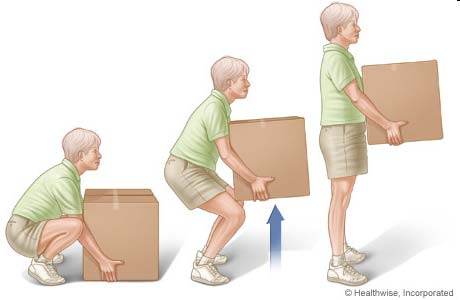
2. Teacher would give examples of work and ask students if work is done in the following situations:
· Mowing the lawn
· Weight‐lifting
· Moving furniture up a flight of stairs
· Pushing against a locked door
· Swinging a golf club
· a teacher lecturing to her class
· a mouse pushing a piece of cheese with its nose across the floor
· A body builder lifts 350 pounds above his head.
· A mother carries her baby from room to room.
· A father pushes a baby in a carriage.
· A woman carries a 20 kg grocery bag to her car?
3. Students perform calculation of Work with the formula:
· Labeling work: w = F x d
· Newton X meter (N m)
· Which also = (kg x m2)
s2
· Calculate: If a man pushes a concrete block 10 meters
with a force of 20 N, how much work has he done? 200 joules
(W = 20N x 10m)
4. Students will also calculate for Power =
· Work*/Time
· The unit of power is the watt.
· A unit named after Scottish inventor James Watt.
- Evaluation:
- Check for Understanding:
1. Two physics students, Ben and Bonnie, are in the weightlifting room. Bonnie lifts the 50 kg barbell over her head (approximately .60 m) 10 times in one minute; Ben lifts the 50 kg barbell the same distance over his head 10 times in 10 seconds.
Which student does the most work?
Which student delivers the most power?
Explain your answers.
Expected answers:
· Ben and Bonnie do the same amount of work; they apply the same force to lift the same barbell the same distance above their heads. Yet, Ben is the most powerful since he does the same work in less time.
o Power and time are inversely proportional.
2. How much power will it take to move a 10 kg mass at an acceleration of 2 m/s/s a distance of 10 meters in 5 seconds? This problem requires you to use the formulas for force, work, and power all in the correct order.
Expected answer:
Force=Mass x Acceleration
Force=10 x 2
Force=20 N
Work=Force x Distance
Work = 20 x 10
Work = 200 Joules
- Vocabulary:
- Work, Power, Weight, Horses power
- Homework:
- Read pages 85‐93 and answer the questions in the reinforcement and study guide handout:
- Main Activity:Outdoor Power Experiment
- Warm up:
Class starts with science trivia
Checking of Homework
Direct Instruction:
Aim: To calculate the power developed in the human leg and to compare the power of different people.
Method:
1. Measure the vertical height of the staircase and record it.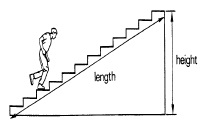
2. Measure the mass of the person and record it
3. Calculate the person’s weight (Weight=mass x gravity) and record it.
4. Zero the stopwatch.
5. Record the time taken for the person to climb to the top of the staircase.
6. Calculate the power developed in the person’s legs (Power=Work / time)
7. Students will fill in the following table:
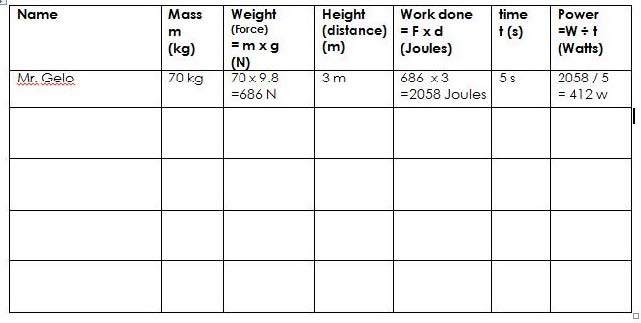
Conclusion: What did you learn from this activity? What were some ways to improve the accuracy of the results?
- Evaluation:
- Accomplished lab sheets
- Vocabulary:
- work, power, weight, joules, watts
- Homework:
- Main Activity:Outdoor Power Experiment
- Warm up:
Class starts with science trivia
Checking of Homework
Direct Instruction:
Aim: To calculate the power developed in the human leg and to compare the power of different people.
Method:
1. Measure the vertical height of the staircase and record it.
2. Measure the mass of the person and record it
3. Calculate the person’s weight (Weight=mass x gravity) and record it.
4. Zero the stopwatch.
5. Record the time taken for the person to climb to the top of the staircase.
6. Calculate the power developed in the person’s legs (Power=Work / time)
7. Students will fill in the following table:
Conclusion: What did you learn from this activity? What were some ways to improve the accuracy of the results?
- Evaluation:
- Accomplished lab sheets
- Vocabulary:
- work, power, weight, joules, watts
- Homework:
- Main Activity:Work and Power Extended!
- Purpose: In this activity, we will experience the concepts of Work
and Power using simple classroom materials. Please complete the
following activity in your group.
Define the following; include the equation used to calculate the term if it applies.
1. Work:
___________________________________________________
2. Power:
___________________________________________________
3. Newton:
___________________________________________________
4. Joule:
___________________________________________________
5. Watts:
___________________________________________________
6. Horsepower:
___________________________________________________
Let the FORCE Be With You…
Measure Force
1) Select an object (wood block, etc.) that has a mass that provides a readable measurement when you use the spring scale.
2) Determine the mass of the object using a triple beam balance:
____________ g
3) Convert the mass of the object to kilograms.
____________ kg
4) Use the Spring Scale to “lift” the object. Determine how many Newtons your object weighs. ____________ N
Calculate Force
5) Calculate the Force (weight) of the object using Newtons’ 2nd Law:
Force = mass x acceleration of gravity
Force (weight) = ______ kg x _______ m/s2 = ________ N
6) Compare your measured Force (see #4) with the calculated Force (#5). Analyze any similarities or differences you see.
_________________________________________________________
_________________________________________________________
_________________________________________________________
_________________________________________________________
_________________________________________________________
- Evaluation:
- Vocabulary:
- Homework:
- Prepare for a graded recitation on Monday
- Main Activity:
- SPAS OLYMPICS
- Evaluation:
- Vocabulary:
- Homework:
- Materials / Resources (including technology)
- State of Minnesota Standards Covered
- View PDF
- Weekly Informational Knowledge Overview - (Students will know...)
- 1. The concepts learned in the topics
previously discussed
2. The concepts learned about Newton’s Laws of motion, speed, velocity, power and work.
- Weekly Procedural Knowledge Overview - (Students will be able to...)
- 1. reinforce concepts learned in the
topics previously discussed by:
• Creating a vocabulary card
• Solving speed and velocity problems
• Participating in the round robin activity
Monday
Tuesday
Wednesday
Thursday
Friday
- Main Activity:
- Warm Up
Class starts with science trivia
Review Activities:
1. Students create a vocabulary card by:
a. Writing a word in the middle of the index card
b. Writing the definition of the word in the upper right hand corner of the card
c. Writing related vocabulary words in the upper left hand corner
d. Writing down examples of the word
e. Drawing/ illustrating the word
2. Students are arranged in a semi‐circle for the round robin activity.
Teacher will say a word/concept and the students have to give an example (power, work, joules etc.)
3. Students will be asked to solve some problems with regard to all major discussions like atomic mass units, mass numbers etc.
- Evaluation:
- Short Quiz
- Vocabulary:
- Homework:
- Main Activity: Review
- Warm Up
Checking/collection of Midterm requirements and notebooks
Bell Ringer: Students answer 5 T/F questions.
Review Proper:
Students play “Who wants to be a millionaire?” Students take turns in being the contestant. They answer questions from the lowest level of difficulty to the highest until they reach 1 million. Once a wrong answer is given, the student stops answering questions and his/her score is commensurate to the level reached.
- Evaluation:
- Students’ scores in the game activity
- Vocabulary:
- Homework:
- Main Activity: Review
- Warm Up
Checking/collection of Midterm requirements and notebooks
Bell Ringer: Students answer 5 T/F questions.
Review Proper:
Students play “Who wants to be a millionaire?” Students take turns in being the contestant. They answer questions from the lowest level of difficulty to the highest until they reach 1 million. Once a wrong answer is given, the student stops answering score is commensurate to the level reached.
- Evaluation:
- Students’ scores in the game activity
- Vocabulary:
- Homework:
- Main Activity: Midterm Exam
- Evaluation:
- Vocabulary:
- Homework:
- Main Activity: Midterm Exam
- Evaluation:
- Vocabulary:
- Homework:
- Materials / Resources (including technology)
- State of Minnesota Standards Covered
- View PDF
- Weekly Informational Knowledge Overview - (Students will know...)
- 1. The examples of simple machines
2. At least three events of historical importance with the invention of three important machines.
3. Related vocabulary to explain and describe the function of simple machines
- Weekly Procedural Knowledge Overview - (Students will be able to...)
- 4. list and give examples of simple
machines
5. construct at least one simple machine
6. associate at least three events of historical importance with the invention of three important machines.
7. use related vocabulary to explain and describe the function of simple machines
8. use related books to illustrate, write, label and graph new concepts 9. use related books in cooperative groups to help write a report on a simplemachine
Monday
Tuesday
Wednesday
Thursday
Friday
- Main Activity: Simple Machines
- Warm up: Class starts with science trivia
Re‐evaluation of science projects
Establishing of New rules
Prep students for their New lesson in simple machines
- Evaluation:
- Vocabulary:
- Homework:
- Read book pages 103 – 110 answer the reinforcement and study guide handout
- Main Activity: Simple Machines
- A simple machine is a device used to assist people in getting work
done faster and easier. Scientifically, work is known as using force
upon an object in order to transport it to a new location. Pushing,
pulling, and lifting are all common forms of work. Simple machines
can used to simplify these actions, making it easier for the laborer to
complete the task.
Pulleys, levers, wedges, screws, wheels and axles, and inclined planes are all examples of simple machines. They can all help people do work in some form. For example, a gardener must remove the weeds from his garden on a regular basis. He could use his bare hands, but using a shovel, a lever tool, will allow the job to be done with less effort. In another example, inclined planes are useful in helping movers load furniture into trucks. By using a ramp, they are able to roll the large items into the truck on wheels rather than lift them
Warm up: Class starts with science trivia
Direct Instruction:
1. Teacher reviews the students the following concepts:
Work is …………………….……
What is a machine?........
Why use machines?.........
WORK
is the transfer of energy from one physical distance to another Measured in Joules
2. Teacher introduces MACHINES:
…..any device or instrument that helps you do something
3. Teacher emphasizes Mechanical Advantage, Input force, output force, and efficiency.
4. Students go over the following simple machines:
LEVERS
Pulley
Inclined Plane
WEDGES
SCREWS
WHEEL AND AXLE
- Evaluation:
- question and answer activity
- Vocabulary:
- Simple machines, levers, pulley, inclined plane, wedges, screws, wheel and axle, mechanical advantage, efficiency, input, output force.
- Homework:
- Main Activity: Simple Machines
- Warm up: Class starts with science trivia
Direct Instruction:
1. Teacher reviews the students the following concepts:
Work is …………………….……
What is a machine?........
Why use machines?.........
WORK
is the transfer of energy from one physical distance to another Measured in Joules
2. Teacher introduces MACHINES:
…..any device or instrument that helps you do something
3. Teacher emphasizes Mechanical Advantage, Input force, output force, and efficiency.
4. Students go over the following simple machines:
LEVERS
Pulley
Inclined Plane
WEDGES
SCREWS
WHEEL AND AXLE
- Evaluation:
- question and answer activity
- Vocabulary:
- Simple machines, levers, pulley, inclined plane, wedges,
Procedural Knowledge ‐ (Students will be
able to . . . )
4. list and give examples of simple machines
5. construct at least one simple machine
6. associate at least three events of historical importance with the invention of three important machines.
7. use related vocabulary to explain and describe the function of simple machines
8. use related books to illustrate, write, label and graph new concepts
9. use related books in cooperative groups to help write a report on a simplemachine
screws, wheel and axle, mechanical advantage, efficiency, input, output force.
- Homework:
- Main Activity:
- Simple Machines with Bill Nye
(Worksheet file is attached.)
- Evaluation:
- Vocabulary:
- Homework:
- Main Activity:
- Quiz
- Evaluation:
- Vocabulary:
- Homework:
- Materials / Resources (including technology)
- State of Minnesota Standards Covered
- View PDF
- Weekly Informational Knowledge Overview - (Students will know...)
- 1. The examples of simple machines
2. At least three events of historical importance with the invention of three important machines.
3. Related vocabulary to explain and describe the function of simple machines
- Weekly Procedural Knowledge Overview - (Students will be able to...)
- 1. list and give examples of simple
machines
2. construct at least one simple machine
3. associate at least three events of historical importance with the invention of three important machines.
4. use related vocabulary to explain and describe the function of simple machines
5. use related books to illustrate, write, label and graph new concepts
use related books in cooperative groups to help write a report on a simple machine
Monday
Tuesday
Wednesday
Thursday
Friday
- Main Activity:
- Simple Machines with Bill Nye (Worksheet is attached.)
- Evaluation:
- Vocabulary:
- Homework:
- Main Activity:Making A Boomerang Can Out of Levers
- Warm up: Class starts with science trivia
Direct Instruction:
Teacher reinforces the application of simple machines.
Students will follow these steps:
(See attached pic. Guidelines #1 to #4.)
- Evaluation:
- Vocabulary:
- Homework:
- Main Activity: Making A Boomerang Can Out of Levers
- Warm up: Class starts with science trivia
Direct Instruction:
Teacher reinforces the application of simple machines.
Students will follow these steps:
- Evaluation:
- Vocabulary:
- Homework:
- Main Activity:
- NO CLASS ‐ LABOR DAY
- Evaluation:
- Vocabulary:
- Homework:
- Main Activity:
- Quiz
- Evaluation:
- Vocabulary:
- Homework:
- Materials / Resources (including technology)
- State of Minnesota Standards Covered
- View PDF
- Weekly Informational Knowledge Overview - (Students will know...)
- Weekly Procedural Knowledge Overview - (Students will be able to...)
Monday
Tuesday
Wednesday
Thursday
Friday
- Main Activity:
- Making A Boomerang Can Out of Levers
Warm up: Class starts with science trivia
Direct Instruction:
Teacher reinforces the application of simple machines.
Students will follow these steps:
- Evaluation:
- Vocabulary:
- Homework:
- Main Activity:
- Evaluation:
- Vocabulary:
- Homework:
- Main Activity:
- Evaluation:
- Vocabulary:
- Homework:
- Main Activity:
- Evaluation:
- Vocabulary:
- Homework:
- Main Activity:
- Evaluation:
- Vocabulary:
- Homework:
- Materials / Resources (including technology)
- State of Minnesota Standards Covered
-
- Weekly Informational Knowledge Overview - (Students will know...)
- 1. the volume of water displaced by an
object placed in water
2. the mass of water displaced by an object placed in water.
3. when the mass of water displaced is equal to or greater than the mass of the object, the object will float.
4. the buoyancy of different objects in water.
5. design a boat that will carry cargo. 6. various boat shapes to cargocarrying capacity
- Weekly Procedural Knowledge Overview - (Students will be able to...)
- 1. state which of a number of factors
affect buoyancy, and which do not.
2. use scientific instruments to determine the relationships between buoyancy and pertinent factors such as triple‐beam balance, graduated beakers, pulleys, and computers.
3. state the nature of the relationship between the various pertinent factors and buoyancy.
4. derive the algebraic relationship between buoyancy and other pertinent factors.
5. work numeric problems using the derived relationship.
6. explain how the algebraic relationship was derived.
7. use basic formulae to calculate volumes of different standard forms (sphere, cylinder, etc.)
8. explain the basic nature of scientific research using buoyancy as an example.
Monday
Tuesday
Wednesday
Thursday
Friday
- Main Activity: Bouyancy and Density
- Warm up: Class starts with trivia
Direct Instruction:
1. Teacher will introduce the topic buoyancy and density:
During the last couple weeks we’ve learned about different types of forces. Today we are going to learn about a different force called buoyancy. Buoyancy is the force that makes things float. It keeps boats, icebergs, and fish, among other things, from sinking.
The buoyancy of an object is related to its density. The density of an object is defined as, its mass divided by its volume. Because of this, something that is small but heavy for its size (a coin for example) has a high density. Something that is light for its size (a box full of Styrofoam peanuts, for example) has low density. Things that have high density sink, while things with low density float. Would the coin sink or float? How about the box?
So how does a big, heavy boat float on the ocean? Obviously the metal that the boat is made out of is denser than the water. A boat floats because it is hollow: it is held up by the buoyant force. The buoyant force happens because water is pushed out of the way, or displaced. The more water is displaced, the stronger the buoyant force. Imagine pushing a beach ball under water at the swimming pool. As more of the ball is pushed under water, it gets harder to keep pushing it down. That is because more water gets pushed out of the way as the ball is submerged, and the buoyant force is increased. The greater the volume of water pushed out of the way, the greater the buoyant force. This is the same reason a boat floats.
Now think about a boat. If you put something heavy on it, does it rise or sink? Is more or less water displaced? If more water is displaced, is the buoyant force stronger or weaker? Does this make sense (remember that the boat is heavier now)? Talk about this with your mentor.
- Evaluation:
- 1. Why does a rock sink but a piece of wood floats?
2. Why does a material sink when it is crushed, but floats if it is shaped like a boat?
3. Why does a boat sink if you add too many materials?
- Vocabulary:
- Buoyancy, Density, surface area, surface tension, buoyant force,
- Homework:
- Main Activity:Density
- Warm up: Class starts with science trivia
Direct Instruction:
Density Practice Problems
The density of a substance is a measure of how much mass is packed into a certain volume of the substance. Substances with a high density, like steel, have molecules that are packed together tightly.
Substances with a low density, like cork, have fewer molecules packed into the same amount of space.
The density of a substance can be found by dividing its mass by its volume. As long as a substance is homogeneous, the size or shape of the sample doesn’t matter. The density will always be the same. This means that a steel paper clip has the same density as a steel girder used to build a bridge.
Density = Mass ÷ Volume

Use the density formula to solve the following problems. Show all work and the answer must have the correct units. Remember that volume can have different forms. A block of ice with a volume of 3 cm3 would be 3 mL of liquid after being melted.
- Evaluation:
- 1. What is the density of CO gas if 0.196 g occupies a volume of 100
ml?
Answer_________
2. A block of wood 3 cm on each side has a mass of 27 g. What is the density of the block? (Hint, don’t forget to find the volume of the wood.)
Answer_________
3. An irregularly shaped stone was lowered into a graduated cylinder holding a volume of water equal to 2 ml. The height of the water rose to 7 ml. If the mass of the stone was 25 g, what was its density?
Answer_________
4. A 10.0 cm3 sample of copper has a mass of 89.6 g. What is the density of copper?
Answer_________
5. Silver has a density of 10.5 grams/cm3 and gold has a density of 19.3 g/cm3. Which would have the greater mass, 5cm3 of silver or 5cm3 of gold?
Answer_________
6. Five mL of ethanol has a mass of 3.9 g, and 5.0 mL of benzene has a mass of 44 g. Which liquid is denser?
Answer_________
7. A sample of iron has the same dimensions of 2 cm x 3 cm x 2 cm. If the mass of this rectangular‐shaped object is 94 g, what is the density of iron? Answer_________
- Vocabulary:
- Homework:
- Main Activity: Density
- Warm up: Class starts with science trivia
Direct Instruction:
Density Practice Problems
The density of a substance is a measure of how much mass is packed into a certain volume of the substance. Substances with a high density, like steel, have molecules that are packed together tightly.
Substances with a low density, like cork, have fewer molecules packed into the same amount of space.
The density of a substance can be found by dividing its mass by its volume. As long as a substance is homogeneous, the size or shape of the sample doesn’t matter. The density will always be the same. This means that a steel paper clip has the same density as a steel girder used to build a bridge.
Density = Mass ÷ Volume
Use the density formula to solve the above evaluation problems in Tues. plan. Show all work and the answer must have the correct units. Remember that volume can have different forms. A block of ice with a volume of 3 cm3 would be 3 mL of liquid after being melted.
- Evaluation:
- Vocabulary:
- Homework:
- Main Activity: Density Problem Solving Reinforcement
- Warm up: Class starts with trivia
Checking of homework
Distribute activity sheets
Direct Instruction:
1. Teacher presents more problem solving activities regarding buoyancy and density.
2. Students will solve problems on their sheets of paper and on the board
3. Ask students of the difficulty they encounter during solving problems
4. Ask students to show complete solutions to their problems
- Evaluation:
- Vocabulary:
- Homework:
- Main Activity:
- Quiz
- Evaluation:
- Vocabulary:
- Homework:
- Materials / Resources (including technology)
- Density problem sheets, buoyancy handouts, pressure handouts,
- State of Minnesota Standards Covered
- View PDF
- Weekly Informational Knowledge Overview - (Students will know...)
- After completing this exercise, students will be able to state Archimedes principle of buoyancy, define a buoyant object as one whose density is less than that of water, and describe how water pressure acts in opposition to gravity in order to make buoyant objects float. Using that information, the student will design a sonic paddle boat to participate in a race at the end of the unit.
- Weekly Procedural Knowledge Overview - (Students will be able to...)
- Design and construct a boat that takes into account factors such as buoyancy, the properties of materials, and design constraints.
Monday
Tuesday
Wednesday
Thursday
Friday
- Main Activity: Buoyancy and Archimedes Principle Application
- In this lesson, students will design and construct a boat out of simple
materials. The boats will then be tested by floating them in a pool or
sink of water, and then adding mass. While students may not be able
to articulate it, they will intuitively begin to understand the scientific
laws required for the design of the boat, i.e. buoyancy and
Archimedes Principle. They will also explore the shapes of boats and
construction techniques that may work for the boat
Direct Instruction:
Let students follow instructions from the handout given.
- Evaluation:
- Accomplished turbines
- Vocabulary:
- Homework:
- Main Activity:
- Sonic Dad Paddle Boat Continuation
(Worksheet file are attached in PDF file format.)
- Evaluation:
- Vocabulary:
- Homework:
- Main Activity: Sonic Dad Paddle Boat
- Warm up: Class starts with science trivia
- Evaluation:
- Vocabulary:
- Homework:
- Main Activity: Finishing the paddle boat
- Evaluation:
- Vocabulary:
- Homework:
- Main Activity: Presentation of Paddle boat project
- Discussion and Extensions
Stimulate a discussion by asking questions referring to experiences
the students had while designing their boats. Some examples include:
1. What did you notice while building your boats?
2. Why did you make the changes you made?
3. What boat designs seemed to work best?
4. What boat designs didn't seem to work well?
5. How did your boat change throughout the activity?
6. How does the process of building a boat relate to the way the scientific process works?
The last question may take some guidance in order for students to formulate an answer. The point is to lead students to realize that: each boat design they tested reflected a hypothesis they had about what would help the boat float; each test produced data ‐‐ either the boat sank or it didn't; the data was used to formulate a new hypothesis, which led to yet another test.
- Evaluation:
- Vocabulary:
- Homework:
- Materials / Resources (including technology)
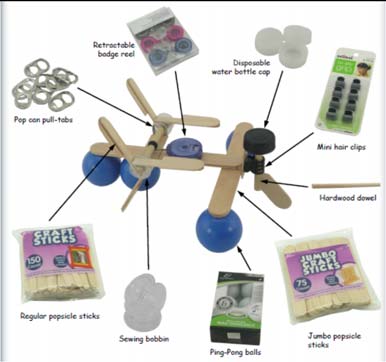
Sonic dad instructions, sewing bobbins, plastic bottle caps, pingpong balls, regular popsicle sticks, jumbo popsicle sticks, glue, glue gun, hair clip, retractable reel badge, shears
- State of Minnesota Standards Covered
-
- Weekly Informational Knowledge Overview - (Students will know...)
- 1. Some basic forms of energy, including
light, heat, sound, electrical, chemical,
and mechanical.
2. That energy has the ability to cause motion or create change.
3. That sound is produced by vibrating objects and that pitch depends on how fast or slow the object vibrates.
4. How moving water and air are sources of energy and can be used to move things.
5. That light travels in a straight line until it strikes an object or travels from one medium to another.
6. That light can be reflected, refracted, and absorbed.
7. That thing that give off light often also give off heat.
8. That heat is produced when one object rubs against another, such as rubbing one's hands together.
- Weekly Procedural Knowledge Overview - (Students will be able to...)
- 1. Investigate and explain that electrical
energy can be transformed into heat,
light, and sound energy, as well as the
energy of motion. Also Assesses:
2. Demonstrate that radiant energy from the sun can heat objects and when the sun is not present, heat may be lost.
3. Recognize that heat flows from a hot object to a cold object and that heat flow may cause materials to change temperature.
4. Identify common materials that conduct heat well or poorly.
Monday
Tuesday
Wednesday
Thursday
Friday
- Main Activity:
- Last Day for Paddle boat project
- Evaluation:
- Vocabulary:
- Homework:
- Main Activity:
- DEBATE: Science vs. Super naturals
Warm up: Class starts with trivia
Direct Instruction:
1. Students prepare themselves by arranging the chairs into two opposing sides
2. Students will be divided into 2 groups: Affirmative and Opposition
3. Each student will be given 3 minutes to deliver his/her speech
4. Discussion time will be allotted for each team
5. Rebuttal comes next
6. Each team leader will summarize the data presented
- Evaluation:
- Rating system using a Debate rubric
- Vocabulary:
- Homework:
- Main Activity: Energy
- Warm up: Class starts with trivia
Engage: Ask who ate breakfast this morning? Why? (To get energy to come to school.)
1st bullet: What is energy? Click on the Discovery Link: Energy Then ask: How are the kids in the clip art using energy?
Explain: Ask what is energy? Listen to students’ (participants’) ideas.
Then have participants/students take out their science notebook and open it to an empty page and title it Energy Notes. (If necessary, pass out sheets of copy paper and have participants fold and make a notebook.)
Explore: Quick Activity: Have students feel and describe the temperature of their desk. Then have them rub one spot with an eraser for 15 sec. and then immediately fee the temperature of the rubbed spot. Ask. Is it the same? How has it changed? Why? After a few moments, have students feel for the temperature of the rubbed spot again. Where did the energy go that warmed the spot? Ask what does energy have the ability to do? Cause a change.
Explain: Have students can then open up their textbook to Chapter lesson 1: What is energy? Have students read the first paragraph to define energy. Show the first bullets and have student take notes to define energy.
Demonstrate more example of energy causing changes: Have a volunteer move from their seat to the front of the room. Show a cube of clay. Ask for a volunteer to change its shape. Display a match. What color is the tip? Strike it. What happens? What energy do you see? After the flame goes out, what color is the tip?
Next students define energy as the ability to do work and list ways it can change an object’s properties. Compare and contrast their understanding of energy now. Energy is what it takes to make a change.
- Evaluation:
- Ask students what are some examples of energy in this
room. Tell students to look at the clip art in the slide and name an
energy that is all around us. Play the video by clicking on the link
Energy is all around us!
Ask students to give other examples of energy in their lives.
- Vocabulary:
- Homework:
- Main Activity:
- FIELD TRIP
- Evaluation:
- Vocabulary:
- Homework:
- Main Activity:
- FIELD TRIP
- Evaluation:
- Vocabulary:
- Homework:
- Materials / Resources (including technology)
- State of Minnesota Standards Covered
-
- Weekly Informational Knowledge Overview - (Students will know...)
- 1. Some basic forms of energy, including
light, heat, sound, electrical, chemical,
and mechanical.
2. That energy has the ability to cause motion or create change.
3. That sound is produced by vibrating objects and that pitch depends on how fast or slow the object vibrates.
4. How moving water and air are sources of energy and can be used to move things.
5. That light travels in a straight line until it strikes an object or travels from one medium to another.
6. That light can be reflected, refracted, and absorbed.
7. That thing that give off light often also give off heat.
8. That heat is produced when one object rubs against another, such as rubbing one's hands together.
- Weekly Procedural Knowledge Overview - (Students will be able to...)
- 1. Investigate and explain that electrical
energy can be transformed into heat,
light, and sound energy, as well as the
energy of motion. Also Assesses:
2. Demonstrate that radiant energy from the sun can heat objects and when the sun is not present, heat may be lost.
3. Recognize that heat flows from a hot object to a cold object and that heat flow may cause materials to change temperature.
4. Identify common materials that conduct heat well or poorly.
Monday
Tuesday
Wednesday
Thursday
Friday
- Main Activity: Energy
- Warm up: Class starts with trivia
Engage: Ask who ate breakfast this morning? Why? (To get energy
to come to school.)
1st bullet: What is energy? Click on the Discovery Link: Energy Then ask: How are the kids in the clip art using energy?
Explain: Ask what is energy? Listen to students’ (participants’) ideas.
Then have participants/students take out their science notebook and open it to an empty page and title it Energy Notes. (If necessary, pass out sheets of copy paper and have participants fold and make a notebook.)
Explore: Quick Activity: Have students feel and describe the temperature of their desk. Then have them rub one spot with an eraser for 15 sec. and then immediately fee the temperature of the rubbed spot. Ask. Is it the same? How has it changed? Why? After a few moments, have students feel for the temperature of the rubbed spot again. Where did the energy go that warmed the spot? Ask what does energy have the ability to do? Cause a change.
Explain: Have students can then open up their textbook to Chapter lesson 1: What is energy? Have students read the first paragraph to define energy. Show the first bullets and have student take notes to define energy.
Demonstrate more example of energy causing changes: Have a volunteer move from their seat to the front of the room. Show a cube of clay. Ask for a volunteer to change its shape. Display a match. What color is the tip? Strike it. What happens? What energy do you see? After the flame goes out, what color is the tip?
Next students define energy as the ability to do work and list ways it can change an object’s properties. Compare and contrast their understanding of energy now. Energy is what it takes to make a change.
- Evaluation:
- Ask students what are some examples of energy in this room. Tell students to look at the clip art in the slide and name an energy that is all around us. Play the video by clicking on the link Energy is all around us!
- Vocabulary:
- Homework:
- Main Activity:
- · Nature of Energy
· Energy is all around you!
-You can hear energy as sound.
-You can see energy as light.
-And you can feel it as wind.
· Nature of Energy
· You use energy when you:
- hit a softball.
- lift your book bag.
- compress a spring.
- Nature of Energy
Living organisms need energy for growth and movement.
· Nature of Energy
· Energy is involved when:
- a bird flies.
- a bomb explodes.
- rain falls from the sky.
- electricity flows in a wire.
· Nature of Energy
· What is energy that it can be involved in so many different activities?
- Energy can be defined as the ability to do work.
- If an object or organism does work (exerts a force over a distance to move an object) the object or organism uses energy.
· Nature of Energy
· Because of the direct connection between energy and work, energy is measured in the same unit as work: joules (J).
· In addition to using energy to do work, objects gain energy because work is being done on them.
· Forms of Energy
· The five main forms of energy are:
- Heat
- Chemical
- Electromagnetic
- Nuclear
- Mechanical
· Heat Energy
· The internal motion of the atoms is called heat energy, because moving particles produce heat.
· Heat energy can be produced by friction.
· Heat energy causes changes in temperature and phase of any form of matter.
· Chemical Energy
· Chemical Energy is required to bond atoms together.
· And when bonds are broken, energy is released.
· Chemical Energy
· Fuel and food are forms of stored chemical energy.
· Electromagnetic Energy
· Power lines carry electromagnetic energy into your home in the form of electricity.
· Electromagnetic Energy
· Light is a form of electromagnetic energy.
· Each color of light (Roy G Bv) represents a different amount of electromagnetic energy.
· Electromagnetic Energy is also carried by X‐rays, radio waves, and laser light.
· Nuclear Energy
· The nucleus of an atom is the source of nuclear energy.
· Nuclear Energy
· When the nucleus splits (fission), nuclear energy is released in the form of heat energy and light energy.
· Nuclear energy is also released when nuclei collide at high speeds and join (fuse).
· Nuclear Energy
· Nuclear Energy
· Nuclear energy is the most concentrated form of energy.
· Mechanical Energy
· When work is done to an object, it acquires energy. The energy it acquires is known as mechanical energy.
· Mechanical Energy
· When you kick a football, you give mechancal energy to the football to make it move.
· Mechanical Energy
· Energy Conversion
· Energy can be changed from one form to another. Changes in the form of energy are called energy conversions.
· Energy conversions
· All forms of energy can be converted into other forms.
- The sun’s energy through solar cells can be converted directly into electricity.
- Green plants convert the sun’s energy (electromagnetic) into starches and sugars (chemical energy).
· Other energy conversions
- In an electric motor, electromagnetic energy is converted to mechanical energy.
In a battery, chemical energy is converted into electromagnetic energy.
- The mechanical energy of a waterfall is converted to electrical energy in a generator.
· Energy Conversions
· In an automobile engine, fuel is burned to convert chemical energy into heat energy. The heat energy is then changed into mechanical energy.
· Chemical -> Heat -> Mechanical
· States of Energy
· The most common energy conversion is the conversion between potential and kinetic energy.
· All forms of energy can be in either of two states:
- Potential
- Kinetic
· States of Energy:
Kinetic and Potential Energy
· Kinetic Energy is the energy of motion.
· Potential Energy is stored energy.
· Kinetic Energy
· The energy of motion is called kinetic energy.
· The faster an object moves, the more kinetic energy it has.
· The greater the mass of a moving object, the more kinetic energy it has.
· Kinetic energy depends on both mass and velocity.
· Kinetic Energy
What has a greater affect of kinetic energy, mass or velocity? Why?
· Potential Energy
· Potential Energy is stored energy.
- Stored chemically in fuel, the nucleus of atom, and in foods.
- Or stored because of the work done on it:
= Stretching a rubber band.
= Winding a watch.
= Pulling back on a bow’s arrow.
= Lifting a brick high in the air.
-Gravitational Potential Energy
· Potential energy that is dependent on height is called gravitational potential energy.
· Potential Energy
· Energy that is stored due to being stretched or compressed is called elastic potential energy.
- Gravitational Potential Energy
· A waterfall, a suspension bridge, and a falling snowflake all have gravitational potential energy.
· Gravitational Potential Energy
· If you stand on a 3‐meter diving board, you have 3 times the G.P.E, than you had on a 1‐meter diving board.
· Gravitational Potential Energy
· “The bigger they are the harder they fall” is not just a saying.
It’s true. Objects with more mass have greater G.P.E.
· The formula to find G.P.E. is G.P.E. = Weight X Height.
· Kinetic‐Potential Energy Conversion
· Kinetic vs. Potential Energy
· Kinetic‐Potential Energy Conversions
· As a basketball player throws the ball into the air, various energy conversions take place.
· The Law of Conservation of Energy
· Energy can be neither created nor destroyed by ordinary means.
- It can only be converted from one form to another.
- If energy seems to disappear, then scientists look for it – leading to many important discoveries.
· Law of Conservation of Energy
· In 1905, Albert Einstein said that mass and energy can be converted into each other.
· He showed that if matter is destroyed, energy is created, and if energy is destroyed mass is created.
· E = MC2
- Evaluation:
- Vocabulary:
- Homework:
- Main Activity: Nature of Energy
- · Energy is all around you!
-You can hear energy as sound.
-You can see energy as light.
-And you can feel it as wind.
· Nature of Energy
· You use energy when you:
- hit a softball.
- lift your book bag.
- compress a spring.
- Nature of Energy
Living organisms need energy for growth and movement.
· Nature of Energy
· Energy is involved when:
- a bird flies.
- a bomb explodes.
- rain falls from the sky.
- electricity flows in a wire.
· Nature of Energy
· What is energy that it can be involved in so many different activities?
- Energy can be defined as the ability to do work.
- If an object or organism does work (exerts a force over a distance to move an object) the object or organism uses energy.
· Nature of Energy
· Because of the direct connection between energy and work, energy is measured in the same unit as work: joules (J).
· In addition to using energy to do work, objects gain energy because work is being done on them.
· Forms of Energy
· The five main forms of energy are:
- Heat
- Chemical
- Electromagnetic
- Nuclear
- Mechanical
· Heat Energy
· The internal motion of the atoms is called heat energy, because moving particles produce heat.
· Heat energy can be produced by friction.
· Heat energy causes changes in temperature and phase of any form of matter.
· Chemical Energy
· Chemical Energy is required to bond atoms together.
· And when bonds are broken, energy is released.
· Chemical Energy
· Fuel and food are forms of stored chemical energy.
· Electromagnetic Energy
· Power lines carry electromagnetic energy into your home in the form of electricity.
· Electromagnetic Energy
· Light is a form of electromagnetic energy.
· Each color of light (Roy G Bv) represents a different amount of electromagnetic energy.
· Electromagnetic Energy is also carried by X‐rays, radio waves, and laser light.
· Nuclear Energy
· The nucleus of an atom is the source of nuclear energy.
· Nuclear Energy
· When the nucleus splits (fission), nuclear energy is released in the form of heat energy and light energy.
· Nuclear energy is also released when nuclei collide at high speeds and join (fuse).
· Nuclear Energy
· Nuclear Energy
· Nuclear energy is the most concentrated form of energy.
· Mechanical Energy
· When work is done to an object, it acquires energy. The energy it acquires is known as mechanical energy.
· Mechanical Energy
· When you kick a football, you give mechancal energy to the football to make it move.
· Mechanical Energy
· Energy Conversion
· Energy can be changed from one form to another. Changes in the form of energy are called energy conversions.
· Energy conversions
· All forms of energy can be converted into other forms.
- The sun’s energy through solar cells can be converted directly into electricity.
- Green plants convert the sun’s energy (electromagnetic) into starches and sugars (chemical energy).
· Other energy conversions
- In an electric motor, electromagnetic energy is converted to mechanical energy.
In a battery, chemical energy is converted into electromagnetic energy.
- The mechanical energy of a waterfall is converted to electrical energy in a generator.
· Energy Conversions
· In an automobile engine, fuel is burned to convert chemical energy into heat energy. The heat energy is then changed into mechanical energy.
· Chemical -> Heat -> Mechanical
· States of Energy
· The most common energy conversion is the conversion between potential and kinetic energy.
· All forms of energy can be in either of two states:
- Potential
- Kinetic
· States of Energy:
Kinetic and Potential Energy
· Kinetic Energy is the energy of motion.
· Potential Energy is stored energy.
· Kinetic Energy
· The energy of motion is called kinetic energy.
· The faster an object moves, the more kinetic energy it has.
· The greater the mass of a moving object, the more kinetic energy it has.
· Kinetic energy depends on both mass and velocity.
· Kinetic Energy
What has a greater affect of kinetic energy, mass or velocity? Why?
· Potential Energy
· Potential Energy is stored energy.
- Stored chemically in fuel, the nucleus of atom, and in foods.
- Or stored because of the work done on it:
= Stretching a rubber band.
= Winding a watch.
= Pulling back on a bow’s arrow.
= Lifting a brick high in the air.
-Gravitational Potential Energy
· Potential energy that is dependent on height is called gravitational potential energy.
· Potential Energy
· Energy that is stored due to being stretched or compressed is called elastic potential energy.
- Gravitational Potential Energy
· A waterfall, a suspension bridge, and a falling snowflake all have gravitational potential energy.
· Gravitational Potential Energy
· If you stand on a 3‐meter diving board, you have 3 times the G.P.E, than you had on a 1‐meter diving board.
· Gravitational Potential Energy
· “The bigger they are the harder they fall” is not just a saying.
It’s true. Objects with more mass have greater G.P.E.
· The formula to find G.P.E. is G.P.E. = Weight X Height.
· Kinetic‐Potential Energy Conversion
· Kinetic vs. Potential Energy
· Kinetic‐Potential Energy Conversions
· As a basketball player throws the ball into the air, various energy conversions take place.
· The Law of Conservation of Energy
· Energy can be neither created nor destroyed by ordinary means.
- It can only be converted from one form to another.
- If energy seems to disappear, then scientists look for it – leading to many important discoveries.
· Law of Conservation of Energy
· In 1905, Albert Einstein said that mass and energy can be converted into each other.
· He showed that if matter is destroyed, energy is created, and if energy is destroyed mass is created.
· E = MC2
- Evaluation:
- Vocabulary:
- energy
mechanical energy
heat energy
chemical energy
electromagnetic energy
nuclear energy
kinetic energy
potential energy
gravitational potential energy
energy conversion
Law of Conservation of Energy
- Homework:
- Main Activity:
- Experiment: Building an anemometer


- Evaluation:
- accomplished data sheets
- Vocabulary:
- Wind energy, anemometer
- Homework:
- Main Activity:
- Quiz
- Evaluation:
- Vocabulary:
- Homework:
- Materials / Resources (including technology)
- Pencil, pin, two soda straws, stapler, scissors, cone pattern, paper, tape, bottle with narrow neck, stop watch, PowerPoint, handouts, lab sheets, work sheets.
- State of Minnesota Standards Covered
-
- Weekly Informational Knowledge Overview - (Students will know...)
- 1. Energy and Energy conversions
2. Forms of energy
3. Types of energy
4. Affirmative and Negative side in a debate
- Weekly Procedural Knowledge Overview - (Students will be able to...)
- 1. Be involved in a sample debate.
The student will learn how to develop affirmative and negative positions.
2. To debate an important issue – exploring, analyzing, contributing views, evaluating the effectiveness of an argument, reaching conclusions, negotiating or agreeing to differ.
Monday
Tuesday
Wednesday
Thursday
Friday
- Main Activity/Lesson: Applying knowledge on Energy
- Warm up:
Class starts with trivia
Checking of informational evidence for the upcoming debate
Direct Instruction:
1. Students will apply the knowledge they have learned in Energy by constructing an improvised anemometer
Invite: Ask students what windmills in Holland are used for?
(Surprisingly, not for energy! They are used to grind grain.) Refer to the previous activity to remind students that electricity is generated from something turning the shaft of a turbine.
(Students that built a windmill in the last activity can use it as one of their "modern" wind machines.)
Students will answer the following questions:
1. Where is the greatest amount of wind energy outside the school campus?
2. What determines the pressure of the wind?
- Evaluation:
- Completed data sheets
- Vocabulary:
- Homework:
- Main Activity/Lesson: Classroom Debate Exercise
(Debate Rubric file is attached in PDF file.) - Time Breakdown:
- Warm Up ‐ 15 minutes
- Group Activity ‐ 60 minutes
- Closure and Homework ‐ 10 minutes
Key Terms:
- Resolution: An expression of opinion (for this exercise the resolution should include the word “should” but should not necessarily have the federal government as the actor).
- Affirmative Team: The side in a debate that supports or attempts to prove the resolution true.
- Negative Team: The side in a debate that opposes or attempts to disprove the resolution.
Warm Up (15 minutes):
As students enter the classroom, the question “What is your opinion on the evolution of the universe? Science or Religion? wouldbe written on the board. The teacher affords students a few minutes to think of and write down their pros or cons about the topic. After students are finished, the teacher would divide the class into two groups of an even number of students.
Group activity (60 minutes):
After students have been separated into an affirmative team and a negative team, the teacher would write the following resolution on the board;
“Resolved: The Evolution of The Universe.”
The affirmative team (pro resolution) would come up with several reasons that support their position. The negative team (anti resolution) would come up with several reasons why that support their position. Both groups would assign two people the role of spokesperson to deliver the teams arguments to the class.
The first affirmative speaker
After a few minutes, the first spokesperson from the affirmative team would give a speech defending why the resolution is good. The spokesperson would be allotted five minutes to speak. While this person is speaking, the other team would be quiet.
The cross examination and preparation time
After the spokesperson for the affirmative team finishes their speech, the teacher would have the negative team ask questions of that spokesperson. The negative team would be allotted 3 minutes to ask questions. After this time has expired, the negative team would have 3 minutes to prepare the negative spokesperson for their speech.
The first negative speaker
At the end of the 3 minutes of preparation time, the negative spokesperson would give a short speech defending why school uniforms would not be implemented in high schools. Part of their speech would directly answer why the affirmative teams arguments about why school uniforms are good. The spokesperson would be allotted five minutes to speak. While this person is speaking, the other team would be quite, but preparing for their next speech. The affirmative spokesperson would be thinking about how to respond to this speech.
The cross examination and preparation time
After the spokesperson for the negative team finishes his/her speech, the teacher would have the affirmative team ask questions of that spokesperson. The affirmative team would be allotted 3 minutes to ask questions. After this time has expired, the affirmative team would have 3 minutes to prepare the affirmative spokesperson for their speech.
The second affirmative speech After 3 minutes, the spokesperson from the affirmative team would give the final affirmative speech defending the topic. This speech would be a direct response to the negative team’s speech. The spokesperson would be allotted five minutes to speak. While this person is speaking, the other team would be quite. After the spokesperson has finished, the negative team would have 3 minutes to prepare the spokesperson for their speech. There would be no cross examination time to question the affirmative team.
The second negative speech
After 3 minutes, the spokesperson from the negative team would give the final negative speech arguing against the topic. This speech would be a direct response to the affirmative’s last speech. The spokesperson would be allotted five minutes to speak. While this person is speaking, the other team would be quite.
The end of the round
As the round comes to an end, the teacher would use the round as an opportunity to involve students in a short question and answer period about debate rounds, speeches, cross examination, etc. Debate is largely a teachable‐moment activity, and after students participate in a debate round is a great opportunity to help students gain understanding.
Closure and Homework (10 minutes): Now that students are familiar with the term “resolution” and affirmative and negative positions, the teacher would read this year’s policy debate resolution to the class. The teacher would clarify any terms students are unfamiliar with using Socratic or divergent questions.
- Evaluation:
- Vocabulary:
- Homework:
- Main Activity/Lesson: Classroom Debate Exercise
- Time Breakdown:
- Warm Up ‐ 15 minutes
- Group Activity ‐ 60 minutes
- Closure and Homework ‐ 10 minutes
Key Terms:
- Resolution: An expression of opinion (for this exercise the resolution should include the word “should” but should not necessarily have the federal government as the actor).
- Affirmative Team: The side in a debate that supports or attempts to prove the resolution true.
- Negative Team: The side in a debate that opposes or attempts to disprove the resolution.
Warm Up (15 minutes):
As students enter the classroom, the question “What is your opinion on the evolution of the universe? Science or Religion? wouldbe written on the board. The teacher affords students a few minutes to think of and write down their pros or cons about the topic. After students are finished, the teacher would divide the class into two groups of an even number of students.
Group activity (60 minutes):
After students have been separated into an affirmative team and a negative team, the teacher would write the following resolution on the board;
“Resolved: The Evolution of The Universe.”
The affirmative team (pro resolution) would come up with several reasons that support their position. The negative team (anti resolution) would come up with several reasons why that support their position. Both groups would assign two people the role of spokesperson to deliver the teams arguments to the class.
The first affirmative speaker
After a few minutes, the first spokesperson from the affirmative team would give a speech defending why the resolution is good. The spokesperson would be allotted five minutes to speak. While this person is speaking, the other team would be quiet.
The cross examination and preparation time
After the spokesperson for the affirmative team finishes their speech, the teacher would have the negative team ask questions of that spokesperson. The negative team would be allotted 3 minutes to ask questions. After this time has expired, the negative team would have 3 minutes to prepare the negative spokesperson for their speech.
The first negative speaker
At the end of the 3 minutes of preparation time, the negative spokesperson would give a short speech defending why school uniforms would not be implemented in high schools. Part of their speech would directly answer why the affirmative teams arguments about why school uniforms are good. The spokesperson would be allotted five minutes to speak. While this person is speaking, the other team would be quite, but preparing for their next speech. The affirmative spokesperson would be thinking about how to respond to this speech.
The cross examination and preparation time
After the spokesperson for the negative team finishes his/her speech, the teacher would have the affirmative team ask questions of that spokesperson. The affirmative team would be allotted 3 minutes to ask questions. After this time has expired, the affirmative team would have 3 minutes to prepare the affirmative spokesperson for their speech.
The second affirmative speech After 3 minutes, the spokesperson from the affirmative team would give the final affirmative speech defending the topic. This speech would be a direct response to the negative team’s speech. The spokesperson would be allotted five minutes to speak. While this person is speaking, the other team would be quite. After the spokesperson has finished, the negative team would have 3 minutes to prepare the spokesperson for their speech. There would be no cross examination time to question the affirmative team.
The second negative speech
After 3 minutes, the spokesperson from the negative team would give the final negative speech arguing against the topic. This speech would be a direct response to the affirmative’s last speech. The spokesperson would be allotted five minutes to speak. While this person is speaking, the other team would be quite.
The end of the round
As the round comes to an end, the teacher would use the round as an opportunity to involve students in a short question and answer period about debate rounds, speeches, cross examination, etc. Debate is largely a teachable‐moment activity, and after students participate in a debate round is a great opportunity to help students gain understanding.
Closure and Homework (10 minutes): Now that students are familiar with the term “resolution” and affirmative and negative positions, the teacher would read this year’s policy debate resolution to the class. The teacher would clarify any terms students are unfamiliar with using Socratic or divergent questions.
- Evaluation:
- Vocabulary:
- Homework:
- Main Activity/Lesson:
- NO CLASS
- Evaluation:
- Vocabulary:
- Homework:
- Main Activity/Lesson:
- Quiz on Energy and Debate
- Evaluation:
- Vocabulary:
- Homework:
- Materials / Resources (including technology)
- Pencil, pin, two soda straws, stapler, scissors, cone pattern, paper, tape, bottle with narrow neck, stop watch, PowerPoint, handouts, lab sheets, work sheets.
- Weekly Informational Knowledge Overview - (Students will know...)
- 1. The concepts learned in the topics
previously discussed
2. The concepts learned about Work
- Power
- Weight
- Gravity ‐‐‐ 9.8 N
- Calculation of Work and Power
- Work = Force x distance
- Power = Work / time
- James Watt
- James Prescott Joules
- All Simple Machines
- Lever
- Wedge
- Inclined Plane
- Pulleys
- Screws
- Wheel and Axle
- Energy
- Nuclear Energy
- Mechanical Energy
- Heat Energy
- Chemical Energy
- Electromagnetic Energy
- Wind Energy
- Hydroelectric Energy
- Buoyancy and Density
- Weekly Procedural Knowledge Overview - (Students will be able to...)
- 1. reinforce concepts learned in the
topics previously discussed by:
• Creating a vocabulary card
• Constructing concept maps
• Participating in the round robin activity
Monday
Tuesday
Wednesday
Thursday
Friday
- Main Activity/Lesson:Review of Concepts:
- Warm Up
Checking/collection of Final requirements and notebooks
Review Activities:
1. Students create a vocabulary card by:
a. Writing a word in the middle of the index card
b. Writing the definition of the word in the upper right hand corner of the card
c. Writing related vocabulary words in the upper left hand corner
d. Writing down examples of the word
e. Drawing/ illustrating the word
2. Students are arranged in a semi‐circle for the round robin activity. Teacher will say a word/concept and the students have to give an example (Work, Power, Energy etc)
- Evaluation:
- Graded Recitation
- Vocabulary:
- Work
- Power
- Weight
- Gravity ‐‐‐ 9.8 N
- Calculation of Work and Power
- Work = Force x distance
- Power = Work / time
- James Watt
- James Prescott Joules
- All Simple Machines
- Lever
- Wedge
- Inclined Plane
- Pulleys
- Screws
- Wheel and Axle
- Energy
- Nuclear Energy
- Mechanical Energy
- Heat Energy
- Chemical Energy
- Electromagnetic Energy
- Wind Energy
- Hydroelectric Energy
- Buoyancy and Density
- Homework:
- Main Activity/Lesson:
- FINAL EXAM
- Evaluation:
- Vocabulary:
- Homework:
- FINAL EXAM
- Main Activity/Lesson:
- Evaluation:
- Vocabulary:
- Homework:
- Main Activity/Lesson:
- NO CLASS
- Evaluation:
- Vocabulary:
- Homework:
- Main Activity/Lesson:
- FINAL EXAM
- Evaluation:
- Vocabulary:
- Homework:
- Materials / Resources (including technology)
- Index cards, books, notes, board markers, Scoreboard, PowerPoint, presenter
- State of Minnesota Standards Covered
- View PDF